Wargaming from Hertfordshire & Beyond!

Tuesday 26 March 2024


The second game in our Wars of the Roses campaign was Blore Heath featuring the Yorkist Earl of Warwick (Paul) versus the Lancastrian Duke of Somerset (Rick). 

 As a consequence of Henry VI’s petit mal, Queen Margaret was effectively in command of the Lancastrians at the time of Blore Heath.  The battle was fought on a damp day causing muddy conditions and swelling the Wemberton brook.  The Yorkists set up on higher ground with woods to their rear.  The Lancastrians launched two uphill cavalry charges but both were shot up and failed.  The cavalry charges were then followed by an infantry assault which also failed.  

 There were two other Lancastrian forces within 8 miles so the Yorkists withdrew during the night.  The Yorkists left a friar to occasionally fire their guns hoping to fool the Lancastrians into thinking they were still on the heath.  It worked but lead to the Yorkist guns being abandoned.

 To simulate the swelling of the Wemberton Brook and the consequent soft ground our brook was classed as difficult terrain except at the bridge.

 Despite their lack of light troops the Yorkists outscouted the Lancastrians thanks to a favourable chit draw.  Edmund Beaufort 2nd Duke of Somerset (Rick) therefore began the set up

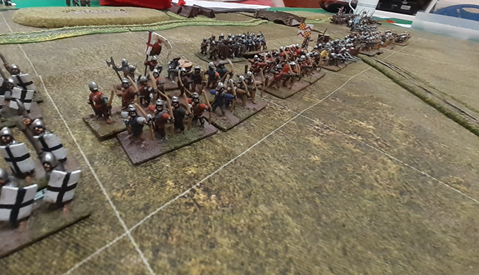
Somerset (Rick) deployed his centre first, pushing his mounted bowmen forward and supporting their right flank with veteran retinue billmen under the command of John Touchet 6th Lord Audley. In echelon on the left of the bowmen Somerset (Rick) placed his reliable Welsh longbowmen closely supported by a powerful unit of fully armoured dismounted men at arms under the personal command of the Duke (Rick) himself.  In response the Earl of Warwick (Paul) deployed a strong armoured centre including all of his knights and men at arms. Warwick’s (Paul’s) veteran bills under the command of 5th Baron Clinton were pushed forward onto the low hills in front of the woods. Protecting the flanks of the bills were a unit of retinue longbow and a unit of Shire Levy bowmen.  The Earl (Paul) placed himself and his bodyguard in the centre of the battlefield.

Somerset (Rick) then arrayed the remainder of his retinue troops (mixed bills and longbows) on his right, forward of the Wemberton brook, under the command of Baron Hungerford (Doug).  Sir John Roddam was in command of the billmen on the extreme right of the line.  Warwick (Paul) responded by positioning mounted retinue longbow on the low hills in the left centre of the battlefield (under command of Baron Ogle) and the mass of his shire levy (supported by retinue billmen) in the cover of the woods on the left of the line. Baron Hastings (David) was appointed to command the Yorkist left flank. 

Finally Somerset (Rick) deployed a strong cavalry force on his left under command of the Earl of Wiltshire (Reg).  Sir Robert Whittingham’s Irish kerns were placed on the extreme left of the battle line.  Facing off against this threat Warwick (Paul) deployed his remaining retinue troops (mainly bills with Sir John Conyer in command) with his Currors in support.  A shire levy unit of bills were held in reserve.  The Yorkist right was under the command of Sir Thomas Neville (Tony).

The Earl of Warwick (Paul) now played his stratagem “ This way my Lord…”.  Misled by Yorkist spies  the Lancastrian left wing found itself pushed back onto the wrong side of the brook thereby isolating Somerset’s (Rick’s) centre.

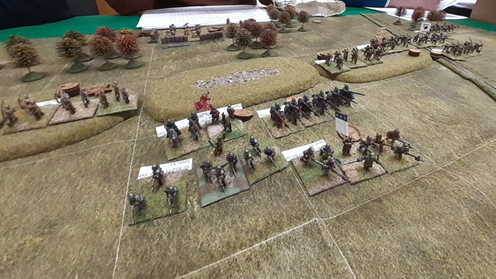
The battle proper now opened with an advance by the Yorkist line onto the low hills in front of them

In reply the entire Lancastrian left wing (Reg) successfully recrossed the brook returning to their original positions.  On the right and centre left the remainder of the Lancastrian army also advanced conforming with the mounted infantry in the centre of the line.  The Lancastrian bowmen originally placed forward of the main line opened fire with some success against the Yorkists.

The Yorkist centre boldly advanced into the centre of the battlefield led by Baron Clinton on their left and supported on the right by the Earl of Warwick (Paul) himself.

The Earl of Wiltshire (Reg) prepared his cavalry to charge.

Accompanied  by a blast of brazen trumpets a flaming arrow rose above the Lancastrian centre.  TREACHERY! Baron Clinton halted his advance and tried to turn his bills against Warwick’s knights.  Confusion spread through the ranks.

A similar confusion now struck Warwick’s knights as they were ordered to ride down the billmen in front of them.

Carpe diem! The Earl of Wiltshire (Reg)  ordered his cavalry forward.  Neville’s (Tony’s) retinue bills held in the face of  Wiltshire’s (Reg’s) charging knights. Under direct command of the Earl his northern border staves attacked the billmen on the right of the Yorkist line.  The Northerners were scattered but not before mortally wounding Sir Thomas Nevile (Tony) and leaving the Yorkist right wing leaderless.   The Earl (Reg) (narrowly escaping injury) now joined his Currors and led his second charge of the day smashing into the disordered bowmen on the hill ahead of him and driving them from the field. 

Meanwhile on the Lancastrian right Baron Hungerford’s (Doug’s) longbowmen were succeeding in disordering Baron Hasting’s (David’s) archers.  Hungerford (Doug) ordered his billmen (led by Sir John Roddam) to advance.

Back on the Yorkist right Sir John Conyer (Tony) fought back with the retinue troops available to him. The Lancastrian bodyguard  unit was destroyed and their mounted knights disordered.  The surviving Lancastrian knights fled back towards their lines. 

In the confused centre of the battlefield Warwick about faced his body guard in time to see the Earl of Wiltshire (Reg) and his Currors ride hell for leather into the Yorkist camp.  Lord Clinton finally about faced his traitorous billmen, only for them to be cut down by Warwick’s (Paul’s) mounted knights. 

Over on the right of the Lancastrian line Baron Hasting’s (David’s) disordered bowmen were engaged by fire and cold steel.  Both units were destroyed and Hungerford’s (Doug’s) relentless advance continued.

With the immediate threat of Clintons bills now eliminated, Warwick (Paul) proceeded to pursue Wiltshire’s (Reg’s) Currors who were busily looting the remains of the Yorkist camp.

The Currors on the extreme right of the Yorkist line (Tony) now tried to ride down the kerns in front of them but calamity! The Lancastrian stratagem revealed a sunken lane directly in the path of the horsemen.  The Kerns held and repulsed the cavalry charge. 

The whole Yorkist right flank (Tony) now began a slow but inexorable advance pushing back the disordered Lancastrian knights and putting pressure on the Irish kerns.

In the nick of time the Earl of Wiltshire (Reg) regained control of his looting Currors and turned to face Warwick (Paul) and his bodyguard.

Somerset’s (Rick’s) retinue and welsh archers at the centre right of the lancastrian line now came into their own peppering the beleaguered Yorkist men at arms

The Yorkist morale faltered and then failed confirming a decisive Lancastrian victory.

The next battle will be Ludford between the Earl of Northumberland (Reg/Doug) and Edmund Earl of March (David) tentatively scheduled for 25th April.

Sunday 3 March 2024

What a Cowboy – Old Mad Bill’s Mule

Old Mad Bill, a lunny prospector dun got ‘imself knifed in a saloon brawl. However, before he died, he let slip that he had actually found a rich gold seam and the map to this potential fortune was hidden on his mule, left tied-up outside the Sheriff’s Office.

So now, four pairs of desperados (each with a Gunslinger & a Shootist) were trying to grab the mule. Things got off to a poor start for Greg and Phil. Phil’s Gunslinger got his-self gut shot and Greg’s pair got themselves pinned down behind the Sherrif’s Office  & barn, by a cross-fire from Dave & Simon’s men. In a desperate stunt, Greg’s Gunslinger dived through the back window of the Sheriff’s Office (a 4 on two dice Greg, no I meant scoring a 4 on both dice!). Either way, Greg’s man rolled across the floor of the Sheriff’s office, dusted the broken glass off his duds and dashed to the front door.

This gave Greg’s Gunslinger a good view of the main street, covering the mule, but then Simon’s Gunslinger snuck-up to the same back window and shot Greg’s Gunslinger dead, in the back!!

Dave’s shootist took this opportunity to dash across the main street and grab the mule. He almost got away with it, but just as he scuttled down the alleyway, tugging the mule, he decided to pop off a shot at Greg’s pursuing shootist, but missing the man, he nicked the mule, promptly causing  it to stampede away toward Greg’s corner!?

Sadly Greg’s Shootist was unable to catch the mule, as Simon’s men were now raising dust around his feet, with angry shots down the street. So the mule ran off, taking Mad Bill’s secret with it!?

Altar of Freedom – 6mm ACW, Peachtree Creek


The Union forces started with a strong position on the ridge, overlooking Mount Zion Church, but were unable to spend any priority points on turn one. The Rebels used this surprise attack opportunity to storm the ridge in force. While the left flank of the Rebel attack faltered, on the right, a single brigade pushed all the way to bridge North of Colliers Mill, driving all before it!! While this audacious attack was in danger of being cut off, the Rebel left rallied and attacked the ridge again, dislodging the Union forces. Meanwhile another Rebel Corps had marched around the far left flank and were threatening both bridges over Peachtree Creek on the East flank.


Union forces were still not getting an Command Priority Points, not helped by having two Generals captured and one killed and to make matters worse, the Union counter attacks were finding themselves bottled-up in the narrow roads to the North of Peachtree Creek. A rebel win.

Never Mind the Billhooks - Wars of the Roses

 A version of Blore Heath. Simon & Tony controlled the Yorkist forces and Chris & Phil the Lancastrians. Pre-game each force was split into three Battles, with one randomly selected Battle, on each side, arriving a bit late. The brook was considered Difficult Ground, except at the fords.

Using pre-game manoeuvring, both sides basically faced-off one Battle across each of the fords. On the Lancastrian left / Yorkist right an uneasy stand-off developed, while Tony tried to edge his Yorkists across the ford, with a small slow flanking move around their right, through the woods.


On the Yorkist left, Simon just stormed his Men-at-Arms across the ford, covered by his Longbowmen. However, Chris’ Billmen & archers bravely held the ford, driving the Yorkist Men-at-Arms back in disarray. Rather rashly Chris’ Lancastrians then decided to follow-up, crossing the ford, chasing the retreating Yorkist Men-at-Arms. Sadly however, they quickly ran into the Yorkist reinforcements, including mounted knights, turning the Lancastrian pursuit into an untidy rout!

Over on the Lancastrian left meanwhile, the arrival of reinforcements allowed the Lancastrians to prepare to take back the ford, but then the unfolding disaster on the right, forced the diversion of a large part of these reinforcements, causing the abandonment of the attempt to retake the ford. Result, a Yorkist win, by holding both fords.

Shoot Out @ Dead Man’s Corner, Chain of Command 1944

 An excellent little Chain of Command scenario, from Wargames Vault, with the Germans defending Dead Man’s Corner in Normandy, against an assault by US Paras.


Steve’s unusual pushing of a German Jump-Off point, well forward, into the orchard to the South-East of Dead Man’s Corner junction, turned out to be an unexpected stroke of genius! As the main para force pushed through the orchard, two ambushes launched from this Jump-Off Point, significantly disrupted the US paratroop advance. When the paras did finally reach the hedge line overlooking the house that Dead Man’s corner, the disorganisation caused by these ambushes resulted in the paras coming off worst from the long range fire-fight with the German MG teams occupying the House at Dead Man’s corner. While the US paras finally did manage to dislodge the German MG teams from the house, their own losses were too high, to allow them to press forward.


Even a more half hearted US flanking move, way around to the South-West, was thwarted by a single German Jump-Off Point, plonked right out on the West flank. In the end the paras simply had to pull back and await armour re-enforcements bigger than an M5 Stuart!  

Holding Out @ Neuville-au-Plain - Chain of Command

 Another excellent little Chain of Command 1944 scenario, purchased off Wargames Vault. This time with the US Paras are defending against a German counter-attack on Neuville-au-Plain.


The Germans opted for 5 infantry sections and opened with a bold, rapid deployment from the Southern table edge, into the field to the East of the church. These 3 German sections rapidly rushed forward to the hedge line overlooking the church, but then quickly got bogged down in a fire-fight with paras in the church and behind the wall to the front of the church. A rush assault by the Germans around the rear of the church then ran into a US ambush, with paras seemingly hiding behind gravestones! A vicious hand-to-hand fight developed, resulting the Germans being thrown back.


Hah, thought Lieutenant Altrik, at least that is all 3 US paratroop sections now accounted for and so he launched a flanking move around to the German right, through the open woodland, with the last two German sections. However, the paras had opted for a 4th Infantry section as part of their Support Option, which deployed into the garden of the house overlooking the wood. Some pretty devastating fire from these paras quickly stalled the German flanking move. Realising that this attack was now just eating men, who could not be replaced, the Germans withdrew.