Wargaming from Hertfordshire & Beyond!

Wednesday 26 December 2018

Cherbourg Perimeter, 1940 (Battlegroup)

Simon kindly laid-on a Battlegroup game, set in 1940, portraying a British delaying action against the Germans on the Cherbourg perimeter. By way of trying to avoid the usual linear slugging match, Simon had arranged for the Germans to come on across one corner of the table, while the British held a line across the opposite corner. The objective was for the Germans to exit units from the British held baseline.


The Germans opening by pushing a group of Panzer IIs around the left flank, while the infantry sought to push the right flank and a group of Panzer 38(T)s pinned the centre. Sadly for the Germans, the British had a pre-arranged 18lb barrage that landed on the Panzer 38(T)s, leaving two of them burning.


The Panzer IIs fared better, supported by a Panzer IV. They started to envelop the British right flank, the Panzer IV knocking out an A13 that was threatening the right flank of the Panzer II force. However, two further A13s had swept around the British right, one quickly neutralising the right most Panzer II, while the other managed to knock-out the Panzer IV. The German fortunes were not going so well.

The German infantry had managed to secure a house at the extreme let of the British line, driving the British infantry from the field behind the house. Emboldened, the Germans pushed another infantry halftrack forward to assault the pinned British infantry, only to have it knocked out by a Boyes anti-tank rifle, hiding on the right flank of the British infantry section.

In the midst of all of this, to add insult to injury, a British Morris armoured car had pushed out from the British centre, weaving between the Panzer 38(T)s in the German centre, to take up a position to assail the rear of the German tanks with another anti-tank rifle! This was all too much for the Germans who then chose to pull back to re-group.

Friday 21 December 2018

What a Tanker, Russian Front


After the successful Normandy WAT game in 15mm, we decided to try the Russian front this time. Greg also had a lovely collection of Russian front vehicles to show off and a nice looking Eastern front village, so why not?
Gone were the many hedge rows of Normandy. Instead the only cover was provided by some low hills and some small woods. Eight players lined up, three Germans and five Soviets. The Germans rolled well for starting vehicles, with two Tiger 1Es and a Panzer IVH. The Soviets started with more of a mixed bag, a T34/85, a T34/76, an SU-85, an SU-100 and Tony managed to score bottom points, claiming a tiny T70!
The aim of the game was for the Soviets to get vehicles onto the roads around the strategically vital village of "Wheresatagain". They would receive 2 points for each operational tank on a road at the end of each turn.
The Soviets started with a mad dash for the village, all accept for Tony in the diminutive T70, who decided it would be fun to park on top of a hill and lock horns with one of the Tigers, with the expected result! Never mind, maybe he would get a better replacement vehicle? Nope, rolled a 4, receiving another T70!

Overall, besides the T70, the Soviets lost a T34/85 and a T34/76, just getting to the village. Things were not looking great for the forces of Stalin. However, after some prolonged chipping away, by Greg's SU-85 and friends, the Tiger on the German right flank succumbed.

This left Dave in the second Tiger, playing big Cat and many mice, around the village, but after a couple of further Soviet losses, this Tiger too fell.


The German replacement rolls were not so good, yielding a Panther and  Stug III, but it wasn't too long before the Panther was embroiled in a melee to the right of the village, managing to despatch the long lived SU-85, before dashing into the heart of the village, to avoid the unwelcome attentions of an approaching IS-2. The highlight of this Panther scrap being the little T70 snapping at the Panther's heels!

Despite amassing 22 points for road occupation, the Soviets had lost 86 points of vehicles, compared to 55 points of losses for the Germans, so a slim net win by 9 points for the Germans. However, with the loss of two irreplaceable big cats, the Soviets were still in bullish mood.

Monday 10 December 2018

Operation Martlet – Push through Fontenay (Second British Attack)

This is the second game from the Too Fat Lardies Operation Martlet campaign.

The earlier attack on Fontenay had severely reduced the troops available to each side but the Germans had been hit particularly badly because the British were able to buy additional squads, not an accptable option available to the Germans as they could only have rifle groups and no LMGs.

After the initial patrol phase the British deployed their Vickers and a reduced section into the upper floor of the barn so as to give covering fire for the advance through the orchard. A further section was deployed along the hedgeline to the left and right of the orchard.


The Germans in response deployed a section into the farmyard and a forward observer into the upper floor of the farmhouse who promptly brought in a very accurate mortar barrage onto the barn, pinning the occupants. The British in response used accurate Bren fire to kill the forward observer, thus ending the barrage.

The British crept forward two sections into the orchard and tried to advance the section on the right. In response the Germans opened up with a tripod MG42, causing the section to rush back into cover.


Lessons had been learned from the previous game and the Brits made good use of  tactical movement, covering fire and Bren accuracy to reduce the effectiveness of German fire.

Even when the Germans deployed a second section of two LMG teams into the woods on the left of the British advance it was unable to have any significant effect upon the British advance in the orchard. 

 
Covering fire from an elevated position in the barn successfully eliminated the flank threat from two German LMG teams.


The Brits in the orchard now prepared to assault the farmyard by throwing smoke grenades. 


However, the Germans had built up a good supply of CofC dice and were able to end the turn thereby removing the British smoke and exposing a single squad to point blank fire from two LMG teams.  


The Germans proceeded to throw a series of 5 double sixes (double phase) hosing down Sarge and his unfortunate squad for six consecutive turns. The Brits were very lucky to lose only 4 men and avoid a broken squad.  Having failed to decimate the Brits the Germans thought better of trying to defend the farmhouse from two sections and  so bugged out leaving the British in command of the battlefield.


Sunday 25 November 2018

What a Tanker - King of Hill 101, in 15mm


Yesterday saw a rather epic Too Fat Lardies "What a Tanker" scrap, held at my house for a change. This involved 7 players and a shed load of 15mm tanks!

The object of the game was to seize and hold Hill 101 (centre table). The three German players started on the far side of the table as viewed and the four Allied players on the near side. Both sides had ~120 points worth of vehicles, but each player could only bring on a single vehicle at a time, chosen by random lot.
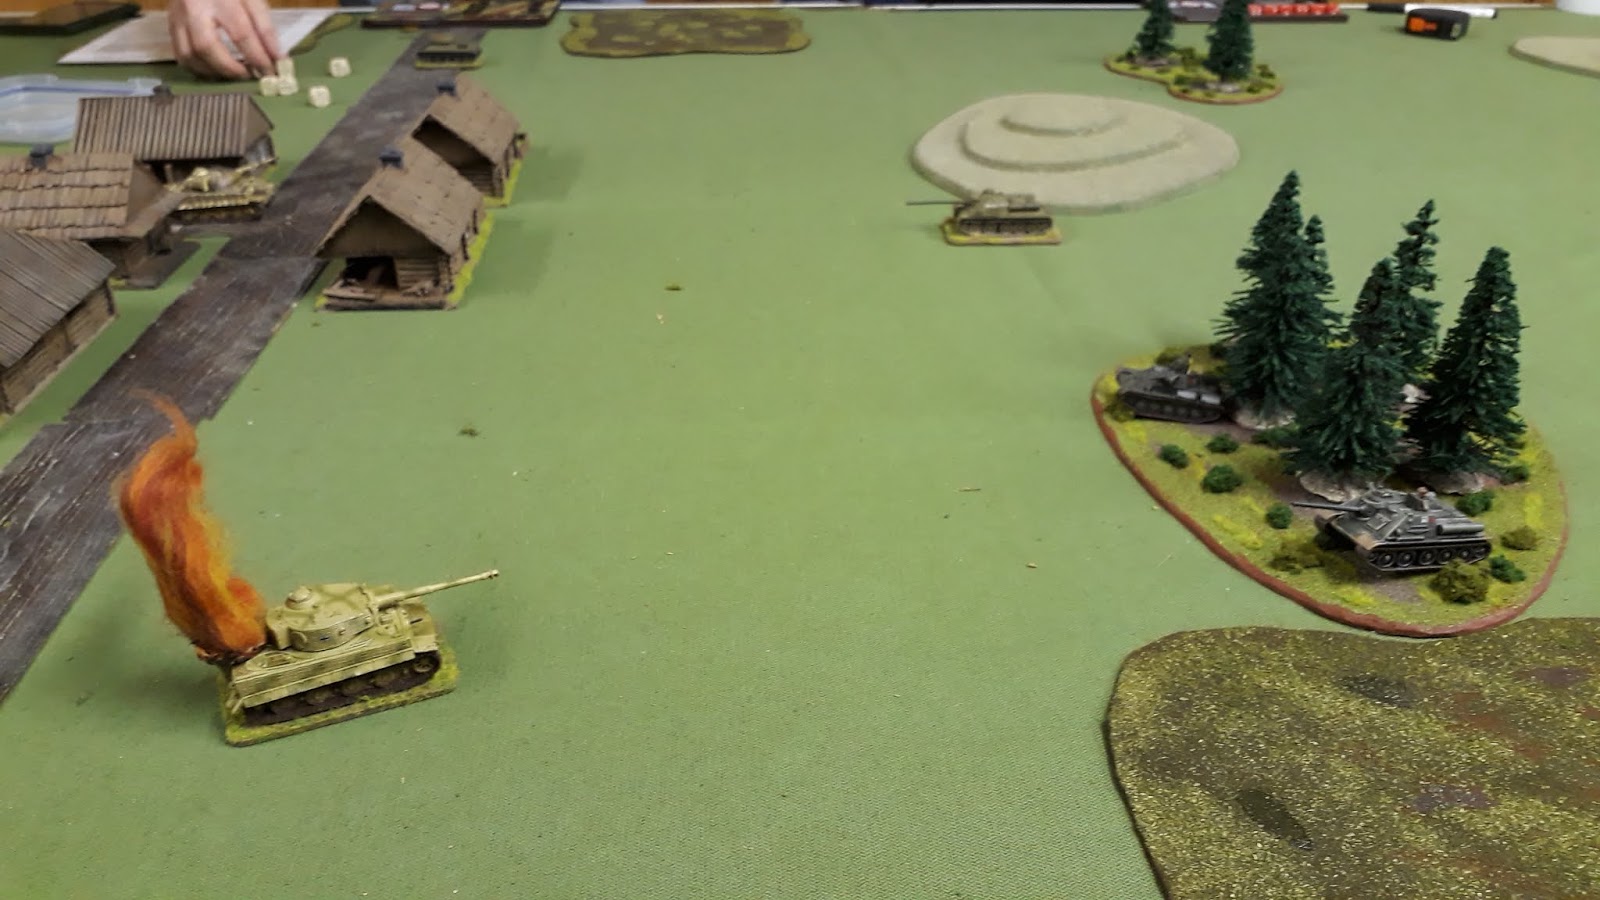
The Germans were lucky in the initial draw, pulling out a Tiger 1E, a Jagdpanther and a Mk IV. The Allies pulling an Achilles, a Sherman Firefly, a 76mm Sherman and an M5 Stuart, so things did not look too unbalanced. However, the Jagdpanther took up centre table position, fairly quickly despatching the Achilles, after it bravely poked its muzzle through the hedge. While the Panzer IV and Firefly conducted a fruitless firefight around the village, the little M5 dashed through the village, to plant a solid flank shot on the left side of the Jagdpanther, which it only just shrugged off.
Meanwhile a Sherman replacement for the Achilles, was nosing around the burning Achilles, to have a pop at the Jadgpanther, however it was not long before this too was burning. This was too much for the little M5, so it streaked through the village and onto Hill 101, swinging around to land another solid hit on the right side of the Jagdpanther! This seriously distracted the Tiger at the far end of the table. Up until now, the Tiger had been playing Cat (sic) & Mouse with a 76 Sherman, but frantic cries from the Jagdpanther about the pesky little Stuart, caused it to slew the mighty 88 onto the little M5, piling its second round into the rear of the brave little tank.

Things were not looking so good for the Allies, but the distraction of the Tiger worked in the Allies favour, as the 76 Sherman managed to land a really good hit on the Tiger, sending it up in flames. This caused the Germans to have to call in their first reinforcement, a Panther!! Was there no end to their luck!?
But, as the Panther lumbered onto the table, the 76 Sherman, buoyed up by the success against the Tiger, climbed hill 101, to have a pop at the exposed flank of the Jagdpanther. Another good hit and the Jagdpanther was burning!
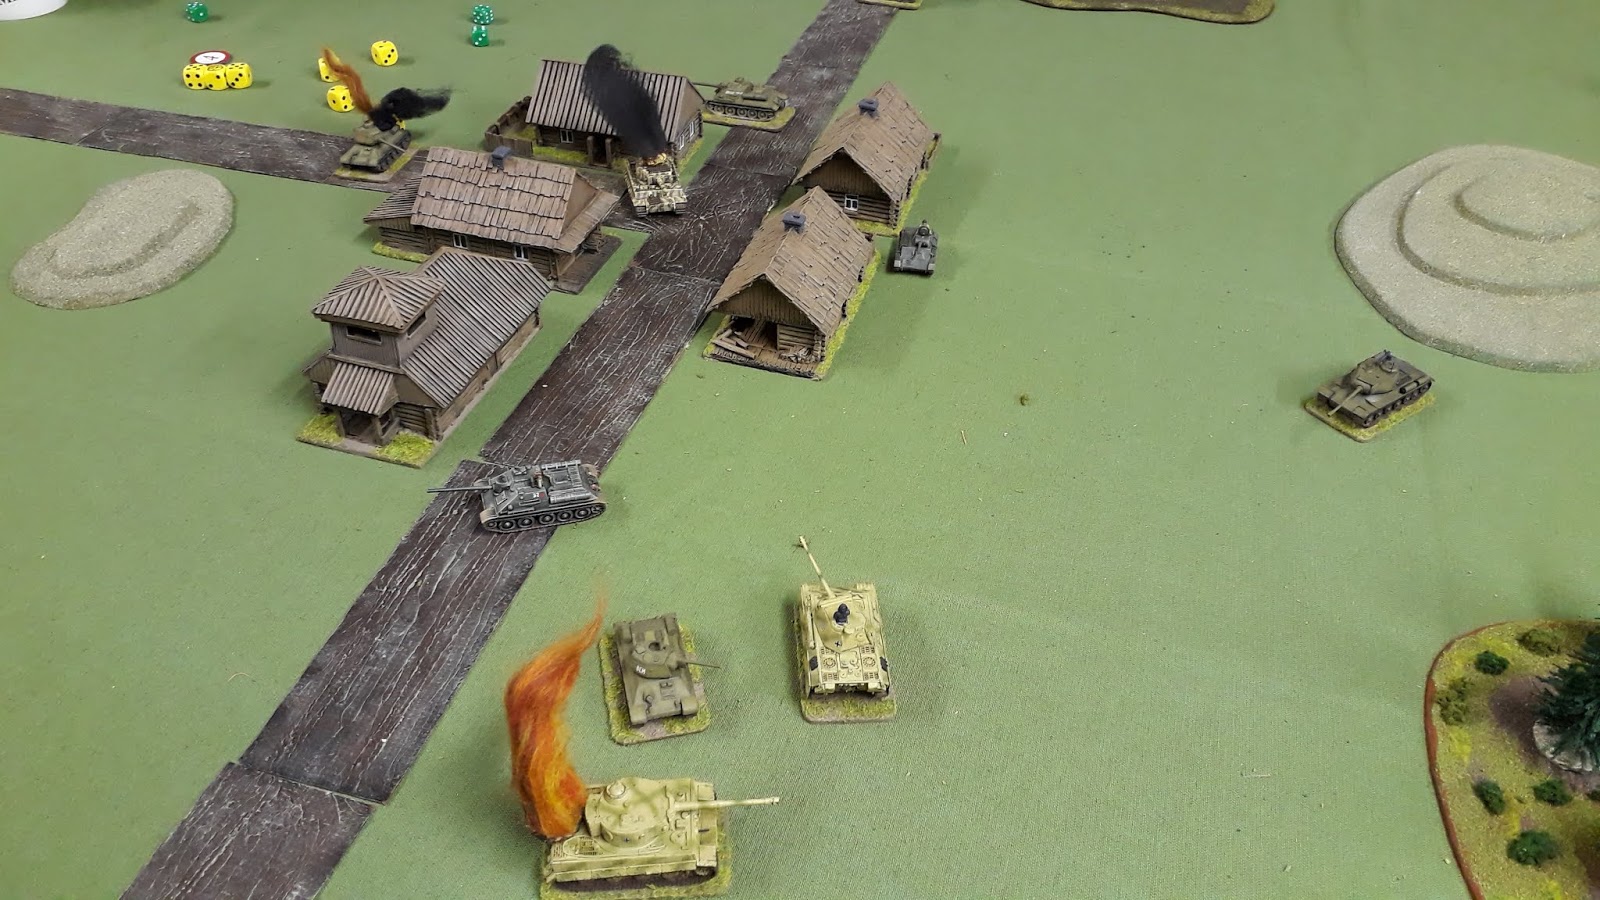
Meanwhile the scrap in the village was turning nasty! The Firefly had lost its short range gunfight with the Panzer IV. The replacement (a 75 Sherman) was faring little better and the Stuart's replacement, a Cromwell fell to the gun of another Mk IV, replacing the Jagdpanther. On hill 101, the heroic 76 Sherman fell to the gun of the Panther. Its replacement, a Churchill, while better equipped armour wise to take on the Panther, was not able to seriously threaten it gun wise.

At this point, the Allies decided to concede hill 101. The Germans had accumulated the lion's share of the hill 101 occupation victory points. They also had a massive bag of 'kill' points and still had the points for the unused off-table reinforcements, a Stug III and a Panzer III. Although the Allies had accumulated a substantial kill total, from the Tiger and Jagdpanther, they had nothing left off table and had only half the hill 101 occupation points that the Germans had. So, in the end a German victory, but perhaps at a cost they could ill afford?

Friday 9 November 2018

What a Tanker - Dust Up in the Desert


Last night's scenario saw the Afrika Korps line up a Panzer II, a short barrelled Panzer IV and a slightly 'out of time' long 50 Panzer III. Against them was a Matilda II, a Honey and a captured M13/40, crewed by some mad Aussies! The objective being to capture and hold the compound in the centre of the table.
The game opened with a curiously one-sided long range exchange between the Panzer II and the Matilda, neither really landing a blow. In the mean time,  the Panzer IV crashed into the orchard opposite the compound, while the Panzer III and the Honey started a race for the wadi on the right flank, just stopping for the odd fruitless pot shot at each other on the way.

Just as the Panzer III and the Honey squared up for a short range slugging match, the Panzer II dashed into the orchard behind the Panzer IV and managed to plant a catastrophic flank shot into the Honey.

On the left flank, the crazy Aussie crewed M13/40 dashed forward from the cover of the Oasis, to crash through the compound wall.

However, spying the Aussie move, the Panzer IV prowled around the left of the compound, trying to get to the Aussie M13's rear. Having had the Honey kill stolen from him, the Panzer III decided to tackle the M13/40 head-on, but neither could really land a blow because of the obscuration by the compound wall.

In an attempt to relieve the hard pressed Aussies, the Matilda eventually lumbered around the right of the compound, trying to get to the rear of the Panzer III. However, their concentration was seemingly thrown off by the Panzer II redecorating the front of the Matilda with repeated 20mm AP strikes!

Deciding the being meat in the M13/Matilda sandwich, the Panzer III crew decided to just crash through the  compound wall, to get a better shot at the M13. This rather startled the Aussies and they failed to land a shot on the now dusty Panzer III, but the Panzer III crew showed no such hesitation, drilling a 50mm round straight through the M13.
At thus point the dust trail of the supporting Afrika Korps infantry could be seen in the distance, so the Matlida decided discretion was the better part of valor and withdrew, leaving the field to the victorious Germans.

Sunday 28 October 2018

What a Tanker, recent arrivals

Here are some shots of a couple of recent arrivals in the "What a Tanker" garage. This first is a lovely little Hetzer.

The second  is a nice chunky M10 Wolverine.

Both are by Warlord.
Next are a couple of the new Dark Ops, "What a Tanker" dashboards. A quick spray of paint and picking out the lettering and you have a nice replacement for the laminated plastic/paper versions.


Sunday 19 August 2018

Black Wolf Club Night, 16th Aug 2018

Well, lots going on.....

Corner 1, Rommel (Sam Mustafa), 10mm early WW2 Russian Front


Very nice looking game, saw Ian trying to educate a few players regarding Sam Mustafa's WW2 “Rommel” rules. I admit that I am interested enough to dust my copy of the rules off, especially for early WW2 10/12 mm.

Far corner 2, Congo

Nice looking game, without any loud expletives were heard, but maybe he was just muttering them under his breath.
Across the way John Dixon and co played a 15mm ECW game (sorry no pics).

Next up we had Frostgrave, Greek Mythology

Malcolm, Rob and Tony played several 28mm “Mythical Greek”  scenarios using Frostgrave. Simon was most impressed that Tony had both the rules and the WSS magazines open at the correct pages. That said Simon thought he was just looking at the pictures! Pretty looking game, even if “animal identification” was wanting a little. At one point Malcolm said that sadly one of the Greek characters had been killed by a giant ram, but when pointing to the site of the incident, all that could see was a large bear!?

Tony’s large Greek Temple also came into action in the 2nd scenario and mighty impressive it looked too.

It’s nice to see the Frostgrave rules, which are incredibly simple, used for a different genre.

Too Fat Lardies, Sharp Practice 2, Peninsular

Simon and Phil played a nice looking game of SP2 set in the Peninsula.  Simon's surly French conscripts had to capture a Spanish priest and the British had to stop them . The game opened well for the French and they were able to march briskly down the road and take the objective. Then things got a bit sticky……Phil managed to get 24 of his elite Light infantry into short musket range of two of my units. 27 dice hitting on a 2-6 (Controlled volley + 'first fire').  OUCH! Miraculously my two units survived.  Simon then tried to get his dragoons to charge the British rifles on the left flank.This was a bit “do or die” and the result was “die”……or more accurately retire and then break. Next turn another 27 dice crashed into the French infantry. Result one broken infantry unit and one retiring at full speed.

However all was redeemed by Simon's reserve unit snatching the priest and sprinting back towards the deployment point and victory.

This French Peninsular “victory” was bought in true Col H’Villams style. OK, the British had sadly failed to secure the objective, in the process losing one casualty, Private Higgins. The French had snatched the prize, from under the noses of the British, but leaving a trail of dead and wounded strewn across the field. When asked about the casualty rate, after the action, Col H’Villams was said to be saddened, but mainly about the cost of equipping and transporting new conscripts to the front!?

Sunday 22 July 2018

The Tip: Oosterbeek 20.9.44

Words and pictures by Fred.

A couple of lads from our local club came over to my house last month to play another Market Garden scenario that I put together based on the attack by KG Bruhns and KG Krafft (9th SS Panzer Division) on the tip of the Oosterbeek perimeter after the collapse of 4th Parachute Brigade's position at Wolfheze during the evening of 19 September 1944. The British fell back overnight into a defensive position held by 21st Independent Parachute Company, 7th KOSB and 1st Reconnaisance Squadron. Dave and Simon (SiWi on this forum) took the paras, and myself the Germans.

Each side had 900 points using the lists in BG Overlord and MG, with all the latter's campaign-specific rules applying. Although the British set up first, we simulated the chaotic, swirling nature of this battle by dicing for initiative to decide who went first in each turn. The German objective was to destroy the British as a fighting force by reducing their BR to zero. The British objective was to survive by reducing the German BR to zero or still have un-pinned units on the board when the game finished. British units that retreated from the table were treated as destroyed for the purposes of BR.

As a special scenario rule, we modelled the benefits that the Germans obtained from the RAF's forlorn attempts to re-supply the paras as the perimeter started to shrink. On a roll of 6 at beginning of each of their turns, the British would place a supply counter at a randomly generated point on the table. Some of these were outside the British deployment zone, others within it. Capturing such counters was the only way the British could re-supply their units during the game. If they did so, their BR also increased by 1D3. If the Germans captured one, the British BR would be reduced by 1D3.

In the end, we played 11 cracking turns.

As the German player, I stuck closely to the historical orbat for these KGs using information from Kampfraum Arnhem, Market Garden Then and Now and It Never Snows in September. The board lay-out was modelled very closely on two excellent maps in KA and T&N respectively. The British won initiative and were able to put a large number of their units on ambush fire.

The Germans started cautiously by pushing an infantry platoon forward under the cover of a hedgerow. One of the surprising revelations of my research was the amount of high hedges, foliage and woodland in the area. The road in this picture went leftwards towards the famous railway crossing where jeeps of the 1st Reconnaissance Squadron had been ambushed previously.


The British deployed cleverly, with an outer crust based in these ruined buildings on the outskirts of Oosterbeek.


An adjacent line of foxholes along this lateral road was to prove very difficult to eliminate.


The British defensive lines also had good depth.


Two 6 pounder ATGs were deployed in positions with arcs of fire covering the more obvious German avenues of advance.


Sources suggest that the 9th SS Panzer Division had a couple of Jagdpz IV L48 SPGs. I haven't painted the ones that I have made yet so I fielded Stug IVs instead as the closest proxy for historical veracity. These were pushed forward carefully to avoid the ATGs.


The British enjoyed good luck with the first supply drop, which fell within their lines and was easily picked up, boosting their BR.


Panzer Grenadiers advanced behind the cover of the Stug IVs.


Their comrades continued to inch forward along the hedgerow.


To their left, other Grenadiers infiltrated a building that promised to be a good position of cover for the rest of the advance.


Instead, and for the rest of the game, it became a magnet for well-placed British fire, causing multiple casualties. The Germans had a dilemma - if they vacated the building, it would leave their left flank open. If they stayed there, they died.


Another supply drop landed within the British deployment zone, boosting their BR further. Things had got off to a slow start for the Germans!


Fortunes gradually turned and the build up of German forces persuaded the British to abandon the first line of buildings and retreat into the nearby woods. The Germans had placed a PRT in the centre of these houses and the paras saw little point hanging around.


An overhead shot shows the state of play after the first few turns.


As a reward for eliminating one squad of paras, the Germans saw the British draw a breakdown chit which was immediately placed on one of the Stug IVs. Luckily, the Germans had had the foresight to bring a repair vehicle with them.


Another Stug IV entered the fray.


The paras continued to pull back slowly rather than get hoovered up by the more heavily armed (and armoured) German attackers, trading space for casualties.


As the Germans were lured forwards, a salvo of artillery fire landed in the midst of their troops courtesy of XXX Corps on the other side of the Lower Rijn. Sneaky!


Having cleared the first line of buildings, with the paras falling back, the Germans applied their coup de grace in the form of a platoon of armoured Panzer Grenadiers. The first Hanomag barrelled down the road towards Osterbeek and unloaded its passengers, who immediately close assaulted and eliminated a nearby house containing some troublesome paras. It then transpired that it was sitting on a British PRT, which soon attracted more artillery fire. Miraculously, the Hanomag survived the first salvo.


On the German right, Grenadiers supported by armour had managed to get round the British flank.


The British had pulled back to form a hedgehog position around the central road.


The Grenadiers pressed on with the support of a 250/9 and started to roll up the British defences.


Two more Hanomags entered the board and launched a frontal assault on the British positions around the crucial cross roads, which was a key objective for both sides.


The battle swung back and forth as both sides saw both good and bad luck. One Stug, having been repaired after a breakdown, then struck a mine and was knocked out. A second received another breakdown counter and was left immobilised. The German Forward HQ (a somewhat anachronistic Panzer IIIK) saw fit to move up and direct the attack.


This German MMG team was able to get round the British flank completely and threaten the British rear positions.


Their comrades continued to pour forward.


The climax of the game saw Grenadiers close assault and capture the cross roads.


The British were clever in pulling back to deeper prepared positions rather than risk their more lightly-armed units being wiped out in an uneven battle. As a Hanomag pushed forward to force the issue, one of their 6 pounders opened fire...


...and knocked it out.


This was a fitting end to a most enjoyable game played in great spirit. We had previously questioned whether Arnhem is truly a good situation for gaming. Previous scenarios had seen the British get absolutely walloped in a serious mismatch. Our game was nicely balanced and went to the wire. We called it a draw: the British were closer to their breaking point (33/54 compared to 24/56) but the Germans had not achieved the scenario victory conditions. The British were not destroyed and had retained their tactical cohestion. The trick seems to be to build in a narrative around the battle with difficult objectives for the Germans, and plenty of cover for the British.

Our next game will involve the British attempts to break into Arnhem in the early hours following the first landings, so the roles will be reversed.