Wargaming from Hertfordshire & Beyond!

Thursday 16 May 2024

With Fire and Sword - Game 1

We played another game of Sharp Practice set in the American Rebellion. This time based upon scenario one from Chris Stoesen’s With Fire and Sword book.

Scenario Introduction

Colonel Houseman and a body of Loyalist militia have gathered at Alexander’s Old Field for the purpose of gathering oaths of allegiance to the crown. However, Captain John McClure has gathered his militia and is intent on disrupting the gathering.


This scenario was especially interesting as there were very few leaders present and four flags per side meant that a significant number of random events occurred.

The Loyalists deployed into two formations within the fenced area of the camp.


Captain John McClure marched his men into the woods to the northwest of the camp, with Lieutenant Hugh McClure marching his men along the road, hoping to outflank the Loyalists.

Hearing hear loud noises coming from the woods Lieutenant Abel advanced his men, but were taken by surprise when Captain John McClure and his men emerged from the woods.


Colonel Houseman sounded the recall for his sentries to reform. Unfortunately, two of them had decided to check out the delights of the local whore house (due to a random event). With the rest of his command, he moved to the fence line to halt the advance of Lieutenant Hugh McClure.


Captain John McClure was having the best of the firefight, with one group of Loyalists soon breaking and heading to the rear.


Having halted the Rebel advance along the road, Colonel Houseman now moved his troops into a position to aid Lieutenant Abel,


And soon Captain John McClure and his rebels were running for the hills.

However, Captain John McClure managed to extract himself from his fleeing men and joined up with Lieutenant Hugh McClure. Between them they rallied their men and separated into two groups, with Lieutenant Hugh McClure heading for the camp

and Captain John McClure heading for the fence line to exact punishment onto Colonel Houseman and his men. Things were going well for the Loyalists, with the Rebels having the better of the firefight as they were in cover. However, Captain John McClure’s men got a bit too enthusiastic and charged over the fence only to be met by two volleys from the Loyalists. This resulted in them breaking,


Leaving poor Lieutenant Hugh McClure alone.


At this point it was decided that the Rebels couldn’t achieve their objective and so the game was called as a victory for the Loyalists.

Wednesday 1 May 2024


The third game in our Wars of the Roses campaign was Ludford featuring the Yorkist Edward Plantagenet, Earl of March (David) versus the Lancastrian Henry Percy, Earl of Northumberland (Reg/Doug). 

Historically on the night before the battle of Ludford Yorkist troops began to desert because they knew Henry IV (God's anointed) was with the Lancastrian army and they had been offered royal pardons for their treachery.  Faced with the loss of their army the Yorkist leaders tried to pull a fast one and declared that the King was in fact dead.  

 With the appearance of Henry the following morning this was proved to be a lie and many of the best Yorkist troops defected to the Lancastrians.  The Yorkist leaders, seeing that the game was up, deserted their troops leaving them to their fate. 

 Having swept away the remaining Yorkist forces the Lancastrians simply got on with sacking and pillaging the surrounding countryside.

 Remember this game was NOT meant to be an historical replay.  The aim was to kill as many of the enemy as possible.

 Prior to the game both sides adopted novel approaches to their army selection.  The Lancastrians went for a strong force of double armed (bill and longbow) men-at-arms and the Yorkists chose to go for four Generals rather than the usual three.  The Yorkists therefore fielded four Commands in columns B+C, D+E+F, G+H+J and K+L.

 Both armies relied on their mounted infantry to scout the area and gather intelligence on the opposition, fielding a modest 3 scouting points each.  After some rather half hearted scouting (David drew a 2 chit and Doug/Reg a 3 chit) it was apparent that the Lancastrians had won (just) the scouting.  Edward (David) therefore began the set up.

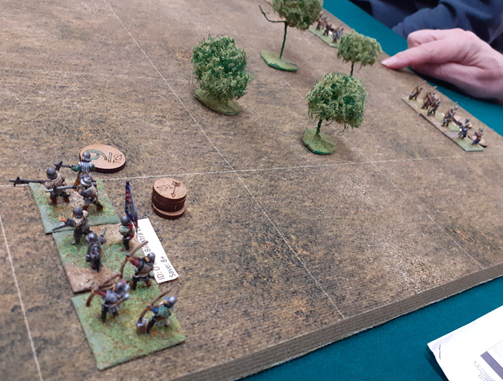
Edward (David) started by deploying a strong left wing with a front line of retinue longbows behind stakes, supported by billmen and handgunners. This command was led by William Neville, 
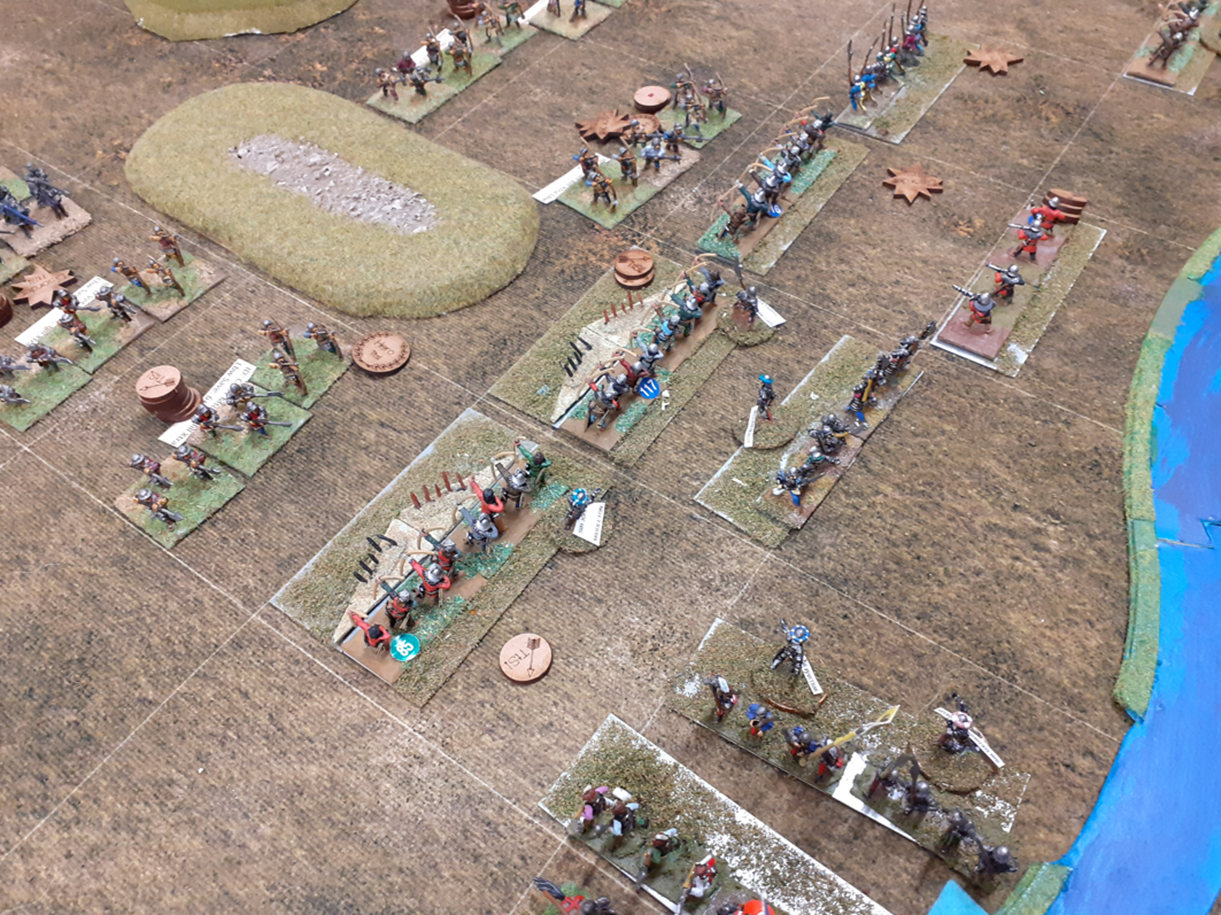
Baron Fauconberg (Mal).  Percy (Doug/Reg) replied by placing a deep formation of billmen closely supported by the army’s cavalry directly opposite them.  This command was under Percy’s (Reg’s) personal command.

Edward (David) then deployed his camps in his centre right deployment zone.  Both camps were heavily defended by artillery and longbowmen behind palisades. The camps were commanded by Baron Scrope (Tony).  In light of the extensive beaten zone of the Yorkist artillery Percy (Doug/Reg) deployed a holding force of shire levy stiffened by a unit of Welsh spearmen on his left flank.  This force was under the command of Baron Clifford (Adrian).

Edward then deployed his centre left command, extending the line of longbowmen on his left flank and backing it up with the remainder of his billmen. This command was placed under the command of Baron Bonville (David).  Against this command Percy (Doug/Reg) deployed another of his deep bill/longbow formations under the command of William Tailboys (Doug).

Completing the deployment Edward placed his mounted bodyguard on his extreme right under his personal command (Tony)


As battle commenced a signal arrow rose from the ranks of the Lancastrian army.  Treachery!  Lord Fauconberg about faced his billmen in the centre of the Yorkist left and made to leave the battlefield.  The Yorkist left was now leaderless and out of command!

Having seized the initiative, the Lancastrians advanced on both left and right wings while their centre inclined right in support of their main assault. 


 The Yorkists replied with longbow and artillery fire.  The first disorder started to appear in the Lancastrian ranks.

Receiving fire from the Yorkist bombards, Baron Clifford (Adrian) soon realised the danger to his shire levies and withdrew them out of artillery range.  Meanwhile, acting on his own initiative, Sir Christopher Curwen (Adrian) led his troops up the extreme left hand side of the table  aiming to stay outside the artillery field of fire and challenge the Yorkist Right flank (Tony).

Percy (Reg) pressed his attack on the Yorkist left, attempting to ride down the handgunners in front of him and forcing them to evade away. The flank of the Yorkist firing line was now becoming dangerously exposed.

The Lancastrian centre (Doug) continued to move forward in support of their right wing.

The Yorkist reserves (David) were now hastening to back up their threatened left wing and to counter Sir Christopher’s (Adrian’s) brave attack on the right.  The treacherous Baron Fauconberg was forced to halt his cowardly retreat as Yorkist billmen streamed across his front.


The Lancastrian cavalry (Reg) continued to drive back the Yorkist handgunners forcing them back across the river Teme but the cavalry were now becoming dangerously over extended.

Baron Bonville (Doug) in the Lancastrian centre now moved into position to engage the Yorkist line in an archery duel. 

On the Yorkist left Sir Christopher (Adrian) moved within archery range of the Yorkist flank guard (Tony).   Baron Clifford (Adrian) and the remaining units of his left wing began a slow lateral move towards the centre of the battlefield and the safety of their camp.

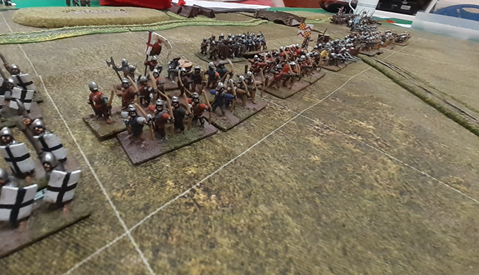
The decisive action of the battle was now beginning on the Yorkist right.  Both armies came together and the subsequent exchange of arrows and blows caused disorder to spread through both forces.


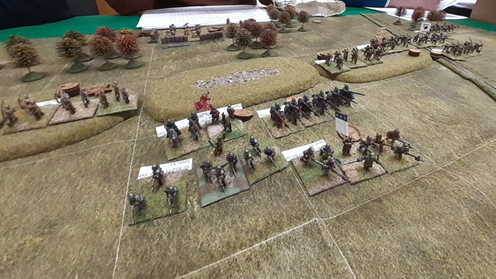
A storm of arrows was unleashed against the Lancastrians advancing through the rolling ground in front of the Yorkist firing line.  Under unimaginable pressure the Lancastrians broke and fled. Despite this the Yorkists were not having it all their own way and the disorder in their ranks was spreading.

 A blast of brazen trumpets sounded from the Yorkist line.  Treachery!  Baron Clifford (who had now successfully moved his troops into defensive positions around the Lancastrian camp) turned to leave the battlefield. His troops were left leaderless.

In addition to this hammer blow the Lancastrian cavalry, struck in the flank by Yorkist bills were driven from the field in disarray.

 At this point it became clear that the Yorkist Flank March stratagem had failed  and that the flanking unit had, apparently, become lost.  Nevertheless the Yorkists were still enjoying success on the field.  Baron Bonville’s (Doug’s) centre column suffered it’s first loss.

Baron Bonville’s (Doug’s) billmen were now coming into action, but was it too late?  It certainly seemed so as the Yorkist flank attack appeared exactly where expected.  Clearly they had not been lost, merely delayed.

As the sun set in the West Sir Christopher’s (Adrian’s) gallant shire levy lost their archery duel against the Yorkist right (Tony) and fled the battlefield. 

Darkness fell drawing a veil over the battlefield and a Yorkist victory.

Saturday 20 April 2024

ECW What if Game!

After a long absence my war reporter has returned for duty...

Last night Festung Williams witnessed a run-out of Simon Miller’s “For King and Parliament” (FK&P) rules, with Chris taking on Tony. The scenario was one I had found in a Partizan Press booklet, and was a “what if” game set in 1659, after the death of Cromwell. It sees General Monck marching down from Scotland as he actually did, but this time General Lambert’s army stands and fights rather than deserting en masse! Chris took the role of Monck and Tony played Lambert.

It was fairly small game with only 9-10 units per side plus officers, but with an additional two units of the London Trained Bands watching from the flanks to see if they should join in, and if so supporting whom. This would be decided by drawing cards. 

The dispositions were pretty classical, with cavalry on the flanks, infantry in the centre and the artillery pieces ineffectually blasting away supporting the infantry. Tony had slightly more units, but several of his were “untried” which meant their true status would only be revealed when they entered the fray.

For Tony’s sake I won’t narrate a blow-by-blow account of the game. Chris swiftly destroyed Tony’s right wing cavalry and one infantry unit. The Force was definitely with Chris as he inflicted multiple hits and managed multiple saves, whilst Tony’s chit drawing was truly lamentable. Even the FK&P pursuit rule which normally sees victorious cavalry racing off the table to pillage the enemy baggage train didn’t deter Chris as his pursuits miraculously took him straight into more of Tony’s demoralised troops. The final act saw a unit of Chris’ cavalry overrun Tony’s artillery and claim victory. The restoration of Charles II could now happen, and there would be no disruption to the timeline of recorded history.

I hope everyone enjoyed it. The rules play much as TTS but with some subtle differences. I had given several of the officers “special traits/abilities” which in the heat of battle Tony forgot about. I had kept it pretty simple and there are more “special” rules and unit types to add, which will give added period feel. It was nice to get my troops on the table including the resin Gallia buildings which I think have their 40th birthday this year!

Simon

Tuesday 26 March 2024


The second game in our Wars of the Roses campaign was Blore Heath featuring the Yorkist Earl of Warwick (Paul) versus the Lancastrian Duke of Somerset (Rick). 

 As a consequence of Henry VI’s petit mal, Queen Margaret was effectively in command of the Lancastrians at the time of Blore Heath.  The battle was fought on a damp day causing muddy conditions and swelling the Wemberton brook.  The Yorkists set up on higher ground with woods to their rear.  The Lancastrians launched two uphill cavalry charges but both were shot up and failed.  The cavalry charges were then followed by an infantry assault which also failed.  

 There were two other Lancastrian forces within 8 miles so the Yorkists withdrew during the night.  The Yorkists left a friar to occasionally fire their guns hoping to fool the Lancastrians into thinking they were still on the heath.  It worked but lead to the Yorkist guns being abandoned.

 To simulate the swelling of the Wemberton Brook and the consequent soft ground our brook was classed as difficult terrain except at the bridge.

 Despite their lack of light troops the Yorkists outscouted the Lancastrians thanks to a favourable chit draw.  Edmund Beaufort 2nd Duke of Somerset (Rick) therefore began the set up

Somerset (Rick) deployed his centre first, pushing his mounted bowmen forward and supporting their right flank with veteran retinue billmen under the command of John Touchet 6th Lord Audley. In echelon on the left of the bowmen Somerset (Rick) placed his reliable Welsh longbowmen closely supported by a powerful unit of fully armoured dismounted men at arms under the personal command of the Duke (Rick) himself.  In response the Earl of Warwick (Paul) deployed a strong armoured centre including all of his knights and men at arms. Warwick’s (Paul’s) veteran bills under the command of 5th Baron Clinton were pushed forward onto the low hills in front of the woods. Protecting the flanks of the bills were a unit of retinue longbow and a unit of Shire Levy bowmen.  The Earl (Paul) placed himself and his bodyguard in the centre of the battlefield.

Somerset (Rick) then arrayed the remainder of his retinue troops (mixed bills and longbows) on his right, forward of the Wemberton brook, under the command of Baron Hungerford (Doug).  Sir John Roddam was in command of the billmen on the extreme right of the line.  Warwick (Paul) responded by positioning mounted retinue longbow on the low hills in the left centre of the battlefield (under command of Baron Ogle) and the mass of his shire levy (supported by retinue billmen) in the cover of the woods on the left of the line. Baron Hastings (David) was appointed to command the Yorkist left flank. 

Finally Somerset (Rick) deployed a strong cavalry force on his left under command of the Earl of Wiltshire (Reg).  Sir Robert Whittingham’s Irish kerns were placed on the extreme left of the battle line.  Facing off against this threat Warwick (Paul) deployed his remaining retinue troops (mainly bills with Sir John Conyer in command) with his Currors in support.  A shire levy unit of bills were held in reserve.  The Yorkist right was under the command of Sir Thomas Neville (Tony).

The Earl of Warwick (Paul) now played his stratagem “ This way my Lord…”.  Misled by Yorkist spies  the Lancastrian left wing found itself pushed back onto the wrong side of the brook thereby isolating Somerset’s (Rick’s) centre.

The battle proper now opened with an advance by the Yorkist line onto the low hills in front of them

In reply the entire Lancastrian left wing (Reg) successfully recrossed the brook returning to their original positions.  On the right and centre left the remainder of the Lancastrian army also advanced conforming with the mounted infantry in the centre of the line.  The Lancastrian bowmen originally placed forward of the main line opened fire with some success against the Yorkists.

The Yorkist centre boldly advanced into the centre of the battlefield led by Baron Clinton on their left and supported on the right by the Earl of Warwick (Paul) himself.

The Earl of Wiltshire (Reg) prepared his cavalry to charge.

Accompanied  by a blast of brazen trumpets a flaming arrow rose above the Lancastrian centre.  TREACHERY! Baron Clinton halted his advance and tried to turn his bills against Warwick’s knights.  Confusion spread through the ranks.

A similar confusion now struck Warwick’s knights as they were ordered to ride down the billmen in front of them.

Carpe diem! The Earl of Wiltshire (Reg)  ordered his cavalry forward.  Neville’s (Tony’s) retinue bills held in the face of  Wiltshire’s (Reg’s) charging knights. Under direct command of the Earl his northern border staves attacked the billmen on the right of the Yorkist line.  The Northerners were scattered but not before mortally wounding Sir Thomas Nevile (Tony) and leaving the Yorkist right wing leaderless.   The Earl (Reg) (narrowly escaping injury) now joined his Currors and led his second charge of the day smashing into the disordered bowmen on the hill ahead of him and driving them from the field. 

Meanwhile on the Lancastrian right Baron Hungerford’s (Doug’s) longbowmen were succeeding in disordering Baron Hasting’s (David’s) archers.  Hungerford (Doug) ordered his billmen (led by Sir John Roddam) to advance.

Back on the Yorkist right Sir John Conyer (Tony) fought back with the retinue troops available to him. The Lancastrian bodyguard  unit was destroyed and their mounted knights disordered.  The surviving Lancastrian knights fled back towards their lines. 

In the confused centre of the battlefield Warwick about faced his body guard in time to see the Earl of Wiltshire (Reg) and his Currors ride hell for leather into the Yorkist camp.  Lord Clinton finally about faced his traitorous billmen, only for them to be cut down by Warwick’s (Paul’s) mounted knights. 

Over on the right of the Lancastrian line Baron Hasting’s (David’s) disordered bowmen were engaged by fire and cold steel.  Both units were destroyed and Hungerford’s (Doug’s) relentless advance continued.

With the immediate threat of Clintons bills now eliminated, Warwick (Paul) proceeded to pursue Wiltshire’s (Reg’s) Currors who were busily looting the remains of the Yorkist camp.

The Currors on the extreme right of the Yorkist line (Tony) now tried to ride down the kerns in front of them but calamity! The Lancastrian stratagem revealed a sunken lane directly in the path of the horsemen.  The Kerns held and repulsed the cavalry charge. 

The whole Yorkist right flank (Tony) now began a slow but inexorable advance pushing back the disordered Lancastrian knights and putting pressure on the Irish kerns.

In the nick of time the Earl of Wiltshire (Reg) regained control of his looting Currors and turned to face Warwick (Paul) and his bodyguard.

Somerset’s (Rick’s) retinue and welsh archers at the centre right of the lancastrian line now came into their own peppering the beleaguered Yorkist men at arms

The Yorkist morale faltered and then failed confirming a decisive Lancastrian victory.

The next battle will be Ludford between the Earl of Northumberland (Reg/Doug) and Edmund Earl of March (David) tentatively scheduled for 25th April.