Wargaming from Hertfordshire & Beyond!

Saturday 30 December 2017

Baden, Extra Pics

The British watch the Saxon advance.
Artor's somewhat impetuous charge on the British right.
Bor's more cautious but remorseess advance on the British left.
Kay holding the British centre, not long before being forced from the hill and cruelly slain by the Saxon invaders.

The moment of Artor's death, as a Saxon counter charge crashed into Artor's exposed flank!

Friday 29 December 2017

The Battle of Badon Reprised


“And so the army of God lead by Ambrosius and inspired by Artor met the heathen host on the field below the fortress of Mons Badonicus…..

The out-scouted Saxons set up first, and seemed scared of the Romano-British artillery located on the walls of the fortress . Strange given the ineffectual use of artillery in previous games  Tony took the Saxon left with their cavalry and some infantry. Dave the Bretwalda took the centre and Colin the exposed right.  The British set-up saw Pete complete with “Great Leader Artor” face-off to Tony, with Phil and Fred taking the infantry in the centre and Chris the predominantly cavalry wing which by dint of the Saxon deployment had plenty of manoeuvre room.  Would Chris be able to use it??


The early turns saw the Saxons trudge forward trying to make the best of their deep units of Warriors, but were somewhat slowed by the drawing of “1s” at the most inopportune moments. Eileen was truly at the club in spirit! Pete tried to take the battle to Tony, and a desultory cavalry battle soon broke out on the Romano-British right.  On the British left Chris was finding it not so easy to advance and turn his massed cavalry so as to attack Colin’s flank.  The relentless Saxon advance in the centre continued, but the British maintained what must have been a frustratingly solid-ish line of spearmen and took the deep units on with only a few “disorders” being inflicted.

By half-way through the game casualties were surprisingly few, being a skirmisher per side lost plus one Saxon cavalry unit.  Finally Chris managed to turn Colin’s flank and attack with cavalry into the side of the deep Warrior units. The loss of a Saxon warrior unit  torn a gap in the Saxon line and a unit of light cavalry galloped through heading for the Saxon camps. It seemed game over as Colin’s warriors began to take multiple disorders and appear on the verge of collapse. The Saxons muttered darkly about the power of the Christian god and this view was reinforced as in trying to re-dress the line the Saxons managed to pull a series of “1s” at just the wrong moments. Chris took two of the camps leaving the Saxons with only a handful of Victory Medals.

With the right Saxon flank in peril the Saxon left (Tony) and centre finally started to achieve results.  Phil’s General died under the hammer blows of the deep warrior units, and thanks to some bizarre manoeuvering Artor, having killed another Saxon cavalry unit, managed to expose his flank to a Saxon cavalry charge and he too was wounded. Dave was finally pushing the Romano-British spear line back towards their own camps on the table edge.  Between them Fred and Chris managed double disorders on two of Colin’s deep units and seemed on the verge of carrying the day but couldn’t land the killer blow.  Back on the Saxon left Tony killed Artor and the Saxons re-captured one of their camps, but were still down to 3 Victory medals.

As night fell both sides licked their many wounds and claimed victory.  The Saxons had certainly lost more men but the British two leaders including the allegedly inspirational Artor. If the game had gone on one more turn the British should have won by killing Colin’s units, but they had been saying that for the last three turns on the game.  If they hadn’t Dave may have steam-rollered over the British spear and into their camps.

Overall a close run thing….

As a “neutral” it was good to see my Saxon and Romano British armies finally on the table.  The Romano-British were painted nearly 20 years ago and “refurbished” with metal spears, LBM shield transfers and re-based about 4 years ago. The Saxons were painted about the same time.  For both armies this was their first major outing in battle. The Grand Manner “Dark age” palisade was purchased soon after Grand Manner started back in 1998. Again this was maybe only the 2nd time on the table.


Friday 22 December 2017

Tanks! at Christmas

Well, it was Christmas games night, so while a large game of Spartacus raged in one corner and a rather raucus game of Robot Rally in the other, Brian, Dave and I were indulging in the game that lets you get those lovely 15mm tanks on the table and roll some dice, Tanks! (By Gale Force Nine).
Brian fielded 2 Tiger Is and a Panther. Dave and I were fielding 2 Sherman Vs, a Sherman Firefly, a Cromwell and an Achilles. The game was 'king of the hill', with the aim of having one of our tanks within one arrow length of the objective uncontested for 3 turns.
The Germans cautiously advanced into the village, while the Allies dashed forward, the 3 Shermans seeking cover among the houses, while the Cromwell sprinted around the German right flank and the Achilles sought to snipe and cautiously retire at the Panther.
What started as a good plan, quickly turned into a melee. The Panther was knocked out first, closely followed by a Sherman. By this time the 2 Tigers were sitting contemptuously on the objective, with the backs to the remaining Shermans. After losing the second Sherman V, the allies were forced to throw all the remaining armour into the scrap and the Tiger's 8 hit points was going to win out.
Gulp! Sherman discovers that the village is occupied!
Closing melee / forthcoming tank graveyard scene!

Friday 15 December 2017

PSC Battle of Britain, 2nd Playing – 14th Dec 2017

This was our second playing of the new Plastic Soldier Company rendition of Richard Borg’s “Battle of Britain” and a much closer run thing it was too. 43 VP vs 42 VP, in favour of the Luftwaffe. For this game Pete adopted his best Goering impersonation, while Kevin & Phil took on the roles of Dowding and Park.
Pete opened with some well escorted initial raids, starting a process of remorseless erosion of the RAF defenders. However, he was hampered by his initial mission selections, which featured quite a few raids suitable mainly for Luftflotte 5, from Norway!? Pete did however manage to knockout a couple of radar stations and a couple of RAF airfields, giving him a slightly easier run-in for raid 2. But, these were rapidly repaired, which along with a couple of choice interceptions, did manage to thwart a few of Pete’s later raids (otherwise the RAF would not have gained another 8 VPs from aborted (incomplete) missions) and the result rather less knife-edge.
Overall thought to be an enjoyable game, well worth playing again.
A few points noted and adopted for this game;
  1. House Rule: Permit the German player (on turn 1) to allocate aircraft cards to Groups / Missions, after seeing them, not blind. This avoids packs of Ju-87s being sent, unescorted to attack Manchester!?
  2. Key Rule Missed on Game 1: The “dogfight” and “interception” counters are dual sided and hence the RAF player only has the potential for 5 air combats per turn, interception or dogfight. This does force the RAF player to prioritise the German raids to be intercepted.
  3. In game 1, the PSC flight stands were used, but proved rather hard to read for the aging gamers present. Hence for game 2, I had created to rather easier to read set of flight stands. These proved very popular, especially when coupled to my painted metal aircraft minis, which are acting as stand-ins until the new PSC re-mouldings appear. Next are some small croupier sticks!
Elsewhere in the club we had a Chain of Command game, with Dave leading some Americans against Tony’s (“didn’t I tell you these were elite SS Panzergrenediers”) Germans. The result was as one might have expected, with a lot of telegrams being sent out afterward by the Department of Defence!

Further down the hall John was running an ECW game, this time not using TtS, while opposite there was an attractive looking 15m Ancients game (sorry chaps, did not get the rules being used).
Elsewhere, off the premises, carefully behind closed doors, for consenting adults, Chris, Rob and Mal were playing Wild West Exodus. Chris & Rob are known for such perversions, but to lead Malcolm astray is unforgivable! Apparently Version 2 of WWX was much streamlined compared to Version 1 and the most concerning thing about the game was Rob’s rather unnatural dice rolling. 

Friday 1 December 2017

From “honest Simon, an educated, upright god-fearing man”……

And so, the forces of God and Parliament met the army of the Godless and Tyranny somewhere in England.  Parliament looked outnumbered; but right would prevail.
And so it looked after turn one. The Royalist left wing cavalry under Goring ( or was that Goering) decided that fighting was not for them, and so left the advance to their cavalry in “the left centre” and the infantry on the center-right.
The Parliamentary Cavalry , fortified by the Lord advanced on the Royalists, and aided by the Godlike Umpire’s rules interpretation, soon seemed to be destroying the front rank. Aussie whingeing pointed out that the umpire had made a tiny mistake and units were restored.
The infantry battle became a true slugging match, with the Parliamentarians stoutly defending the ridge. However ultimately, numbers told and the Royalists broke the line capturing objectives. On the Parliamentarian right the forces of God held the water mill, but could not hold the church which anchored their left flank. It did not matter. It was an Anglican church (a tad early in history) and hence a nest of vipers.  
The cavalry battle too became a war of attrition albeit with more manoeuvre. Swedish tactics battled Dutch tactics in the pell-mell of combat, and no clear victor despite the Royalist advantage in numbers. Will Goring ever command again or will he retreat to his booze and bordellos?
As darkness closed in the battle ended with a marginal Royalist victory which even the slothful Goring described as “Pyrrhic”.  A moral victory for God and Parliament.
~~~~~~~~
An interesting game. It obviously took far longer than a TtS ancients game.  We hadn’t actually finished by the time we “drew stumps” at 10.00. That said we had far more units in play.  I reckon the Parliamentarians had a minimum of 30.  The mechanisms and “record keeping” seems more time consuming than ancients, but that could be just unfamiliarity with the rules.  

Saturday 25 November 2017

We thought we would try something different with To The Strongest (TtS); an "ambush"! A scenario for Tribola (147BC) was published in Wargames Soldiers & Strategy #92. Eileen, Chris & Tony formed up the Roman column pursuing Viriathus' Lusitanians into the valley, only to find it a trap.

The Lusitanians, under Viriathus (Simon), waited in the hills to the South and West of the ponderous Roman column. The "ambush" under TtS was represented by the Lusitanians being able to set up only 2 squares from the Roman flank. The Lusitanian infantry commands, under Simon & Dave fell upon the 2nd and 3rd Roman command flanks, with Chris's 2nd Roman command suffering particularly badly.

However, the planned move of the Lusitanian cavalry (Phil), sweeping down from the head of the the valley, to threaten the Roman baggage train, rather stalled with a '1' activation chit first out of the bag. This failure to sieze the moment was only matched by Eileen's inability to get the Roman vanguard in motion!

Tony employed this borrowed time well, before the Lusitanian cavalry arrived, to back 3 of the 4 carts off the table (Tony - Ox drawn carts did not actually have a reverse gear!). He also started to reorganise the Roman rear, who started to progressively roll-up Dave's right hand Lusitanian command.


By this time, Chris's 2nd Roman command was demoralised, but Eileen was starting to turn the Roman Vanguard around, putting some real pressure on Simon's central Lusitanian infantry command, Simon managing to pull 3 consecutive '1's in combat!

To relieve the pressure on Viriathus, the Lusitanian heavy cavalry fell upon the now exposed rear of the Roman vanguard, while the numerous Lusitanian light cavalry started to harass the rear of the two rearmost Roman commands. However, Tony brought his Roman heavy cavalry round to chase off the Lusitanian light cavalry, frustratingly chasing many off the table, only to find them coming back just a few squares away!

Victory medals on both sides were now getting scarce and it was left to the Lusitanian heavy cavalry to crash into the exposed flank of the Roman vanguard cavalry, in order to claim the last 2 Roman Victory Medals. Victory to the Lusitanians!!

Another very close run game under TtS and the ambush made a nice change from the usual pitched battle, well the Lusitanians thought so, even if the Roman's did not quite share their enthusiasm!

Tuesday 7 November 2017

Crisis for Six in Dunkirk!

After an uneventful evening Eurotunnel crossing and establishment of the FOB in the IBIS Central in Dunkirk, the intrepid party set off for the Crisis Wargames show in Antwerp. This was a first for us and turned out to be like Salute, but with cheaper parking and the option to have lunch included in the entry price of 20€!! Plenty of traders, a good selection of games, a ‘bring and sell’ section that one could actually get into(!), as well as a nice friendly atmosphere. Recommended.

Intrepid travellers before joining the mammoth entry queue.

Richard Clark looking pensive!

Some familiar faces at the Sharpe Practice 2 table.

Day 2: Dunkirk outer perimeter tour: After causing major disruption in the local boulangerie by having the effrontery to order coffee and croissants early on a Sunday morning, the team set off for Veurne. In May 1940 this town was one of the key points on the Dunkirk defence perimeter. The tour started respectfully in the CWGC cemetery in Veurne, but almost came unstuck when the team was forced to shelter under trees in the corner of the graveyard for almost 15 minutes, while an unexpected “light shower” passed over! We then moved on to the canal defence line and thus planting the seed of a 20mm Early War German engineering assault section, complete with rubber boats, firmly in Greg’s mind!?

After Veurne it was on to an old Maginot Line bunker on the France-Belgium border.

Then came a spot of lively battlefield archaeology, while the team debated which was actually Langley’s cottage, leading Simon to decree that local planning permission should not allow properties to be modified / altered, where such properties appear in published battlefield guide books!

After a brief stop at the site of Ervine-Andrews’ VC winning action, it was onto Bergues, a nice old walled town which formed an important part of the Western end of the Dunkirk perimeter defence. We slogged our way through a coffee and biscuit in a cosy café on the town square, before heading down to then Cassel gate, the area of most of the 1940s action.

After Bergues, it was off to the Wormhout barm massacre site, for a solid reminder of man’s inhumanity to their fellow men! After this sombre reflection, an unscheduled excursion to the Esquelbecq CWGC cemetery, to pay some deserved respects to the victims.

We then headed down to the bunker at Peckel, the site of Cresswell’s epic 3 day siege in 1940.

Next stop was Cassel. The long climb up the cobbled road to the top (in a modern car!) serving as a good reminder of the military significance of the only bit of high ground in the area. Indeed, Cassel has been the site of three battles through the years, even if no-one could name the other two. After lunch in a delightful little café (which could easily have served as the set of ‘Allo ‘Allo!), we pressed on up to the 3 battles monument, spectacular panoramic views and rather more dubious ‘Roman wall’ remains!


Before setting off to our last visit of the day, we drown down past the location of where a knocked-out German Panzer 35t was photographed in 1940, knocked out by a 2 pounder located further up Cassel hill.


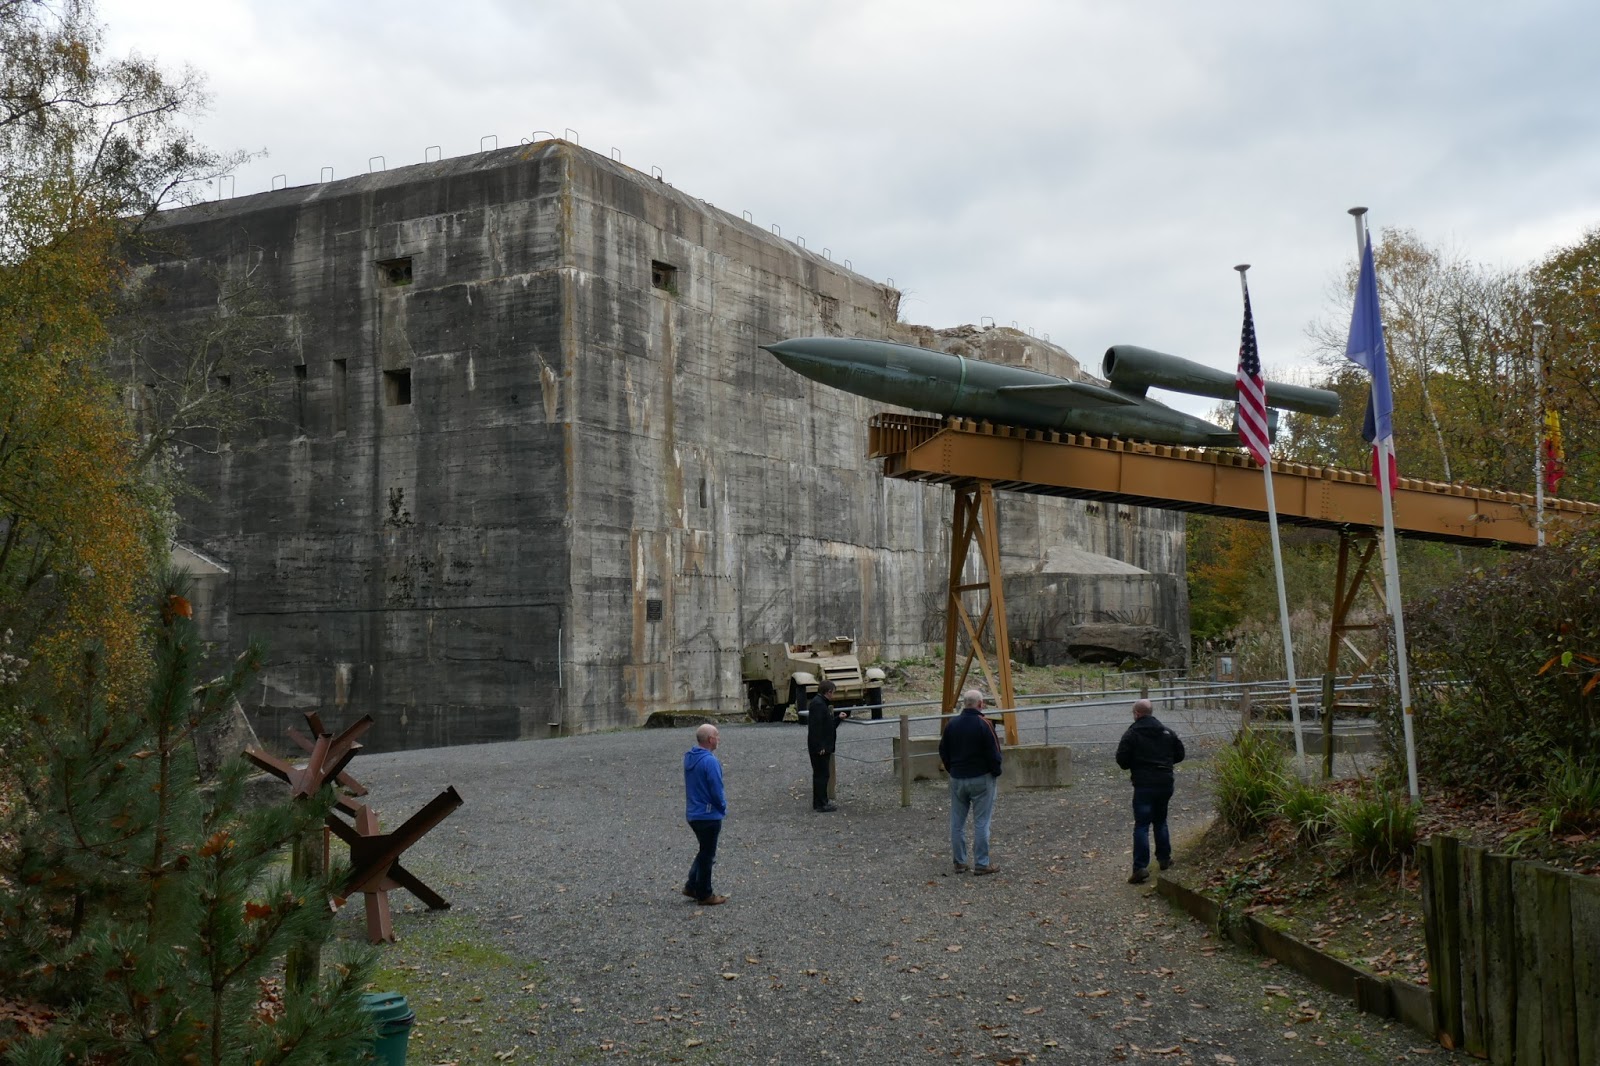
Our last stop of the day, was a deviation to the Dunkirk 1940 theme, the V2 preparation / launching bunker at Eperlecques, the aptly named the “Blockhaus”!


The scale of construction is both awe inspiring and depressing and was well worth the deviation from the main tour theme. Despite the grand plans, it was interesting to reflect that Eperlecques never actually launched a V2! The sheer obvious scale of the facility attracting some very severe Allied bombing, including everything up to the 22,000 lb Tallboy and "Disney" bombs. The facility did however continue to process V2 rockets for mobile launchers.

Day 2: Dunkirk and the beaches: The day opened gloriously, with a blue, lightly clouded sky and sunshine, which compensated for the early (well for Rob!) to get out to the beach at low tide. We located the wreck of the Crested Eagle, causing another sombre moment of reflection for the 300 lives lost during her sinking.


After a short diversion to an “Atlantic Wall” bunker sticking out of the dunes, it was back to Dunkirk and the CWGC Dunkirk cemetery, to reflect upon the 5500+ names of Commonwealth Servicemen lost in two World Wars.

After a brief return to the hotel, to check-out, we embarked upon the walking tour of Dukirk, an interesting idea, clearly inspired to fill a bit of a publicity gap after the recent film’s release. Anyway, the many themed blue display boards gave us a nice walk, with Dave claiming that we had walked over 14km all-told that day.


Yet another Atlantic Wall Bunker


On the Mole

The day ended with a visit to the Dunkirk museum, with its interesting and sometimes eclectic mix of exhibits, including model Landrovers on the beach in 1940! Anyway, a great trip. Sedan anyone!