Wargaming from Hertfordshire & Beyond!

Friday 22 December 2023

Kampfgruppe Von Luck - Scenario 1

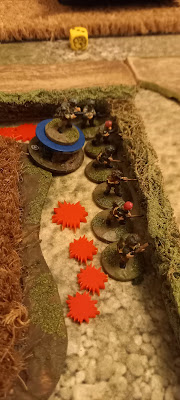
The much vaunted 21st Panzer Division tank crews slept, while their infantry took crawling through the cornfields, trying to work out where the Allies were!


After crawling a few hundred yards, Blue section was surprised, first by a vicious ambush by a British bren gun team, then by two infantry sections, one behind the hedgerow and one further back in the cornfield. Blue section sustained heavy losses, but rallied enough to return fire. After directing Green & Yellow sections to fire at the Northernmost Allied section, Lt. Altrich ran forward to stabilise the situation with Blue section. Pausing only briefly to yell, “It’s all your fault” at Sgt Bouue, Lt. Altrich screamed at the poor quivering FAO, to laydown a mortar barrage, which the FAO prompted did, but sadly on his own position!!

Lt Altrich rolled his eyes skyward and yelled again, at the FAO, to get him to roll the barrage forward.
The combined fire of Green & Red sections was too much, even for the stalwart paras and the Allied right flank section was soon streaming to the rear.

Meanwhile with the Allied left flank pinned under the barrage, the Allied commander called for a rather disorderly retirement from the field.

Phil

Chippenham in 878AD - A Game of Ravenfeast

Last night we tried out the Ravenfeast Viking-era skirmish rules. Released during lockdown they are very simple but have high production values, and best of all are free! The scenario Phil chose was very appropriate for the time of year, being the Viking surprise attack on Alfred’s Christmas celebrations at Chippenham in 878AD. The game gave me a chance to deploy my Tiny Mats winter “Frostgrave” mat and hernia-inducing Grand Manner terrain, with both Phil and I supplying figures. In my case I don’t think my figures have ever been on the table actually as Vikings. They were last seen on a table masquerading as Oathmark humans.


As a four player game Greg took the Saxons, with myself, Phil and Tony the marauding Vikings. Greg’s two units started within pallisaded area near the hall, with the three Viking groups starting at various points on the table edge. The Saxon objective was to get Alfred off the table intact together with one other “character”.

The game started with Greg seemingly moving towards the exit held by Phil, a manoeuvre that drew Tony to support Phil. 

A quick about-face saw Greg then come towards my startled warriors who moved to engage. My bondi shield wall attacked whilst the huscarls held the gap in the palisade, with the archers firing fairly ineffectually at anything that moved.

After butchering my bondi Greg saw Tony moving to reinforce that side of the battle, and once again Greg changed facing and sped towards the advancing Phil. Phil’s berserker found himself carved into little pieces, but his Jarl was made of sterner stuff and faced off with two Saxon huscarls. Greg’s shieldwall smashed into Phil’s bondi and the result was carnage. It was certainly a bad day to be a Viking! Finally, Alfred made a break for it with the rest of the Saxon force following. Tony tried to intercept with his berserker but to no avail. The Christian God smiled on Alfred and he escaped accompanied by his so-called priest.

The rules are simple but elegant, and the cards and geld add additional decision making and uncertainty to the gameplay. The only negative we noted was the stodgy, long-winded combat featuring hi status leaders. Very hard to kill!

However, we enjoyed them so much Ravenfeast will be returning on New Year’s Eve.

Simon

Thursday 14 December 2023

Tarletons Quarter

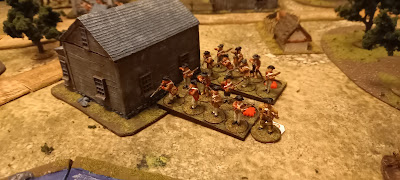
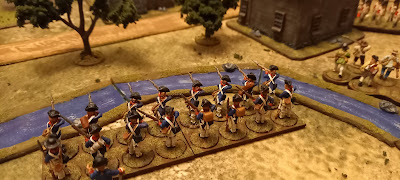
We played another game of Sharp Practice set in the American Rebellion, this time based upon the Jan Spoor Tarlton's Quarter scenario.

Scenario Introduction

The basic plot is a raid on a farm in the South Carolina countryside by a combined force of British and Loyalist troops, which is interrupted by a force of local partisans, subsequently reinforced by Continental troops.

Complicating factors include decision-making on what elements of the farm’s produce to destroy and what to carry away, the possible discovery of a notable rebel political leader, and conflicts between the allies on both sides.

The Loyalist commander will seek to destroy as much as possible of the farm (it belonging to personal enemies) while the British commander will seek to leave the farm and its inhabitants intact while taking away as much of the livestock and destroying as much of the crops as possible in order to supply the local Crown forces.

The partisan commander will make killing Loyalist troops and preserving the farm his priority, with local rivalries coming to the fore, while the Continental commander will seek to prevent the destruction of supplies above all else.


The Loyalist troops advanced rapidly towards the river.

But quickly encountered some rebel skirmishers.


More loyalists headed towards the smokehouse, intent on a bit of arson.


With the British skirmishers supporting their flank.

Major Francis Cholmondeley quickly advanced to the cross-roads hoping to support the loyalists.


However, the loyalists were having a desperate time, being shot to bits by the rebels and having their commander, Captain Archibald Campbell, killed. Things were not going to plan.


The rebel militia advanced over the bridge.


And after a brief fire fight, sent the British skirmishers packing.

Major Francis Cholmondeley formed his men into line and poured fire into the rebel militia, whilst the loyalists were having a difficult time in setting fire to the smokehouse.


Having watched the loyalists run away, Lieutenant Gerald Majoribanks advanced his grenadiers, hoping to bring cold steel to the continental light infantry who had just crossed the river.

However, things were going from bad to worse with Lieutenant Gerald Majoribanks being knocked out as his men were dying around him. The continental line moved forward in support of their militia friends on the other side of the river.


With the smokehouse finally on fire the crown forces decided to retire from the field, in the face of the advancing rebels. This was a major victory for the rebels, with the crown forces failing to achieve any significant objectives.

Friday 8 December 2023

Mantic Walking Dead, A Call to Arms

Pulled this little gem out of storage, to let Greg get a look at how the Mantic Walking Dead game system works. “A Call to Arms” is a later, slightly cut down version of “All Out War”, aimed more at a skirmish game, rather than the more fleshed-out quasi RPG/Campaign system of “All Out War”. Maybe we might see some changes in the re-release of All Out War?

Anyway, Greg took the bad guys (Derek, Wes, Reggie, Patrick, Sandra & Albert) and Phil took the good guys (Andrea, Rosita, Otis, Tyreese, Julie & Lori). We played scenario 1, where the aim is for both gangs to pass by each other, to exit the opposite end of the table, while simultaneously attempting to sweep-up 6 supply tokens, dotted around the table.

Both sides crept cautiously onto the table, more concerned with thinning out the Walkers, than dealing the other gang. Eventually both sides had thinned out the Walkers near their home areas, so that they were confident to move further into the table.


From here on in, Derek & his gang of rogues got their act together faster, making better use of “Follow Me” moves, while trapping / distracting the remaining Walkers, although Reggie did almost spoil things by wandering back & forth, blasting his shotgun aimlessly at passing Walkers!

Andrea’s team were struggling with some well placed zombie reinforcements (thanks Greg!), as well as some unfortunate zombie ‘recoveries’. This left Andrea & the good guys, unable to fire at the bad guys, without attracting zombies into contact. Derek’s men exploited this, with Wes dashing forward, to gun-down Andrea with his trusty M4 carbine.

This really left the good guys struggling, unable to make effective progress, or return fire, without getting entangled with the undead. In the meantime, Greg had remembered the game objective. Sandra led the way, dashing forward, to the exit zone. Then Derek rounded up the rest of the gang and pushed down the right side of the parking lot, discharging some parting shots at the survivors of Andrea’s gang, before slipping out of to the exit zone.


I think “A Call to Arms” is a nice little skirmish game, with a decent feel for the Walking Dead genre. It also poses quite a few little tactical choices, while trying to make best use of disparate skills in your team & avoiding the undead. OK, getting your head around all the various attributes can be a struggle and the tokens can be a bit of a fiddle, but well worth a dusting off these rules.


STAR WARS CHAIN OF COMMAND: RISE OF THE LARD - Game Report

Scenario

The Wednesday Wargamers played a modified version of the Star Wars Chain of Command game that Rob played at Oozing Lard in the summer.

The background for the scenario was:

The Rebellion is not going well, the Rebel fleet is scattered far and wide and a rag tag force under the command of Princess Leia Organa has retreated to Lardos IX, a small moon on the outer rim of the Pynt sector on the edge of the Pi spiral arm.

The Empire is hard on the Rebel’s tail and have landed a force outside the small fortified lawless town of Mos Painfuly, where they are ordered to destroy the Comms Array located there.  This is the only comms array on the moon, and the Rebel’s only means of communication with their fleet. 

The winner of the game will be decided on Victory Points (VP’s).

Empire Victory Points:

  • Reduce Rebel Force Morale to 0: 2 VP’s
  • Dispatch an Engineering team to destroy the Comms Array: 2 VP’s
  • Kill or capture Princess Leia: 2 VP’s
  • Retrieve a missing Probe Droid from a group of Jawas, as it carries vital information as to the whereabouts of the rest of Organa’s troops on the moon: 2 VP’s. 
  • Achieve Darth Vader’s personal objective of beating Luke Skywalker in combat and returning him to a JoP, to be turned to the Dark side by the Emperor: 2 VP’s

Rebel Victory Points:

  • Reduce Empire Force Morale to 0: 2 VP’s
  • Destroy the Empire Engineering team before they can lay the charges to destroy the Comms Array: 2VP’s
  • Kill Darth Vader: 2 VP’s
  • Purchase a Medical Droid from a group of Jawas, to replace those lost in the Rebel’s retreat: 2 VP’s
  • Achieve Luke Skywalker’s personal objective of finding a group of Tuskan Raiders who may have knowledge on the whereabouts of Obi-Wan Kenobi: 2 VP’s

Force Lists

The Empire Force consisted of:

  • Darth Vader (Ranking Senior Leader)
  • Dir Orson Krennic (Senior Leader)
  • Rocket Launcher Team
  • Engineering Team
  • Sniper
  • 3x Sandtrooper Squads
  • Deathtrooper Team
  • E-Web Heavy Repeating Blaster
  • 2x 74-Z Speeder Bikes
  • AT-ST

The Rebel Force consisted of:

  •  Princess Leia Organa (Ranking Senior Leader)
  • Luke Skywalker (Senior Leader)
  • Heavy Repeating Blaster
  • Sniper (Cassian Andor)
  • 3x Pathfinder Squads led by Han Solo, Lando Calrissian and Jyn Erso.
  • Wookiee Squad led by Chewbacca
  • X-34 Landspeeder
  • AT-RT Walker

Game Report

There was no Patrol Phase. All JoPs were pre-positioned.

The town was surrounded by a force field which allowed the passage of lifeforms and machines, but blocked energy, preventing blaster fire into or out of the town.

The were also several “wandering monsters”, a Rancor, a Sandworm, and a Tuscan Raider sniper team, which would randomly move towards/attack the nearest unit. Unfortunately neither the Sandworm nor the Tuscan Sniper activated during the game.


The initial turns saw Luke and a Wookiee team on a Landspeeder dashing along the north edge of the map towards the Tusken Raiders, to ask them about Obi-Wan, with the Empire deploying an AT-ST to try and intercept them.

The Rebels also deployed a Heavy Repeating Blaster team in the cacti in the east, but this was hit by the AT-ST’s mortar, killing one man. Having lost his best friend, the gunner then discovered a hungry looking Rancor had appeared behind him. He managed to move further into the cacti and hide before the Rancor managed to attack him.


Despite repeated AT-ST fire wiping out several of the Tuscan Raiders, Luke managed to obtain the info he needed, completing his objective. He then headed back to the Landspeeder to join the battle.


Meanwhile in the east and west, the Rebels and Empire both deployed squads into the town, and snipers (who were both ineffective) on the corners of the city wall. The Empire also sent a team of Speeder Bikes through the main town entrance.


A firefight between Jyn’s Pathfinder squad and Sandtrooper and Deathtrooper squads went badly for the Rebels, with the majority of Jyn’s squad being wiped out, forcing her to flee.

The Deathtroopers then advanced further east, to try and prevent Leia, leading a Rebel Pathfinders squad and a Wookiee team, who had entered through the NE corner entrance, from reaching the Jawa’s droid shop; and also to shield the route for their Engineers to reach the Comms Array.

The Rebels took out one of the Speeder Bikes, forcing the other to retreat, before charging the Deathtroopers who had positioned themselves within the eastmost market shop.

Repeated Melee attacks within the shop wiped out the Deathtroopers, leaving only their leader alive, who was subsequently killed by Leia in a one-on-one fight (Girl Power!!).


The Landspeeder carrying Luke slowly advanced towards the main town entrance, hitting the AT-ST with its Ion blaster on the way, causing it to be temporarily disabled. Unfortunately the AT-ST managed to fire back before Luke reached the town, killing his driver, and forcing Luke to use his force powers to create a sandstorm screen as protection from further attack whilst they argued over who would drive.


Han led more Rebels into the town in the SE corner, but they were immediately fired upon by the Sandtroopers in the town, receiving heavy losses and shock, forcing them to take cover behind the nearest building.


Dir Krennic soon reached the Jawa’s shop, to begin negotiations for the return of his Probe Droid, whilst his Engineers and their Sandtrooper protection reached the Comms Array, ready to start planting explosives.


The Empire were now close to completing two of their objectives, and with more Sandtroopers entering the town from the NW, they outnumbered the Rebels. With Luke stranded in the desert outside the town, Leia was becoming at serious risk of being captured/killed.

Although the Empire’s Force Morale had dropped to 4, losing them a Command Dice, it was considered that the Rebels were unlikely to complete any more of their objectives and therefore they decided to cut their losses and abandon their mission, ceding victory to the Empire.

Conclusion

An interesting game. The use of objectives and victory points to decide the winner prevented the game from descending into a pure shooting contest.

The Empire deployed Darth Vader early in the game, giving them his extra (Red) Command dice, which helped them rapidly advance into the town and gain a strong position covering the Rebel entry points with units on Overwatch.

The Rebels delayed deploying Leia and her Red Command dice until late in the game, giving them less activations and consequently slower progress into the town. The Rebels also had an objective outside the town, which distracted key units, delaying them from entering the battle. The Rebel main heavy weapon, an AT-RT, was never deployed, and their Heavy Repeating Blaster team never fired, mainly due to trying to escape the clutches of the Rancor.

The Sandworm and Tusken Raider Sniper were never activated, and the Rancor never got to eat anyone (which deeply disappointed Rob).

If the game had continued to an end, it is unlikely the Rebels could have prevented the Empire from destroying the Comms Antenna, or recovering their Probe Droid. And with the Rebels outnumbered in the town, there was a high risk of Leia being captured or killed. Luke may have arrived in time to save the day, but the Empire’s AT-ST was still a formidable weapon which would probably have given the Empire an unbeatable position.

The Force lists and unit stats were those used in the Oozing Lard game (rather than Rob’s latest iteration), and may not have been adequately balanced. This will be addressed in future games.