Wargaming from Hertfordshire & Beyond!

Saturday 20 November 2021

2nd Panzer try to take the Bridge at Celles (again...)

Last night our travel-stained war correspondent reported for duty in a freezing Belgium. The so-called battle of the Bulge is reaching its peak and a crisis for the Allies, as the German lead elements close in on the precious bridges over the Meuse. Battlegroup Bohm of the 2nd Panzer Division has been ordered to break through the allied lines and seize the bridges, in readiness for Kampfgruppe Cochenhausen to advance northwest towards the coast. Facing them are the old Shermans of the 29th Armoured Brigade, 11th Armoured Division who have been hastily rushed back to the front to try and halt the German advance.

The battle commenced with two Panthers prowling westwards across the wintry landscape to the North and South of the Ferme de Mahenne.

The British took up defensive firing positions in the village of Foy Notre Dame and the copse to the south. Phil’s Panther crashed through hedges and took up a firing position facing the village. It was soon engaged by a Firefly with its mighty 17pdr. The result was a miss. The next turn the Panther returned fire. Cue one dead Firefly.

The weaker 75mm armed Shermans retreated into the village hoping to get lucky and find a way of obtaining a flank shot on a Panther.

The second Firefly played hide-and-seek with Greg’s Panther, hitting twice but the Panzer shrugged off the single loss of a temporary dice by judicious use of the “What a Tanker Card”. With the other Shermans trying to hide, Phil’s Panther raced into the centre of the village to kill the remaining Firefly with a flank shot. Ouch!


Matters were looking distinctly sticky for the British. Dave’s 75mm Sherman was next to go as Phil smartly manoeuvred his Panther round one of the buildings to send a round into the rear engine compartment. Boom!

The final action of the evening saw Rob’s M4 with a Panther to its front and another to its rear.

This was never going to end well. Some strange noises coming from St Neots as “Honest Simon” drew the 1st chit of what would prove to be the final turn. Phil’s Panther applied the coup de grace to the hapless British. A 4-0 German victory!

Once again the battle showed the superiority of the German armour. Even the defensive advantage of the British proved to be of no major benefit, especially as the German “fast” attribute let them manoeuvre quite adeptly in the urban environment”.

Simon

Friday 19 November 2021

A taste of 1940's 'O' Group

After being all at sea we decided to return to the land and try out “O Group” again using Phil’s very nice minis and terrain. We played the third scenario from the recently released 1940 Handbook from Reisswitz Press. As we didn’t quite have the correct minis for this scenario we just went with a German 1st rate battalion and a French 2nd rate battalion, both with some support.

The initial French attack on the left and right flanks went well and on the left they managed to get a platoon into the woods on the hill overlooking both the farm and the village of Montcornet. The single German platoon in the walled field next to the farm was looking decidedly outnumbered, although the FOO in Montcornet was doing a sterling job of providing fire support, thus keeping the heads down of the platoon in the field next to the T-junction.


The French advance on the right soon stalled as the Germans deployed the whole company, thwarting any outflanking move. The French pushed their troops forward on the left and managed to push the platoon out of the walled field, although some Germans appeared in the farm and stalled this advance.


Soon the French platoons on their left flank were starting to take casualties and/or were suppressed. At this point the French armour turned up only to be ambushed by a PaK 36. A hit and one severly shocked tank crew. The second tank drove off the road and headed towards the fields. In response the Germans deployed some Panzer IIIs and soon both French tanks were knocked out. At this point the game was called as it was time for me to head back North and the French were looking very unlikely to take their consolidation point and the German armour was looking very menacing.

First game of Kiss Me Hardy

After playing several naval games using the “Black Seas” rules from Warlord Games we decided that we would give the “Kiss Me Hardy” rules from Too Fat Lardies a go.

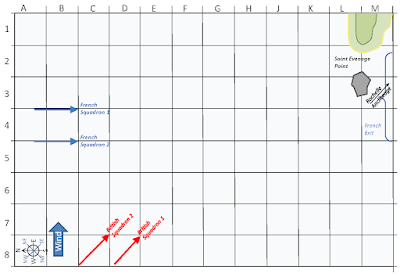
During a mighty storm, the French Fleet successfully broke the Royal Navy blockade and have run South to the protected anchorage of Rochelle. However, the huge 3 decker, Commerce d’Marseille was damaged in the storm and had to take refuge in the bay at Saint Neotee.

Repaired, the big 3 decker is now running South, accompanied by the 3rd Rate Tonnant and two Frigates, Gloire and Venus.

The blockading Royal Navy fleet was scattered by the storm but in the subsequent chase, HMS Victory (100 guns) and HMS Ajax (74) and frigates Shannon (40) and Diamond (40) have located the French laggards and are now moving to intercept.

French Objective: Get the Commerce d’Marseille, around Saint Evenage Point and into the safe anchorage at Rochelle.

British Objective: Sink or capture the Commerce d’Marseille. Sinking her will count as a tactical victory. Capturing her will count as a major British victory.


The French fleet sails South with the frigates providing cover.


The Royal Naval frigates move to intercept with Victory and Ajax standing off.


The Royal Navy crash through the French line, pouring fire into the French, which caused the frigate Glorie to strike its colours.


The Tonnant passed between the British frigates and as they sailed away it turned it guns on the Ajax. Damage was done but these ships are tough.


This left the two British frigates chasing the last French frigate which soon struck its colours. However, the Commerce d’Marseille was left staring at two British ships of the line. It turned West into the wind and was becalmed and broadsided by both Victory and Ajax. Even the plucky Tonnant couldn’t help and at this point the game was called as the French were unable to get the Commerce d’Marseille into port and it was being hunted by two British ships of the line.

An interesting game and very different from “Black Seas” in that the movement was more sedate and generally almost all the shooting was at the masts to try and slow ships down. Similar scenarios using the “Black Seas” rules have seen all the shooting at the hull to try and destroy ships as mast hits are more difficult. We did find some issue with using the turning circles on a congested table but already we are looking at alternatives. All appeared to enjoy the game and it is one that will be played again.

Friday 12 November 2021

Rome teaches Dacia a lesson

With the war correspondent away it was down to his trusty sidekick to take up the typewriter and report on the Roman invasion of Dacia.


The Dacian plan was to hold the right flank behind the river and make the legion come to them, whilst attacking the Auxilia on the Dacian left flank. The Dacian left flank advanced to the river only to find it held by Auxilia and cavalry.


The Dacian cavalry skirmished with the legion, but unfortunately only brought the rubber tipped javelins.

The Roman cavalry attacked on the other flank and managed to get across the river, forcing a warband to retire. The Dacian plan was going awry already.


Especially since Chris had clearly got bored and advanced the Dacian right flank across the river and stared straight at the orderly Roman legion.


With some fine shooting and a bit of luck the Dacians managed to break the Roman line on the left flank.


To help their brothers out the Dacian fanatics attempted to cross the river but the Roman cavalry stood fast and held...


But not for long and we ended up with the unusual sight of a warband chasing the cavalry.


It was starting to look bad for the Romans as the Dacian left flank now turned their attention to the legion. 

However, the Legion marched forward munching their way through the Dacian right flank. Chris possibly now had second thoughts about crossing that river.


The final straw was the Roman cavalry charging down the warband on the left flank, after it had failed in the attempt to drive the cavalry from the hill.


Friday 5 November 2021

2nd Panzer try to take the Bridge at Celles

We played another game of What a Tanker during the 1944 Ardennes offensive with Kampfgruppe von Bohm hoping to take control of the bridge at Celles. However, the British 29th Armoured brigade had other ideas. After abandoning their new toys (Comets) they jumped back into their trusty Shermans.


The British deployed from the North West hoping to cut of the Germans advancing towards the bridge from the East. The British Cromwell and a Sherman raced down the road to take position covering the bridge and the road through Celles, whilst the Firefly and a Sherman headed east to try and get flank shots into the advancing Germans.


The Stug poked its nose around the bend in the road, which drew attention from the Cromwell. First round away and suddenly there was smoke pouring out of the Stug. Strike one to the British.


With the Firefly having no target it now moved to the South to try and outflank the second German tank which was prowling to the South of Celles. The Cromwell crossed the hedge and poked its nose around the corner of the building, only to find itself staring straight at a Panther...

Quickly the driver found reverse and got out of the firing line. However, the Sherman behind the hedge was not so lucky and took some damage from the Panther. With the Firefly advancing to the rear of the Panther the commander decided to charge the British. Unfortunately this didn’t end well with the Sherman getting a flank shot and the Cromwell firing into the rear. Scratch one Panther. Thus ended the German Ardennes advance.