Wargaming from Hertfordshire & Beyond!

Wednesday 28 June 2023

Mistle & Oak – Part 1 (An Infamy battle)

Septimus had known this was going to be a fool’s errand. “Follow the stream and scout-out the shore-line”, the Legate had said! “The British won’t be expecting us”, he had also said!. Well two of his lads were now dead as a result, along with four Auxilia troopers and eight of the Auxilia archers were missing! For what? OK, he had counted at least eight dead British warriors and his archers appeared to have accounted for at least as many of the damned British slingers, but they were still no closer to knowing the British strength along the shoreline.


Why had he allowed the Legate to persuade him to follow the stream? It had just divided his forces. Initially things had looked good. A decent show of force had caused one British Warband to pop-up in the hills to the East, jeering feebly from their hilltop. His archers had driven off one group of slingers, scouted the wood to the North of the ford, thereby allowing his legionaries to cross the ford and head toward the single native hut. However, another group of slingers had then popped-up to the rear of his legionaries, but these too were quickly dealt with by his archers, dashing to the other side of the wood and peppering this new group of slingers with very well placed arrows.


In the South, the first warband had finally lumbered off the hill and down into the auxilia. The fight looked tough, but manageable, but then another Warband started to filter down through the trees, to the North of his legionaries, scattering his archers, This forced him to deploy his legionaries into close order line, shields braced, facing this new threat. But just as Septimus thought that this was going to be just another tough day in the legionary meat grinder, a group of British cavalry appeared far to his rear. They splashed across the stream, weaved magically through the marsh, bordering the stream’s Southern bank, then crashed into the rear of the auxilia, breaking their ranks.


So, next time Septimus would do it his way. Not follow the stream, but maybe use it to properly screen one of his flanks. He’d also take another couple of auxilia units, or maybe some cavalry, to better scout out the terrain ahead of him. These British bast**ds would not get the better of Septimus again!?

One thing he did reflect on, was just how slow the British seemed to react to the Roman movements?! He was sure that as his legionaries had surged across the ford, he had heard distant native wailing. It sounded like, “Not another frigging Tempus Fugit….. the Gods must be against us!”. Very odd!?

Wednesday 21 June 2023

Escape from Stalingrad Z

Allegedly Greg saw this game advertised as being available at UK Games Expo and immediately thought 'Chris will be buying that'.   Apparently he knows me well as having had a play test of the game I did indeed return with a copy of it (along with a few other things, but that's another story).

Escape from Stalingrad Z by Raybox games

The game is the latest in the Weird War 2 category with the backdrop of the grim battle for the battle of Stalingrad becoming even worse than it was  by the dead coming back to life.  The game doesn't fall into the trap of trying the explain why this has happened instead presenting a first had account based on one of the soldiers involved.  What makes this game unusual is is also has a campaign system based on a series of campaign maps that your character or characters try and work though to escape.  Unsurprisingly perhaps, when surrounded by hungry walking corpses, the living German and Russian forces decide that fighting each other is no longer their priority and join together to escape the dead.

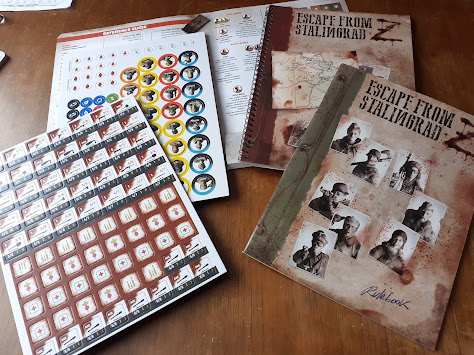
The game comes in three distinct levels.  Firstly the most basic level comprises a slip case containing two booklets (The Rules and the Scenario book) and two sheets of card counters representing your characters, zombies, items, weapons, food, ammo and first aid kits as well as some markers and six standee doors.  The inside of the slip case also doubles as a Quick Reference sheet.

The components of the basic version of the game

This contains almost everything you need to play the complete campaign and while a little rudimentary the components are high quality and the artwork perfectly acceptable.  You will need to supply your own twelve sided dice (or use a suitable phone app) and have a paper and pen to keep track of your characters wounds and fatigue, but that's all.  The counters are heavy stock cardboard and will survive a lot of game play.

If you fancy spending a little more the game also comes in a boxed set which includes all the above components (literally the slip case is in the box) together with 8 character dashboards, dice, two more sheets of counters and cardboard standees of all the characters and zombies along with plastic stands for them and the doors from the original set.  There are also coloured markers for tracking wounds and fatigue for your characters.

Additional components from the boxed version of the game

If you fancy using miniatures rather than the standees then these are also available and looked to be good quality metal sculpts, but with a lot of 28mm Weird War models already in my collection I decided to stick with the boxed version.

The scenario book contains all of the scenarios you will play in your quest to leave Stalingrad with 48 different games in total, although you will not have to play them all as there are a number of routes out.  The scenario book is spiral bound allowing you to lay it flat with the scenario rules and instructions on the left and the map on the right.

The Stash Scenario set up and ready to play - just add your characters on the squares marked 'A'.

The game is perfectly suited for solo play with the zombies moving with a fairly basic set of rules - but then they are zombies, tactical finesse is not expected.  Alternatively it can be played cooperatively with each player taking a character.  Eileen and I both tested the basic scenario at UKGE with the characters having to collect a knife and possibly a pistol before escaping the board.  Even for the first mission it was challenging and I just managed to escape the board with the knife and pistol in my possession.  Eileen managed to get both items but got swarmed by the undead before she could escape.

Following our return Tony popped over for a game and managed three scenarios in an evening including learning the game, finding his favourite weapon before getting trapped in a room surrounded by zombies and getting killed attempting to get out.

Overall the game plays pretty fast and with 8 starting characters to choose from has a good amount of replay-ability considering the number of available scenarios to work through.

Tony is planing to return so we can try a co-op game.  Once that is done a further report will follow


Chris

Sunday 18 June 2023

Honours of War

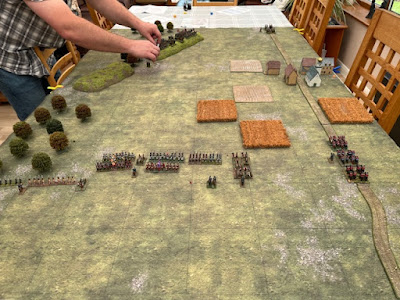
Saturday saw my third game of the week. Greg and I decided to dust off my thirty year old 15mm Seven Years War armies and try a bit of old-school gaming using Osprey’s “Honours of War” rules. I had devised a semi-fictitious scenario pitching my French vs the Prussians. Historically they only met once in a major battle, being the heavy French defeat at Rossbach in 1757. Hence, I devised a scenario set during the lead up to Rossbach with a numerically superior French force trying to push through a Prussian blocking position.

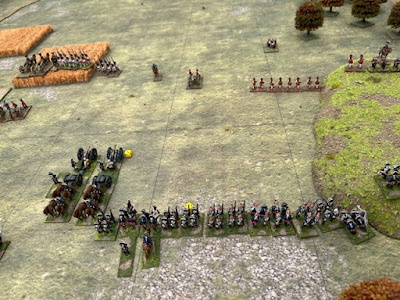
The French had four brigades being light infantry on one flank and cavalry on the other, with infantry and artillery pushing through the centre.


The Prussians matched the French cavalry and decided to take the French infantry head-on leaving the French lights to wander around the woods.

Under Honours of War a key element is the influence of the Brigade Commanders. These are rated from “Dithering” to “Dashing” and on a die roll can end up doing nothing to being inspired and making double moves. Unfortunately, two out of four French Brigadiers were rated as “dithering” which seriously undermined their battlefield effectiveness. Hence the French artillery and light troops hung back leaving the infantry to march into the teeth of the Prussian infantry defensive line.

Firing and melee uses system akin to TFL’s shock, albeit in Honour of War no figures are removed. The battle for the centre saw the French infantry comprehensively destroyed by the Prussian artillery and musketry.

In return the French broke one Prussian infantry regiment and forced back the cavalry.


I conceded the game when it was clear the French centre had disintegrated and the cavalry failed to make the desired impact. It was only a matter of time before the French army reached its “break point”.

We both enjoyed the game. As with any Osprey set of rules there are a few issues, but I think this is one of their better sets. The rules are simple enough to handle “big battles” but to my mind have enough period flavour. I have found an active “Test of Honour Forum” which (a) shows there is a loyal cadre of players and (b) contains some useful stuff such as an improved QRS specifically for 15mm figures, scenarios and answers to rules queries etc etc. Tony has Austrians and Chris is slowly building a Russian force. Maybe we will see some Prussians vs Austrian/Russian action one day soon. I am almost inspired to build a British/German allies army to take on my French or a crap Reichsarmee force to ally with the French or Austrians.

Simon

Friday 16 June 2023

Dave's Double Disaster

Thursday June 15th 2023 was, to quote FDR, “a day that will live in infamy” for Dave. He ventured from his northern lair to have a double-header of games, the afternoon being a “For King and Parliament” ECW game against myself, and the evening being a Sharp Practice AWI game also featuring Chris and Greg.

The ECW game used the first scenario from “Marlowe to Maidenhythe” fictional campaign book, with Dave taking the dastardly Parliamentarians and myself the dashing Royalists. Due to the authors table lay-out being a rather odd 6 x 5 or 12 x 10 grids we omitted both baselines and hence most troops deployed off-table. The Parliamentarians deployed with their cavalry force on their left wing, and their infantry in a maze of hedges centre and right. The more numerous Royalist cavalry were split between the flanks with the infantry to push up the centre against the enemy infantry behind the hedges.


The Royalists advanced with both cavalry wings,

but the infantry held back. Clearly they didn’t fancy attacking the pike-heavy enemy behind the hedgerows. Dave’s forces stood on the defensive but soon found their ability to manoeuvre against the developing Royalist attack compromised by the terrain. The Royalists quickly managed a cavalry flank attack on an exposed infantry regiment and it broke and fled. Shame that the Royalist cavalry then turned and raced towards the Parliamentarian table edge in search of the baggage train. On the Royalist right wing things were more even as three Royalist “Swedish” units took on two Parliamentarian “Dutch” units.


Both sides eventually lost a unit but Dave’s “gallant Commanding General” Sir Christopher Grey was mortally wounded when he drew a one for “officer wounded” and then a ten” for “effect of the wound”. This one action meant his left wing was now out of command. From then on it was just a matter of time. The Royalist foot took heart at the sight of the cavalry’s exploits and finally advanced in line towards the enemy position.

The Royalist cavalry moved to threaten the Parliamentarian flanks and the response exposed their infantry to withering flanking fire. Suddenly the Royalist cavalry charged back onto the table straight into the rear of luckless Parliamentarian infantry. The battle was decided when the Royalist commander Sir John Boulters turned his rather tardy cuirassier regiment and managed a flank charge into the remaining Parliamentarian left wing cavalry unit.


We both think we got most of the rules right despite not having played them for maybe nine months or more. They seem to give a good, fun ECW battle. The Parliamentarians were “up against” it from the beginning partly due to the scenario deployment, and hardly laid a glove on the Royalists. Maybe Scenario two will be different?

The AWI game was based on a “Sharpe Practice 1” scenario called “Tarleton’s Quarter”, which Dave adapted for use with SP2. The game saw Dave and Greg take the British and Loyalists who were tasked with raiding a farm, which was defended by Chris and myself with a force of defending local partisans and a force of Continental troops marching to help them. The British and Loyalists advanced rapidly onto the table with the British regulars marching straight up the road towards the centre of the farmstead, with other troops fanning out to burn crops and outflank the rebels. Chris gamely advanced his militia to meet the regulars knowing that they were all there was to defend the farm. There was no sign of the Continental troops. Chris managed to form his troops into a ragged firing line facing Dave’s regulars. Dave decided against using cold steel and instead fired, with little effect. Chris replied and we found that his musketballs were nuclear tipped. Carnage ensued. The battle continued until with four flags Chris managed a second volley of 20 dice. This did for the British who with leaders down started to pull back and take hits to their morale.

The British flanks began to threaten the Rebels,

but they in turn found Continental troops and more rebel skirmishers starting to arrive to fight them.


More nuclear-tipped dice from Chris saw the regulars break and the two units of Continental light infantry skirmishers pour fire into Greg’s Provincial Regulars, who in turn pulled back.

With the British mission obviously a failure Dave and Greg retired from the field leaving the victorious rebels to scour the field for souvenirs.

Although it galls me to admit it, the game was won by Chris’ militia with their near miraculous musketry. The two British regular units were hors de combat before any other British units were able to lay a glove on any Rebels, and that proved the pattern of the evening. Chris dice will be subjected to “drugs testing” as their performance was outstanding but as they are owned by “honest Simon” I am sure they are “clean”.

I think that will do for today.

Simon

Friday 9 June 2023

What a Cowboy - For a Few Poker Chips More

This was a variation of John Savage’s, “For a few poker chips more” ’King of the Hill’ style scenario, published in WSS#125. Set-up was as for John’s scenario, but alongside the central target building, was a wagon. This wagon contained the ‘gold’. At the end of each turn, the character closest to the wagon, with LOS to the wagon, would earn $10. Players would also earn $ for other characters taken out of the game ($10 for a Greenhorn, $20 for a Shootist, $40 for a Gunslinger, doubled if taken out by a lower grade character).

The Stars of our show were,

·        Gripp Tightly, Greenhorn – Chris

·        Cliff Hanger, Gunslinger – Simon

·        Will Cody, Shootist – Greg

·        Kit Bash, Shootist – Tony

·        Ben Wade, Shootist – Phil

The game opened with Will making a dash for the stables, to the North of the village square, where he could take-up a commanding position on the roof, using his trusty Winchester and Marksman skill.

Gripp tried to slide down main street, from the East, only to get shot by Will, from his vantage point on the stable roof. Gripp ducked back into cover, nursing a bullet hole in his arm. Next Ben made a dash from the South East, skidding into the central building, only narrowly being missed by rounds from Will’s rifle. This now left Ben cashing-in $10 a turn, for being closest to the wagon.

While all this was going on, Cliff slipped into the back door of the stable. He toyed with a Trick Shot, into Will, up on the roof above him, but instead shouted up to Will, to make a deal. If they joined forces to get rid of Ben, they would split the loot. This left Ben dodging bullets from both Will’s rifle and Cliff’s Peacemaker. Things were getting hot for Ben!

Meanwhile, Kit had worked his way up from the South West, along the South side of the Church, to overlook the stable. A couple of shots from Kit caused Cliff to duck back into the stable arches. This opening allowed Ben to sprint across to the wagon, partly negating the range advantage of Will’s rifle.

After a furious exchange of fire, Kit sprinted from the church, skidding-in alongside Ben at the wagon. Kit’s ability to dodge bullets was fast becoming legendary!! While dodging bullets, Kit also manged to wing Cliff, causing him to duck back into the stable. This was the only opening Ben needed, he leapt the trail of the wagon and sprinted for the stable, sliding into the stable archway, gunning Cliff down, as he was recovering his wits!

This just left Will on the roof. While Will was still taking pot shots at the crazily dodging Kit, Ben slipped up the stairs of the stable and loosed off a couple of point-blank range shots at Will. Drat, missed, Ben cursed and dropped back down the stairs.

Will was clearly unnerved by this, but peered out again, to locate Kit at the wagon, but was puzzled to see another figure (Bronco Billy, Cliff’s alter ego!), now blazing away at the jinking Kit. Hah, thought Will, at least I can get rid of one of these varmints! However, as Will took careful aim at the jinking Kit, Ben leapt up the stairs again, to blast a couple of close range shots at Will. One winged Will and he jumped back, to avoid the second. Disaster!! The edge of the roof was the only cover. Will jumped over the edge of the roof, but landed badly, putting him out of the fight.

We called it a day there. Ben had earned nearly $150 and held the high ground! Ben was happy to share the loot with Kit and poor Gripp could only look on, nursing his wounded arm.

Excellent set of rules Mr Savage, now where is "What a Cartel"!?!

Thursday 8 June 2023

She was only the Magistrates Daughter

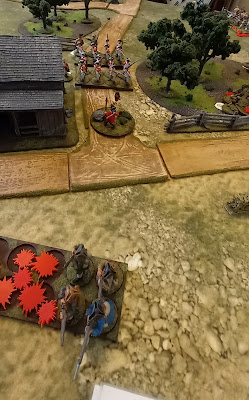
The game scenario was taken from the Too Fat Lardies magazine article, entitled, "She was only the Magistrates Daughter". This was a game of Sharp Practice set the South during the American War of Independence. Both Captain Henry Brown of the Patriot Militia and Captain John Cornwall of the Loyalist Militia were smitten by the Magistrates Daughter (Miss Elizabeth Stockwell) and were resolved to "rescue" the fair maiden. The Crown forces were to deploy from point A with the Militia deploying from point B. The Patriots deployed from point C but also had a moveable deployment point. Both forces were heading to the Stockwell house, point D.


The Patriot Militia deployed into the woods in an effort to race for the Stockwell house.

Whilst the Continentals marched up the road hoping to capture the Crown deployment point B at the T junction.

The Crown forces, fearing that the Continentals might stop them from using their forward deployment point, used their command flags to deploy the Militia.

However, The Patriots managed to move a deployment point next to the house at the T junction and deployed their Light infantry skirmishers into the house. With a restricted arc of fire only a few of the skirmishers were able to fire and only killed a solitary Loyalist. The Crown forces deployed their Line and Light infantry North and South of the road respectively.


The Continentals deployed into line and a firefight was initiated between them and the Crown Light infantry.


However, the Light infantry was not having the best of this and soon was forced to take cover behind the nearest house.


Meanwhile, the race for the Stockwell house was on with the Patriots heading for the front door and the Loyalists making for the rear door.


The British column of Line was slowly advancing.

Serjeant Hale had at last sorted out his Light infantry and started to advance down the road.

However, The Patriot Light infantry had other ideas and poured lead into them.

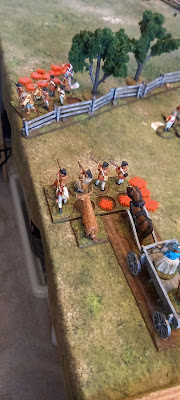
Serjeant Hale ordered his men over the fence and into a nice firing position.

Poor Smithers took a shot to the head and was killed instantly. Serjeant Hale looked over and was cock a hoop as he could now merge the two groups into one.

The British dice rolling was much better than the poor Patriots and the Continental Light infantry were soon driven off leaving behind their dead Serjeant. Meanwhile, Captain John Cornwell had managed to rescue Miss Elizabeth and Daisy the cow, whilst the Patriots were attempting to batter down the front door.

In a moment of madness the Patriot Militia fired upon the retiring column, managing to wound poor Miss Elizabeth.

With fury in their eyes, The British deployed into line...

and charged the Miltia, almost completely wiping them out and capturing Serjeant Holmquist.

Captain Henry Brown hoped to sneak past the British line but was attacked in the flank, with his Militia routing and ending up as a captive of the Crown. Things were not going to plan for the Patriots.

The Continentals headed up the road hoping to prevent Captain John Cornwall making off with Miss Elizabeth.

However, the British Line came charging up the road taking the Continentals in the flank.

The melee was brief and bloody with Captain Ivor Singleton dying on the British bayonets. At this point what was left of the Patriot force retired from the field, licking their wounds, whilst the Crown forces held a court of enquiry to establish the guilt of the two captive militia officers.