Wargaming from Hertfordshire & Beyond!

Saturday 26 February 2022

Kiss Me Hardy: Small Ships Scenario – “Spring Blownapart”

 A small ships scenario, using Chris Stoeson’s, “To Covert Glory” KMH adaptation.


Commodore Roberts viewed the Isle of Elbow with some unease. The French fleet was already here and no doubt, the Terror of Europe, Nathan Blownapart, was already in a boat, headed out to the small French fleet, to make good his escape.

Roberts despatched the Schooner Sealark, round the East of the island, while the rest of fleet, comprising 26 gun frigate, Surprise and 12 Carronade Brigs, Defender & Growler, went around the West of the island, to head off the escape of Blownapart.

As Sealark rounded the Eastern headland of the Isle of Elbow, she could see the French Brig, Pandour and Schooner Vigie, attempting to rendezvous with the small boats carrying Blownapart. Just to the North of these ships, Sealark could also see the French 26 gun frigate Nemisis and 14 gun brig Genie, pulling ahead, Westward.

Sealark could not believe her luck, as Pandour and Vigie, continued to drift Westward, as they struggled to get Blownapart safely aboard. Sealark closed and turned, to pour two devastating stern rake broadsides into Vigie, causing her to haul out of line and strike her colours.

Meanwhile the frigate HMS Surprise and the French frigate, Nemisis, raced for the rocky outcrop, to the West of Elbow. Neither won the race and they both turned South Westward and started to trade broadsides, with Nemisis coming off worst from the exchanges.

While the bigger frigates traded hammer blows, Commander Davis, with Brigs Defender and Growler snuck between the stern of the frigates and the rock West of Elbow. This left the single French brig, Genie facing down two carronade armed brigs. Some fine seamanship allowed the RN brigs to pass the French brig at close range, delivering eight 18 pound carronades, at short range, leaving Genie a sinking wreck. 

Defender and Growler turned then their attention to the escaping Pandour. If Pandour got away, all would be lost, as Blownapart would be free to return to Europe.

However, Pandour had not escaped undamaged, Sealark was in pursuit and had landed a few blows, before Defender and Growler took over the pursuit. Sadly Pandour was both out of range and out of arc of their powerful carronades, but they each still had a pair of 6lb bow chasers, which they unleashed. To their surprise, Pandour hauled down her colours! Clearly Sealark and long range fire from Surprise, had done more damage than was first obvious.

So, Blownapart was hauled back to the Isle of Elbow and peace restored!  

Thursday 24 February 2022

Star Wars - Scenario 11 Battle Report – Battle For Endor

Having forced the Rebels to evacuate their primary base on Endor (in the previous game), the Empire are planning to send a small occupation force in to take control of the abandoned facility, seeing it as a vital strategic objective.

The Rebels are determined to stop this from happening, and are mounting a counterattack to force the Empire out of the area, and hopefully allow them to reoccupy the base.
 
THE PATROL PHASE
 
Both sides entered the table in the eastern sector, and slowly advanced their patrols towards the landing pad. The Rebels managed to place a Jump-Off Point close enough to allow deployment onto it, with two more placed in the woods and hills nearby. This was expected by the Empire, who spread out their JoPs to surround the Pad. 

Disappointingly, both sides ignored the western half of the table, despite the availability of toilet facilities in the barracks.

FORCE SUPPORT

The Empire brought a couple of Probe Droids with them, hoping to push back or remove some of the Rebel JoPs. However, these were not deployed.

Both sides decided to deploy a Forward Observer and Barrage. The umpire was therefore expecting a long game, as both sides sat in smoke wondering what was happening.

OBJECTIVE

To win a victory, one side must force his opponent to withdraw from the table, either voluntarily or due to a reduction in his Force Morale, whilst keeping his own Force Morale at 3 or greater. Nothing too difficult there.

With both sides having the same starting Force Morale the Rebels were selected as the active player in the first Phase of the game.
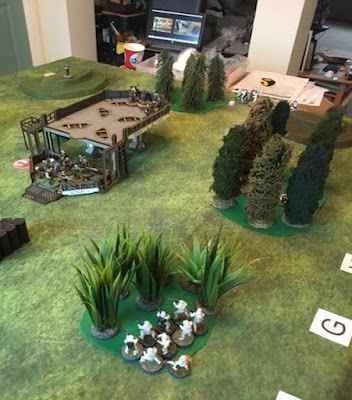

BATTLE REPORT

As expected, the Rebels deployed a squad of Troopers on to each level of the Landing Pad, Luke joining the Troopers on the lower level, with a Forward Observer deployed on the nearby hill. 


The Empire responded, deploying Stormtroopers on the east edge of the board, and in the cacti, west of the Pad. The Rebels tried to bring down a barrage on the Stormtroopers in the east, but their ranging shot was way off target, landing on the Pad. Luckily no one was hurt.


Two separate firefights had now broken out. One between the Rebels on the upper level of the Pad and the Stormtroopers in the east. And one between the Rebels on the lower level platform, which they elevated to improve their LoS, and Stormtroopers to the west, which had advanced towards the Pad. These were reinforced with another squad of Stormtroopers and Darth Vader. The Rebels on the west of the Pad took considerable casualties, with the remaining 3 Troopers breaking and abandoning the Pad. A couple of shots would have hit Luke had he not been able to deflect them using his lightsabre.


The Empire also took some casualties, with the Stormtroopers in the east becoming pinned. A squad of Shoretroopers, armed with a light mortar, deployed into the wood to provide additional firepower. The Empire also deployed their own Forward Observer. Which side would manage to call in a barrage first?


The answer is the Empire!

The Rebels took several more casualties; their morale was steadily dropping. Under cover of the barrage, Luke and the remaining Rebels on the Pad decided the time had come to abandon it and “head for the woods!”. More Rebel Troopers were deployed in the nearby woods and on the hill. The battle was becoming more balanced. Or was it?

The Rebels continued their advance into the woods. Unfortunately, one team, pinned in the open by the barrage, was abandoned by their comrades. Not very “Rebely”.


The Empire started to move their barrage towards the woods that were now refuge for Luke and most of his force. The Rebel barrage eventually arrived, resulting in most of the battlefield now being shrouded in smoke.


The Empire, having acquired a CoC dice, decided to end the turn, removing both barrages. The centre of the battlefield now looked rather empty, apart from several trampled dead Rebels.


Long range firefights commenced, with the Rebels taking the worst of it, with more squads taking losses or breaking. Luke was again forced to rely on his lightsabre for protection, this time managing to deflect a shot, taking out the shooter.


The Empire were also taking casualties, with their morale quickly dropping to 4. Could victory slip from their hands? No. The Rebel’s morale was dropping even faster, and soon hit zero. Game over. Another Empire victory. (Play music).


ANALYSIS

The Rebel’s decision to deploy on the Landing Pad didn’t really work for them. Despite the hard cover it provided, they were quickly outgunned by the Empire and started to take heavy losses. Maybe they should have deployed more units on it to take full advantage of its central fortified position. However, that would have potentially made the Empire’s early barrage much more decisive. One big game changer was the Empire’s repeated rolls of double 6’s on their Command dice, giving them 2 or 3 consecutive turns. This they used to good effect and was the key to them ejecting the Rebels from the Pad. Once on the run in the open the Rebel’s advantage was lost. Although both sides had selected a barrage, the Rebels failed to deploy theirs early enough in the game, and paid the penalty.

This could be the first game of Star Wars CoC that we have actually completed. This is probably a combination of better familiarity with the variances of the game, reduced Platoon sizes, simplified unit stats, and of course, lucky dice rolling by the Empire.

“All Hail The Emperor!”

Rob

Sunday 20 February 2022

Big Cat Hunting

Racing from the 4th century AD to August 1944, our overworked correspondent found himself in the small French village of St Evenage Sur Dives. The Allies have finally broken out of Normandy and are sweeping South-West to try and entrap the bulk of the German army. A reinforced Sherman troop from the 4th Canadian Brigade were under orders to take the village and its stone bridge to both prevent its use by the retreating Germans and also allow allied armour to continue the advance in the area. Facing them were Panzers from 2nd SS Panzer Division with orders to hold the village.


The Canadians came on with an M4 in the lead,


and the Firefly holding back in cover. The Achilles, wary of its paper-thin armour also held back looking for targets. The second M4 and Stuart started to advance through the Southern area of the village accompanied by an infantry patrol. The Tiger I started to roll forward along the Northern edge of the table, whilst the Stug took up position near the Northern end of the Bridge. Hidden behind hedges and “low profile” this German proved very difficult to spot. To add to the Allied dilemma a German patrol also pushed into the village.

Things didn’t go well for Phil’s Sherman as it rolled through the cornfields towards the Tiger. However instead of succumbing to an ’88 shell, the 75mm L48 of the Stug tried a long-range shot. Result another “Tommy Cooker”.

With both infantry teams identified and the location of both German tanks now known, the Allies started to move their vehicles North. Tony’s M4 Raced into the open to try a flank shot on the Tiger, but the “heavy armour” proved its worth. Caught in the open Tony’s M4 proved the Ronson motto...” It lights first time”.


Phil’s Stuart began a cat-and-mouse game with the Stug which had ventured out of its riverine lair to help the Tiger. Racing through the rubble Phil managed a rear-shot which removed 1 dice, but the Stug is a tough old beast. Back in the North the Firefly and Achilles gingerly approached the Tiger and traded shots. Rob suffered two temporary damage but without playing the German WAT card it could have been even worse. With only 4 dice he found it hard to target the Canadian armour as they lurked in the rubble and woods.


Chris decided not to help his feline partner and instead concentrate on hunting down Phil’s mighty Stuart. Phil responded with a “fast” move that saw the M5 roar over the stone bridge and hunker down behind the “hump-back”.


At this point it was decided to “call it” as a draw. The British had the objective but both German Panzers were still operational, even if the Tiger was “on the ropes” and may have succumbed in further turns.


Everyone seemed to enjoy it and once again we saw the advantages of the Tiger 1. However as Phil put it, “all the German eggs are in one basket and it only takes one lucky shot”. For the Canadians the lucky shot proved elusive.

Simon

Honours of War; Game 2

Sunday saw the second run-out of our refurbished Seven Years War armies, and Osprey’s “Honours of War” game. Although a fictitious scenario the battle was set the day after the battle of Leuthen in December 1757 where Frederick of Prussia has decisively defeated the Austrians commanded by the Archduke Charles. The action saw the Austrian rearguard trying to hold off the Prussians to allow the remains of the field army to escape intact to Breslau.

The Austrians set up holding a line between the villages of Rathen and Sahra.

The Prussian mission was simple, break the line. The armies set up with the two lines of infantry facing each other and the cavalry also facing off.

The Prussians as attackers set off at a smart pace but were soon under artillery fire, and had no reply. They just had to take the casualties.

The Prussian cavalry attack saw one regiment retire as the combination of Austrian cavalry and artillery fire took its toll.

The Prussian infantry marched stoically forward as Tony tried in vain to relocate his artillery on the flank.


Back with the cavalry the Prussians secured a decisive advantage as they broke two Austrian regiments in quick succession aided by the harassing fire of a Freikorps regiment who had taken the village of Sahra. The fourth Austrian cavalry regiment retired badly battered but just about still in the fight.

The infantry battle however went badly for the Prussians. The charge of the left flank Brigade into the Austrians went disastrously wrong as the infantry fire took its toll and then the melee saw them break.


At that point we called it a day. The Prussian cavalry on the right were victorious and the centre “superior” infantry Brigade largely intact. The Austrians still had two infantry Brigades largely intact albeit one was “inferior”. We decided it was an honourable draw.

So, what did we think of the rules? Fairly simple but with some nice touches of “national characteristics” and added “friction”. I have written my own QRS which translates everything into inches and distances for 15mm figures, and some more work is needed on this. I think the key will be in setting challenging scenarios for the period. All armies are pretty similar despite “national characteristics”, so just setting up equal points armies across the table will be a less-than-satisfying experience. However, if this means our twenty-five year old armies finally see some action I for one will be more than happy.

Simon

Friday 11 February 2022

Adrianople Avenged....or Not? Take 2

After a few days enforced R&R due to close-run-COVID incident caused by a Frenchman, our reporter once more headed to the North-East Balkans. Rumours were rife that the Goths were itching for revenge following their hammering by the Romans two weeks ago. This time Rob played the role of Roman Magister Militem whilst Phil assumed the Gothic Kingship following the untimely death of his predecessor following the last battle. Apparently the unfortunate died of his wounds and a mysterious large cut to his throat...

The Romans deployment was “interesting”. Light cavalry and Auxilia comprised their left flank with a legionary heavy centre, and cavalry also in the centre and right wing advanced in front of the Legions. Either inspired on insane, time would tell. The Goths deployed with an infantry heavy right and the cavalry left and centre.


The Romans advanced quickly with a general advance along the line. This reprised the tactics of the previous battle. The Goths responded in kind in particular pushing up their archers on both flanks. However the Roman plan quickly began to founder. The Cataphracts founds themselves in front of a marsh, and the core of Legionaries found no way past their cavalry brethren. The Goths struck on both flanks killing light cavalry with archery, and slowly began to pin the Romans down.

The Romans managed to inflict a few disorders, but landed no killing blows. In return the Gothic cavalry hurled javelins killing Auxilia in the centre tearing a hole in the Roman line between their left and the centre/right. Additional disorders caused by morale checks only added to the Roman misery. With their Legionaries impotent behind their cavalry they slowly tried to extend and re-order the line to cover more territory but too little too late.

More Auxilia died on the Roman left in a hail of light infantry archery, and on their right the most advanced... and exposed... Legionary unit died in a frontal and flank charge by two Gothic cavalry units.

The end was not far off as more Roman gold poured into the Gothic camp.

Dave then charged three cavalry units through the gap in the Roman centre. Tony replied with a blocking move by light cavalry archers but in vain.

Dave’s cavalry surged into the Roman camp and claimed victory.


A complete reversal of two weeks ago. A 12-0 victory to the Goths. In fairness the chits did favour the Goths. I have never seen a light archers unit inflict two disorders and kill a unit in a single move before. But c’est la vie as a COVID-infested Frenchman might say!

The Roman tactic of placing his Legionaries behind the cavalry backfired, as they were largely ineffectual yet comprised 30% of the overall Roman combat power. Rob claimed he didn’t know that they were “Legionaries with extra bow”, which may or may not have been true. Rumour has it that the Gothic feasting continued long into the night. Or was that just the rustling of crisp packets at Fort Banks.

Simon

Saturday 5 February 2022

Star Wars Chain Of Command - Evacuation Of Endor

The Empire is steadily advancing towards the Rebel base on Endor. 

Accepting eventual defeat, the Rebels have started to evacuate the base. There is much to evacuate and time is running out as the Empire’s force is getting closer. To buy more time, a small Rebel force has been deployed to try and intercept and delay the Empire.

To win a victory the attacker (Empire) must capture the Rebel Landing Pad and hold it until the end of the Turn. Any other result is a victory for the defender (Rebels). 

Phil and Dave took the role of the awesome Empire. Mal & Steve played the snivelling Rebels.

The Patrol Phase didn’t go too well for the Rebels, with the Empire managing to place a JoP in the woods to the north of the Rebel base. The Umpire (a totally unbiased Rob) was expecting this to be very a quick game.


The Empire activated first, deploying a squad of Stormtroopers behind some handy Cargo pods, within sight and 24” of their objective. No Rebels in sight. It must be an easy Empire victory.


Unfortunately not! The Rebels responded by deploying a squad of Troopers and Luke behind hard cover on the elevating platform of the Landing Pad. These were placed on Overwatch to try and deter the Empire from charging in. The Empire’s objective has suddenly got a bit harder.


To strengthen their attack, the Empire deployed another squad of Stormtroopers in the woods near their first squad.


Followed by their AT-ST at the West end of the table. The Rebels were starting to look considerably out-gunned.


Having got a double activation, the Empire deployed another squad to the West of the woods, and Darth Vader plus his Comms Officer in the woods. Taking the Comms Officer as a support option allowed Darth to remotely activate the AT-ST, significantly increasing its effectiveness. A Forward Observer also arrived on the scene, and a barrage was requested.


Feeling distinctly outnumbered, the Rebels deployed a squad of Troopers in the cacti grove West of the Landing Pad, on Overwatch, and their Rebel Pathfinder Special Forces, with its anti-armour capability, into the woods to their South.


On the Empire’s turn the barrage started, with a direct hit on the troops on the Landing Pad, pinning them in place, and providing a smoke screen for the Empire to advance a squad towards the Rebels troops in the cacti grove, and another squad towards the Landing Pad.

The Stormtroopers charged into melee with the Rebels in the cacti, but unfortunately came off worst, taking heavy casualties and being forced to retreat. But Stormtroopers are expendable!

Meanwhile the AT-ST steadily advanced into line of sight of the Rebels.


The Rebels raised the Landing Pad’s loading platform, giving Luke and hid squad of Rebels an elevated view over the base, albeit partially obscured by smoke. If only the barrage would end!

The Rebels also deployed an additional squad of Troopers to reinforce those in the cacti, and its RPS-6 Rocket Launcher team to try, unsuccessfully, to stop the advancing AT-ST.

In response, the Empire deployed a replacement squad and an HH-12 Rocket Launcher team into the now congested woods, and opened fire with the AT-ST’s 16 dice firepower. The Rebels in the cacti started to take heavy losses and shock.

The barrage continued to cause shock, but no kills, on the squad on the Landing Pad, and obscure their LoS, reducing their effectiveness at delaying the Empire’s advance.


The Rebels eventually managed to accumulate a CoC Dice and end the turn and barrage.

This brought the troops on the Landing Pad back into action, and from their elevated firing position, rained fire on the now exposed Stormtroopers, further stalling the Empire’s advance.

The Rebel Pathfinder Special Forces, which had been picnicking in the wood, slowly advanced towards its edge and targeted the AT-ST with anti-tank fire, but with no effect.

 
The Stormtrooper squad, now under fire from the Landing Pad, diverted to engage the Rebels in the cacti, and gain some cover. The ensuing melee causing small losses to the Empire, with the Rebel squad being wiped out. The Rebel force morale was now on five, with the Empire still holding strong.

With gaming time having run out, and with the Rebels still having two intact squads on the table and one squad left to deploy, a draw was called. Although the AT-ST could still have brought victory to the Empire.

Rob