Wargaming from Hertfordshire & Beyond!

Saturday 26 March 2022

Star Wars - Scenario 12 Game Report – Search For The Kyber Crystals (or Darth Vader’s Bad Day Out)

During the battle over the Forest Moon of Endor, the Rebels destroyed several ships from the Empire’s fleet, debris from which was littered over sections of forest on the moon’s surface. The Empire have been progressively searching this debris to recover valuable equipment and munitions, before the Rebels can do the same. One of the ships is particularly important to the Empire, as it was carrying a large supply of Kyber Crystals, which the Empire needs to power its third Death Star, currently under construction at a secret location. Debris from this ship has landed in one of the densest regions of forest, preventing search craft from landing nearby. The Empire are therefore advancing through the forest on foot to reach the debris site. Rebel spies have discovered the nature of this ship’s cargo, and the Rebel command have therefore sent a task force to try and recover the crystals before the Empire.

THE PATROL PHASE

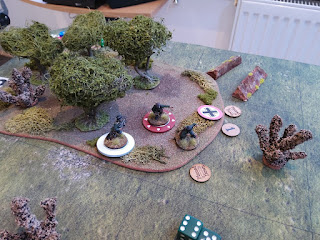
The map was laid out to represent a dense forest, with sections of ship debris scattered within it. The Empire and Rebels started the Patrol Phase in opposite corners, and, as no Jump-Off Points may be placed on the ship debris, ended with each having facing lines of Jump-Off Points close to their nearest debris fields. The Rebel JoP in the giant trees was added by their Pathfinder Special Forces later in the game.

FORCE SUPPORT

The Empire fielded Darth, four Stormtrooper Squads and a Death Trooper Team. The Rebels went with the old team of Luke, Leia & Han (but no Chewbacca), three Trooper Squads and a Pathfinder Special Forces Team.
 
OBJECTIVE

To win a victory, one side must find the crystals and recover them back to their deployment area, or force his opponent to withdraw from the table, either voluntarily or due to a reduction in his Force Morale, whilst keeping his own Force Morale at 3 or greater.


BATTLE REPORT

From the offset it soon became apparent that the inherent hatred between the two sides outweighed the desire to search for the crystals. A bloody massacre ensued. The Rebels deployed first, deploying Luke and a squad of Troopers from the wood in the East into the edge of the Bulkhead, and Leia with another squad from the wood in the North heading towards the Airlock. The Empire responded with the deployment of a squad of Stormtroopers south of the Hatch, with Darth and a second squad deploying from the cacti in the South West and heading for the Hatch. Both of these were in the open. The Empire would live (or rather die) to regret this.

The Rebels then advanced further into the Bulkhead, lining up along its edge to open fire on the Stormtroopers in the open South of the Hatch, who took heavy losses and Shock, becoming pinned. Han and another squad of Troopers deployed into the wood in the East, on Overwatch, covering the Stormtroopers in the South. The Rebel Pathfinder SF then used their Infiltrate ability to spawn a JoP inside the central wood of giant trees, from which they then deployed and opened fire on Darth and his squad.


Things were starting to look bad for the Empire. Darth advanced his now depleted squad into the hard cover of Hatch, whilst bringing up reinforcements, deploying a squad of Stormtroopers onto the Nose Section, and the Death Troopers into the cacti. The Death Troopers fired at the Pathfinders, causing one casualty. This was the Empire’s last real action in the game.


The Rebels now had an incredible series of Command Dice rolls, three rolls of two 6s, and a roll of four 6s, giving them 5 consecutive phases. The four sixes also gave then a CoC dice and a random event occurred, they found a cache of wine, increasing their Force Morale 1 point. Were they celebrating too early. Unfortunately they weren’t! Luke and his squad inflicted heavy casualties on the Stormtroopers in the South, killing the leader and eventually causing the few remaining men to break. The Rebel Pathfinder SF slowly whittled away at the Death troopers, eventually wiping them out.


The Pathfinders then threw a couple of grenades at Darth and his squad, wounding Darth, before turning their attention to the Stormtroopers on the Nose Section. Meanwhile Luke and his squad advanced towards Darth’s squad in the Hatch. Opening fire a couple of times to pin them. 


The Empire finally got a turn. However, with a Force Morale reduced to 2, they only rolled 3 dice; rolling a 2, 5 & 6, with only the 2 being useful (but not really!). Losses at this point were Rebels 1, Empire 24.


The Rebels then continued their onslaught, the Empire taking more casualties, with the Pathfinders quickly inflicted losses and shock on their target, pinning it. The Empire’s Force Morale now dropped to 1.


The Empire, again rolled a 2, 5 & 6. But this time the Rebels used their CoC dice to interrupt, with Luke and his squad charging into close combat with Darth and his remaining (pinned) Stormtroopers. Some sabre-on-sabre action ensued. The outcome was bloody. Darth and his squad were wiped out. With their Force morale now zero (the Rebel’s being 1 higher than their starting value) it was Game Over. Not the Empire’s finest hour.


ANALYSIS

A very one-sided game, totally due to the Rebels Command Dice rolling giving them 5 consecutive phases. The Empire just became sitting targets and were quickly wiped out by the Rebel’s relentless attacks.

We have now agreed on a House Rule for Star Wars (and WW2?) CoC based games. If two or more sixes are rolled on the Command Dice in one phase to retain the next phase, then three or more sixes would be required on the next roll to retain the following phase, and then four or more sixes to retain the subsequent phase, etc. This should practically limit the number of consecutive phases of a side to two.

Rob

Thursday 17 March 2022

SPACE WEIRDOS - The First Impression

With the decision taken not to hold the regular Thursday Zoom game it fell to the diehards (Chris and Tony) to fill the gap and ensure that the Blog wasn't left unsupported.  Obviously a suitably serious game system was required, but which?  Eagle eyed readers who looked at the title will already know the answer - Space Weirdos.

Space Weirdos is a simple 'Astro-Beer and pretzels' sci-fi skirmish available from Wargames Vault for the princely sum of $4.99 (or £4.32 in real money).  Weighing in at a mere 16 pages (including the Cover and rear page Quick Reference Sheet) it uses an opposed dice roll mechanic using pairs of D4, D6, D8, D10 or D12.  Different figures use different die types depending on their skill in defense, shooting, melee or will power with situational benefits or penalties increasing or reducing the die type used.  Despite the short format, rules for designing your own units are included so its was child's play to work out a quick Orc vs Marines game to test the rules out.

In the green corner we have a Marine Sergeant leading his force of two Marines with Heavy Rifles and one Marine with a Flamethrower.  With Heavy Armour and excellent shooting skill the Marines were expecting to gun down the Orks at long range.  If they got in close the Armour and Melee weapons should mean they were still effective.

In the other green corner the Orks, with a Boss leading 4 Orks with Heavy Pistols and Knives along with a Goblin Sniper for long ranged work.  The Ork Boss was a devastating close combat fighter with the other Orks not far behind, all were armed with Heavy Pistols meaning the long range firepower was limited.  The Goblin sniper was looking to engage the enemy from a distance being terrible in hand to hand.


Chris was hosting and had put together both forces so it was up to Tony to choose sides and he picked the Orks, will he wash away the Marines in a green tide?  Will his tactical skill  bring victory?  Has he read the rules?  He claims to have skimmed them and exhibits some knowledge of the mechanics - good enough.  Following pre-game kebabs ordered by Eileen the game begins.

The Marine Sergeant had the Leadership skill Tactician meaning that the Marines roll for initiative using 2d8 against the Orks 2d6.  All figures have 3 actions whose use is limited by their stats.  Speed 2 means only two move actions are allowed per turn for example. 

Turn 1 and the Marines go first.  Players alternate moving figures, both are cautious and there is limited sniping at range which proves ineffective as significant movement meant reduced shooting dice and cover improved defense.  Eventually the Marines scored a hit.  
Rather than automatically inflicting a wound, a successful hit leads to a roll of the Under Fire table (2d6 plus modifiers with a 10 or better killing the target outright)  the Marine rolls a 3 and his target gets a snap shot back at him!  Luckily the Ork misses.  End of the first turn and no casualties have been inflicted.

Turn 2 and the flamer equipped Marine tries to get the bead on an Ork sneaking down the left flank, sadly the Ork is well hidden and no shot is possible.  Instead in his go the Ork charges the flamer, hits and inflicts damage, the Marine goes down.


The goblinsniper comes into his own and takes a shot at the Marine.  He aims, hits and takes the Marine out of action.  First blood to the Orks.


The Marine Sergeant decides to even the score and charges into the fray, sadly for him the fray hasn't read the script and he inflicts no damage.  The Ork Leader counter charges and puts the Sergeant down and stunned.  Things are not looking good for the Marines.  Luckily no other Orks can get into combat and finish the Sergeant off (small mercies).


Turn 3 and the Marines go first.  The Marine Sergeant tries to recover and fails, he tries again and fails a second time, he tries again and succeeds, all three actions used and he's still down.  At least he's not stunned though.  It doesn't last.  After both Orks finish their attacks the Sergeant is out of Action. In compensation the two Marines on the far side of the table each manage to take out an Ork, albeit loosing one of their number in the process. Its still not looking good.

Turn 4 and with only one Marine left Tony senses victory and wins initiative.  An Ork charges in only to be felled by Overwatch fire.  The Marine than takes a turn and kills the second Ork closing in on him (what a Hero!).


He then uses a command point to dodge the incoming fire and hide.  The turn ends and with it the game.  It turns out to have been too little too late.  With 3 dead Marines the Orks score 60 while 4 dead Orks are only worth 52 points.  Victory to the Orks and the Marines are left to wonder what went wrong.

In the inevitable post game discussion the rules are considered to have worked, the game is fast to play, once the rules are understood and the Under Fire and Under Attack tables means that the effect of hits are uncertain and can result in counter fire.  Both sides suffered poor rolls and the initial game saw little damage inflicted.  An enjoyable evening has been had and the game is likely to be played again - overall a success.


Sunday 13 March 2022

What a Tanker - Nomonhan Incident

This week our time-travelling reporter had only to go from 1945 to July 1939, but faced a long and arduous journey along the Trans-Siberia railway to the Soviet-Japanese border, arriving just in time to witness some of the fighting during the battle of Khalkin Gol, or as the Japanese conveniently name it, the ”Nomonhan Incident”. Some incident!

The world has stood aghast as the militarised and pitiless Empire of Japan has ravaged its neighbours. September 1931 saw the Kwantung Army invade Northern China and following a war of extreme barbarism, set up a puppet state known as Manchukuo. 1939 has seen this heartless, vicious regime attack the peace-living peoples of the Soviet Union. Comrade Stalin has despatched General Zhukov to defeat the Japanese and restore peace and harmony to the freedom -loving people of the Soviet Far East. The battle would pitch armour from the Soviet 1st Army Group against the Japanese 3rd Tank Regiment.

On July 9th the massive Japanese force had forced the gallant Soviets from the dominant Baintsagan Hill, but the reinforced Russian armour was set to counter-attack.

The Russians came onto the table with their mighty BT tanks taking the centre and occupying Baintsagan hill,

a heroic, lone T26 taking the southern hill

and the “dummy” advancing across the Northern table edge. The Japanese tanks crawled onto the hills just beyond their start line and settled into hull-down positions behind the crest-lines.

Both sides started to trade long range fire, as the Soviets tried to work out how to attack.


The Nipponophile (yes that is a real word...) Umpire had set the Japanese up in a perfect defensive position. Hull down, with interlocking fields of potentially enfilading fire. A Soviet counter-attack seemed a tall order. Thanks Chris!

Kills proved elusive until the T26 saw the drew a bead on the puny Te-Ke Tankette. The mighty 45mm gun sent its shell whistling towards the Japanese positions and was rewarded with the sight of an explosion and a plume of oily smoke. Thus die invaders of the Motherland!


Back on Baintsagan Hill things weren’t going so well. One BT took several hits, some permanent but managed to inflict severe damage one of the Japanese tanks. Tony claimed a dubious flank shot on the heroic T26 and the less-than-impartial umpire proved his need for glasses by agreeing with him. The T26 took damage. The commander coolly left his tank to brew up with his samovar leaving the others to play out another fruitless turn. Apparently the game finished as a draw.

Simon

Friday 11 March 2022

Chain of Command, Caesar's Camp, Scenario 5 - End of Campaign

Lt. Davies eyed up the Chateau with some suspicion. The platoon had been here before and had taken heavy losses in trying to take the Chateau before. The platoon had arrived, down to two reduced strength sections. However, HQ had allocated almost another platoon of infantry for this second attempt, along with a FO & Mortar Battery and a Vickers MMG.

Just as in the last attempt, the Platoon deployed yellow section into the Northern woods, just West of the road, along with the FO. Blue section deployed onto the road, to provide covering fire on the Chateau, once Jerry stuck his head up.

But, just like last time, Jerry deployed a section behind the hedgerow overlooking the Northern woods. Yellow section probed carefully Westward, coming under fire from the German section. Yellow section went to ground and called for support. Red section deployed behind yellow section, in the Northern woods. A short range fire fight resulted in casualties to both sides, but being outnumbered, the Germans withdrew to the woods to the North of the Chateau.

Jerry then stuck his head out of the Chateau and started harassing fire on the Northern wood. The FO responded to this, by calling up for a 3” mortar barrage on the Chateau, with the spotting round dropping right down the chimney!

Deciding this was the moment to push forward, Lt Davies called for Sgt Mallom to start to flank the Chateau from the North-East, reinforcing the push with green section. Meeting some stubborn resistance from the Germans in the woods North of the Chateau, the FO walked the mortar barrage Northward, onto the woods, where the Germans were hiding. Recognising the risk of his pinned down troops in the North being overrun, Lt. Aldtrik revealed the LMG team, dug-in, just North of the wood, but decided to send out Sgt Steinfen to take charge, while he himself stayed in the Chateau!


Encountering this extra fire, the British advance drifted left, toward the Chateau, but just as red section reached the hedge overlooking the Chateau, the Germans revealed an IG.18 infantry gun, concealed behind the hedge, immediately in front of the Chateau. Once again, the British advance went to ground.

Lt. Davies called for the FO to walk the barrage Southward, to try to suppress the IG.18, while he himself deployed with the Vickers MMG and purple infantry section, on the far side of the road, at the end of the track leading to the Chateau. The Vickers MMG soon began chattering, bullets pinging off the gun shield on the IG.18.

Realising that the now exposed IG.18 crew could be quickly wiped out, the German yellow section, hiding in trenches just to the South of the track, opened fire on the Vickers MMG.

Sadly for the Germans, the long range firefight between the Vickers MMG and it’s supporting infantry section and the German yellow section, in it’s protective trenches, did not go well. Before long, yellow section was reduced to only the NCO and the IG.18 gun team was wiped out. British casualties were one crewman from the MMG team one rifleman from the supporting purple infantry section! (so much for good German dice rolling!)


Now, all the British fire turned on the Chateau itself. With it’s LMG team deployed in the slit trenches, to the North of the Chateau, the garrisoning infantry section could only really deploy 4 riflemen in the upper story windows. Despite the cover from the thick chateau walls and obscuration from the British barrage smoke, the volume of British fire was causing too much attrition. Down to 2 riflemen, Lt. Aldtrik chanced a look out of the windows, only to receive a glancing blow, from a ricocheting bullet, knocking him unconscious (and driving the German Force Morale to zero!).

Friday 4 March 2022

Trouble in Tecklenburg

With retirement looming our reporter has been told to “slow down” by the bureau, so the hectic pace of reporting is dropping. After a week’s break he headed to North Germany in early April 1945. Although the war is clearly lost for the Germans some units continue to fight doggedly on.

The Fife and Forfar Yeomanry, part of 11th Armoured Division are under orders to take the small town of Tecklenburg. With their shiny new Comet tanks they are now confident enough to go toe-to-toe with anything the Germans still have. The Germans are from the “Von Clausewitz” Panzer Division, an Ersatz unit thrown together from various training units. Its vehicles may be a motley collection but the crews are all seasoned professionals.


The Germans roared onto the table with the mighty Jadgpanther heading West seemingly into oblivion. Dave’s Stug took up a defensive position in cover

and the PzIVs prepared to hold the South of the table around the Church. As befitted their leadership, the British sought to confuse by employing random tactics. The heavily armed Comets and Archer stayed on the defensive, seemingly un-nerved by the Jagdpanther whilst the Cromwells ventured further into the open.

Things seemed to go badly for Jerry when a Comet managed a flank shot on the Jadgpanther, and soon the mighty cat had lost three command dice. Chris crashed him into a wood to lick his wounds, but shrewdly turned him to threaten any advance. The British lacked the nerve to go for the kill and missed their chance as Chris restored a dice. In the South the Tony’s Cromwell charged forward but met a grisly end when a PzIV came round the corner of the Church and despatched him with a single flank shot.


Finally Rob took Tony’s so-called advice and charged his Comet out of cover to confront the Jadgpanther. At close range the Jagdpanther despatched him with a single shot.


Things looked grim for the Fife and Forfars. The Stug and Archer traded long-range shots until a German 75mm shell struck home and plunged through the 3 dice of armour. 


With only two tanks left running and all four Germans still in the game, it was decided to award the victory to the “Von Clausewitz.

Simon