Wargaming from Hertfordshire & Beyond!

Wednesday 29 November 2023

Celles II – What a Tanker, After Action Report


 This was a rerun of a Bulge based ‘What a Tanker’ game, run a couple of years ago. The tanks were changed around a bit, but this was an excuse for a lightweight game and another chance to try out some rule mods. These rule mods are unashamedly cribbed from John Savage’s excellent ‘What a Cowboy’ rules, plus a couple of things from our own experiences with WaT.

The vehicle line up was;

·        Panther (Rob)

·        Panzer IVH + Stug IIIG (Steve)

·        Cromwell + Sherman M4 (Mal)

·        M10 Achillies II + Churchill IV (Dave)

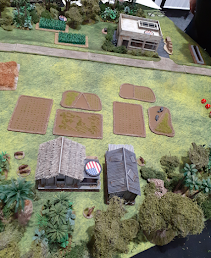
The objective was to secure the bridge (South West corner). This would be achieved by having an operational tank within 18” of the bridge, while denying the opposition from having an operational tank within 18” of the bridge, for one complete turn. The minimum game length was 4 turns, so no easy dash to win.

The Brits got off to a flying start, with the Achillies dashing down to grab an overwatch slot at the back of the woods, near the bridge and the Cromwell making a sprint for the village centre. The Churchill & M4 brought up the rear, more sedately.

The Germans made a slower start. The Stug seemed to have trouble getting out of first gear and the Panther proved to like the woods a little too much!

Being in the van of the German forces proved fatal to the Mark IV, as it quickly succumbed to a lucky shot from the Cromwell. Seeing this burning wreck, the Stug decided to hang back, but then got into a long range, ineffectual slugging match with the Churchill, that had lumbered into the field to the North East of the village.

Deciding that the bridge had to be contested, the Panther pushed forward, to the South of the village. However, its advance was spotted and rapidly contended by the Achillies to it’s front and then by the Cromwell to it’s rear. When the M4 turned up too, the Panther decided to make a dramatic sprint around the M4, through the village and out to the West (what else do you do with three 1s and 2 6s?!).

While the M10 tried to hold the Panther’s attention to it’s front, the Cromwell dashed around the Panther’s rear. Easy shot! Missed twice!! The brave Cromwell crew paid dearly for these misses, as the Panther pivoted and blasted the Cromwell to pieces.

Sadly, while the Panther was dealing with the Cromwell, the Achillies was unable to exploit the exposed rear of the Panther, as it had become bogged down in the woods. So, it was left to the lowly Sherman to tackle the raging cat!

The Sherman bravely distracted the big cat, while the Achillies untangled itself, enabling it to slide into a firing position, from where it despatched the cat, with a well placed 17 pounder shell!


This left the Stug crew with a dilemma. Retreat with dishonour or charge on, to a glorious end?! After the earlier stuttering, the Stug was now positively flying! Passed the Churchill, despatching the Achillies, then around Sherman and into the village. However, the Sherman had other ideas and roared after the Stug and exploiting the flexibility of the turret, it despatched the Stug with a close range flank shot!

Another fun and fast game of ‘What a Tanker’ and another chance to test out the ‘bonanza’ style rule mods, which seem to add a little extra dimension to the game.


My second game of the day was “Rome or Death - The Battle of Mentana, 1867”. 

 While Garibaldi had succeeded in unifying most of Italy an independent Papal State remained supported by the French. 

Garibaldi took the field to complete the unification of Italy and marched on Rome.

The game was played using a set of rules called Pickett’s Charge.  As you can probably tell from the title the rules were originally intended for use during ACW games.  Garibaldi marched in 1867 so pretty much contemporaneous with ACW.  

The battle was fought for control of the road to Rome (so any old road really. After all, “All roads lead to Rome”)

The French held the ridge at the bottom of the photo. The road and the right wing were held by Papal troops.  Garibaldi’s Red Shirts deployed opposite the Papal forces and the remainder of the Italian army faced off against the French.

Forward elements of Garibaldi’s army had occupied the Monastery and villa in the centre of the battlefield.


The Franco-Papal forces decided to hold on the left and drive forward on the right led by the elite Papal Zouaves. 


Garibaldi’s plan was a mirror image, attacking with his Red Shirts on his left and feinting on the right against the ridge.


The armies were deployed in brigades of around four regiments each.

The Papal Zouaves advanced smartly forward into the fields ahead of them covered by their skirmisher screens.  Opposing them were Garibaldi’s Red Shirts supported on their left flank by light artillery.


In the centre the Papal infantry and the French skirmishers moved forward to engage the Italian garrisons in the monastery and villa


From the start the Zouaves (on the right) had a bad time of it. Their skirmishers were quickly forced to withdraw by the advancing Red Shirts.  As they came under fire first one Zouave regiment was forced to withdraw and then a second.  The Red Shirts pressed forward relentlessly.


Meanwhile in the centre both the villa and the monastery were suffering under heavy attack from the Franco-Papal infantry and artillery.


On the French left both armies stood off daring each other to charge.


Finally the Italian garrisons were forced to flee but before the victorious allies could advance and occupy the strongpoints fresh Italian troops were rushed forward to occupy the monastery and villa.


On the Papal right flank two regiments of Zouaves had become over extended and had now been exposed to flank attack by their retreating comrades.  The Red Shirts, abandoning all order, charged forward throwing back the Zouaves and threatening the road to Rome. 


As a final roll of the dice the Papal cavalry charge boldly through the centre forcing back a unit of newly arrived infantry and opening up the centre for exploitation. 


Despite throwing back the elite Papal Zouaves the Italians had taken heavy casualties and the game was declared an honourable draw.


On the outskirts of Hue the 810th NVA were ordered to delay the US advance by either successfully playing two CoC dice or reducing American morale to zero.

The Marines were tasked with moving two squads off the NVA board edge or breaking the NVA morale.

The game began with the usual patrol phase.  Aiming for deployment points on the edge of Hue and in the jungle on both flanks the NVA moved their patrol markers forward cautiously, allowing the Americans access to the majority of the board.


The Americans opened hostilities by bringing their supporting armour on the road and deploying an infantry squad into firing positions by the service station.  The NVA chose not to respond and looked forward to taking possession of the comfortable US boots approaching them. 

CoC points were slow to come for the NVA.


 With their confidence growing the Americans committed their remaining squads to covering positions on both flanks. Their armour support crawled up the road towards Hue


 With no response from the NVA the Americans pushed forward on their right flank aiming to eliminate the NVA left wing deployment point.

 Seeing the US making good progress and closing down  potential NVA firing arcs, the Vietnamese freedom fighters responded by ambushing the advancing Americans from the cover of the building on their extreme left flank.


Effective NVA fire brought the American advance to a halt but exposed the NVA heroes to the combined firepower of the whole US force.  The NVA were annihilated!  NVA morale was badly hit.  How could anything stand against such awesome firepower? 

To add insult to injury, as the NVA approached their first CoC dice the Americans played their ace.  By expending their own CoC dice they reduced the NVA CoC points total by three.  Time was not with the NVA.

To forestall an American advance on the NVA right a second squad was now deployed in overwatch positions in the jungle. 


The NVA now made the critical decision to reinforce their positions on the left by deploying two further squads and a heavy machine gun into the buildings on the edge of the city.


The NVA continued to pour fire into the leading American squad, causing leader casualties and building up the level of shock on the squad.  Return fire from the supporting American infantry and armour was lacklustre.

The NVA then delivered the coup de grace by launching a human wave attack against the beleaguered US squad.


Seeing the danger to their right wing the Americans pushed forward from their positions around the service station.


Too late!  The ferocity of the NVA assault swept away the remains of the leading US squad.  US morale plummeted.  Despite taking fire from the entrenched NVA  the Marines pressed on with their countercharge. 

The Americans also advanced through the jungle terrain on the opposite flank, only to stall in the face of NVA fire.  US morale continued to fall.


The final act of the battle was now played out as the advancing NVA and the countercharging Marines met in mortal combat.


Despite the Marines destroying their opponents the savagery of hand to hand combat led to an orgy of  mutual destruction.   Marine losses finally caused their morale to fall to 0 and the day went to the heroes of the NVA.


Steel Lard took place on Saturday 18th November at Patriot Games in Sheffield.  Games are played in an old machine shop customised for its new function as a gaming space.  All the facilities you would expect are provided including a nice little coffee bar and bistro.  The cost for the day was £10 including a £6.50 lunch voucher for use on the premises.  How could I say no?


The event followed the usual format whereby attendees are offered a choice of two games from the list that are being played that day.  This year the list included favourites such as  Chain of Command and Sharp Practice but also featured What a Cowboy, Kiss me Hardy, Through the Mud and the Blood and Pickett’s Charge.


Nine games were on offer

A Rock and a Hard Place


Chain of Command, presented by Graeme Atkinson


20th May 1941. Operation Merkur, the German invasion of Crete is about to begin with von Braun’s glider assault on Tavronitis Bridge.


Death in the Donga


What a Cowboy, presented by Simon Walker


You are escorting the French Prince Imperial on a patrol in Zululand. What’s the First Rule?  Don’t get him killed!


Harpers Ferry: A Tragedy in Two Acts


What A Cowboy, presented by Richard Crawley.


An exploration of John Brown’s insurrection at Harpers Ferry, Virginia in 1859. Players take on the roles of abolitionists, civilians, and US Marines in one of the pivotal events of pre-Civil War US history. All of the playable characters are named individuals whose actual fates we know. Can you change history?


Mayhem in the Med


Kiss Me, Hardy!  (Version 2 development game), presented by Charley Walker


A gale has blown most of the British Squadron off station.  Only their Inshore Squadron remains to confront the Franco-Spanish invasion of the Isla San Nicolas and its crucial port facilities.  Outnumbered and outgunned, can they hold off the Spanish and French ships long enough for their supporting ships to return and thwart the troop landings?


Morning Glory on the Combahee


Sharp Practice, presented by Ken Welsh


Based on a historical Union raid up the Combahee River during the American Civil War to destroy plantations and rescue slaves. The raid was accompanied by the famous abolitionist Harriet Tubman. Will the Union troops achieve their objectives before the Confederates can put up a coordinated response? Can the Confederate mounted troops put up a spirited defence, hold the river crossing and protect the plantation family members before the delayed arrival of their infantry? And just what do Southern Belles keep hidden in their underpinnings? 


Oh Sugar!


Chain of Command / CoCing Up the Mud and the Blood, presented by Alex Sotheran


As part of the British Fourth Army, the Canadian Division was tasked with capturing the small village of Courcelette, including the surrounding German defence lines on the north west of the operation. 21st Battalion of the 4th Canadian Division faced the Sugar Beet Factory on the outskirts of Courcelette which was held by Germans of the 211th regiment of the 45th Reserve Division. Using the lessons learned, the Canadians stormed the German defences and cleared the Sugar Factory before going on to clear the village itself. Will history be repeated, or can the Germans hold the line? Using an early iteration of Chain of Command Great War.


Rome or Death – The Battle of Mentana,1867


Pickett’s Charge, presented by Ken Reilly


It’s 1867 and whilst most of Italy has joined the new Italian State. The Armies of the Pope supported by the French are maintaining a separate Papal State.  Our old friend and redshirt, Garibaldi has decided it’s time to take Rome for the nation and to the rallying call of “Rome or Death” he rallied his men to the cause.


Bring your best red disco shirt or your Sunday vestments and let’s get the party started.


The Spy Who Larded Me 


Sharp Practice, presented by Matt Slade

During the American Civil War the small town of St Orbens stands in the hotly disputed Lard County. Through skilful diplomacy, Mayor Rickard Clarke III has kept his town intact and out of the line of fire despite attempts by the north and south to turn him one way or the other.


Today Mayor Clarke is to wed the beauty that is Miss Niccola Skinner. What he does not know is that Miss Skinner is in fact Sir Sidney Roundwood, the disgraced English gentleman and ace confederate spy. A master of disguise, Roundwood has infiltrated the mayoral office and plans to murder Mayor Clarke on their wedding night. The “grieving widow” would then lay the blame at the door of the northern forces surely drawing Lard County into the war on the side of the south.

Union have sent in a detachment to persuade the Mayor that the love of his life is not quite who he thinks. 

Rebs have got wind of this and are trying to stop the union capturing the nefarious Roundwood (think Terry Thomas) who will spill the beans with very little resistance.


Walk This Hue!


Chain of Command, presented by John Savage


31st January 1968. The North has launched a huge nationwide offensive, soon to be known as the Tet Offensive. While targets and cities across South Vietnam are attacked, nowhere does the offensive fall heavier than on the City of Hue. Here, US forces in the MACV (Military Assistance Command, Vietnam) Compound south of the city, are surrounded and in danger of being over-run by strong NVA forces. 

Captain Batcheller’s Company A, 1st Battalion, 1st Marine Regiment have been ordered from their base at Phu Bai north along Highway One with orders to break through and relieve the US forces in Hue.  Supported by M48 tanks from the 3rd Marine Tank Battalion, the US column crosses the An Cuu Bridge as Highway One stretches ahead on a tree-lined berm to the outskirts of downtown Hue. 


But elements of the 810th NVA Regiment have already taken up defensive positions to block the road. Can you lead Alpha 1/1’s first platoon to break through and secure the route into Hue and the MACV Compound? Or will you take command of the NVA and shut the door on the advancing Marines and cut-off the MACV Compound?