Wargaming from Hertfordshire & Beyond!

Friday 23 September 2022

The Battle of Ilipa (206BC)

Last night four hardy souls met to reprise the battle of Ilipa from the 2nd Punic War in 206BC. Chris was laid low with COVID, Rob was still providing free childcare and Greg was “working somewhere in London”. Tony and Dave took the roles of Hasdrubal and Mago, and Phil played Scipio. I supported Phil and supplied refreshments. Our first game of this back in June had resulted in a pretty inconclusive slug-fest between deep units. This time I had tweaked the ORBATs slightly to reduce the Carthaginian’s spearmen but boost their cavalry.

The game set up saw the Carthaginian’s with cavalry heavy wings under Tony, and myself with an infantry heavy centre for the Romans. It seemed all set to see if the Carthaginian wings could win the day before the Roman legions broke their infantry opponents.

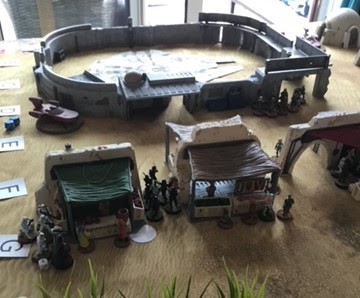
Tony started quite aggressively, pushing his right wing cavalry forward. How unusual!

with the light cavalry hoping to take to fortified Roman camp.

However, Phil countered with the Roman cavalry and soon charged his Punic opponents killing a unit in combat and sweeping away another right unit under TtS’s morale system. On the Carthaginian left again the cavalry attacked with the Romans countering with archers, cavalry and mercenary scutarii. The Carthginian plan seemed to be foundering as another unit of their Spanish cavalry died.

However, the Roman attack in the centre wasn’t going to plan. The Spanish javelinmen and slingers were a nuisance scoring a disorder on a Roman Quincunx, and their veteran status made them unusually difficult to kill. Even when the Roman legions charged home their attack did little damage.

The combat on the flanks continued to be bloody. Phil’s general saw his unit killed, but his general survived the “Infamy, Infamy” stratagem...a typical Punic trick...and he relocated to the surviving cavalry and started to charge towards the Punic camps. On the other flank both sides broke through, but Phil brought his cavalry back under command and managed to position them to attack the Punic flanks, whilst Tony’s breakthrough unit was stranded in the middle of nowhere.


The centre continued to be an attritional battle, with disorders being landed but no killing blows. Here the Roman Quincunx proved its worth being able to rally even when in combat. Eventually a Quincunx killed its opponent and even managed to turn the enemy flank.

With their coin reserves dwindling the Carthaginians unleashed the elephants into the battle in the centre. Shame that they died under a hail of pilums and as they stampeded swept away a unit of mercenary Numidian cavalry. The last remaining Carthaginian victory medal was surrendered when Scipio himself charged into the Punic camp.


An interesting game, and one that seemed closer than the victory medal count of 16-5.

The Roman Quincunx is a powerful unit but very expensive, costing even more than a Successor phalanx, so any Roman army will normally find itself outnumbered as regards units. A few more “failed saves” in the centre may have given a different result.

Simon

Monday 19 September 2022

Battlegroup Match Report

Whilst Tony’s Pacific Australians fought French, German Volksturm and US Paras at Lost Ark, myself and Greg maintained some modicum of sanity by playing a “Battlegroup Blitzkrieg” game set in France 1940. Those who went on the Ardennes trip before the Pandemic may recall the trip to the village of Stonne.

Here French and Germans fought a series of vicious actions to control the hilltop vantage point, and unlike much of 1940 the Germans didn’t have everything all their own way. So unlike the proceedings at Lost Ark we kept standards up and played a game set during French counter-attack early on the morning of May 16th. I took the French and Greg the Germans of 10th Panzer and IR Grossdeutschland.

The Germans started with some units in possession of the village, and the French all entered from their table edge. Despite decent firepower, command and control was going to be the main French problem with only two officers, and lots of units as each infantry section comprised two teams. However, things started well for the French with a lucky mortar barrage that killed the PAK36 and its towing vehicle, meaning Greg drew two BR chits. The French moved their light armour up the left flank


infantry through the fields on the right and pushed one Char B up the road. The Germans responded with their armoured platoon moving to meet the H39s

infantry occupying houses and the lone Panzerjager I bravely taking on the mighty CharB.

Greg scored a hit on the Char B but needing a double six rolled an eleven. The dice gods were not with him.

Greg’s luck got even worse when his artillery strike onto the French positions was diverted back onto his own troops. The result was only one “pin“, but things were definitely not going the way of the Wehrmacht. The French infantry tried fire and close assault, with their VB sections “pinning” the German troops leaving the rifle team to close-assault. However, the élan of the “inferior” French failed and soon two rifle teams were “pinned” in the open. These are not the infantry of 1914! Frustrated by the lack of “punch” of the Panzer III vs the front of a H39, Greg decided to gamble all on a flank charge. It was almost as if Tony was in the room. The H39s, hampered by the “one man turret” rule, failed to react and soon a H39 was ablaze, and the others in danger.

A German artillery strike then caused infantry casualties plus destroying several Laffly trucks.

The French continued to fight on, destroying a Panzer III

but when the two infantry teams who had failed to charge were finally wiped out by rifle and MG34 fire it was all over. The French morale collapsed and Stonne was left to the Germans.


Both of us agreed it had been a fun game, played out in just less than two hours. It was fairly small given it was using 20mm figures on a 6 x 4’ table. I had learnt the lesson from our last late-war game where I packed too much stuff onto the table leaving the attacker with no manoeuvre room. Unlike late-war Battlegroup games which tend to be armour/artillery battles, this proved to be a real combined-arms encounter, with the infantry playing a crucial rule. Even the role of the French transport lorries was important. Normally lorries are rushed back off the table, but with so few orders available for the combat troops I left them on-table and had to draw chits when two were destroyed. The “campaign specific” Battlegroup rules for the French armour worked well. For 1940 they are tough armour-wise, but the “one man turret” rule that gave a spotting penalty proved quite an historically accurate handicap.

I may be inspired now to build a full Char B platoon plus acquire some R35s. Why didn’t I buy the ones Greg pointed out to me on the Bring-and-Buy at Colours last week? An opportunity missed!

Simon

Saturday 17 September 2022

Full speed ahead and damn the torpedoes (or another game of ACW naval)

Having spent a week enjoying the delights of “Dixie”, our hard-working reporter once again joined the fray to witness some more action on the rivers of the Deep South during the American Civil War. Greg took the Unionists and Tony the Confederates to play one of Peter Pig’s ready-made scenarios. This would see the introduction to battle of the innovative Unionist turreted monitors against a pair of Confederate Ironclads supported by two converted riverboats.

Soon hot iron was flying across the waters as ships manoeuvred into optimum firing positions. Once again, the CSS Planter which was sunk and resurrected last week, was soon a burning hulk but the other Confederate ships proved tougher nuts to crack.

The CSS Arkansas (or as Tony repeatedly pronounced is Ar-Kansas) was quickly proving its worth both as a gun-ship and a ram. The USS Monitor took damage. The mighty CSS Nashville had part of its rudder shot away and at some point appeared in danger of colliding with its own ship the General Sumter. However, the crew repaired the damage and managed to regain control.

The Sumter then rammed the Monitor again, bringing the plaintive dry from Greg “who gave the lunatic two rams”! The Monitor limped off to lick its wounds but could still fire its two heavy guns battering away at all and sundry. The CSS Arkansas seemed to exit the battle with a damaged smoke stack and only one damage point remaining.


However, the Nashville fought on finally forcing the Monitor to strike its colours, and Greg suffered a sense-of-humour failure when the USS Canonicus’ 18 dice only inflicted one point of damage?


Was the tide literally turning in favour of the Confederates. The answer was “no” as the General Sumter sank to the bottom courtesy of the USS Canonicus’ big guns. With both Confederate ships down to 10 damage points between them, and the Arkansas effectively out of the fight the game was decided in favour of the Union. The Confederates had failed to break the blockade and the Anaconda plan would continue.

Simon

Sunday 11 September 2022

Star Wars – Escape From Tatooine Campaign, Mission 4: Rebels Hire Off-Planet Transport (Part 2)

This is a continuation of the mission for the Rebels to escape from Tatooine on the Millennium Falcon with the stolen Death Star plans. To achieve this, they must first break Han Solo and Chewbacca out of prison.

So far, several Rebel squads have advanced towards the prison, killing/routing the prison guards and preparing to order R2-D2 to open the prison cells to release the prisoners. More Rebels have advanced towards the market area and are holding back several Stormtrooper squads.

The Empire’s crack Death Trooper squad are yet to deploy. Their presence will improve the Empire’s failing morale, but will they be sufficient to enable the Empire to achieve victory.

 
OBJECTIVE

The objectives have still not been achieved, and remain as:

Part A: The Rebels must rescue Han and Chewbacca from their cells in the Prison.

Part B: All named characters must then reach the Hanger containing the Millennium Falcon. The hanger must then be defended until the Falcon has been readied for take-off (requiring a Task Roll of 12).

However, the Rebels appear to be ignoring these objectives, and are instead just trying to kill as many Empire troopers as possible. Not very Rebel like. Has Leia become bitter and twisted?

FORCES

So far in the mission:

The Empire have lost 6 troopers, one Junior Leader has been wounded, and the Security team (6 troopers + Junior Leader) guarding the prison have been killed/routed.

The Rebels have lost 2 troopers, and one Junior Leader has been wounded.

BATTLE REPORT

The Empire started by deploying their last Senior Leader (Stormtrooper Lieutenant), the Death Troopers (gaining them a Force morale point), and their Incinerator Team, to provide much needed firepower and morale support to the dwindling Empire force. The Stormtrooper Lieutenant and the Incinerator Team moved north to support the defence of the prison, whilst the Death Troopers headed towards the market.
 
[It should be noted that the Empire had actually changed their Support Option choice from an Incinerator Team to a Green Stormtrooper Squad, so the Incinerator Team was not in play, and should not have been deployed, but that’s the Empire for you, no morals!]

 
Before the Death Troopers could be brought into play, the Rebels advanced Leia and her Rebel Trooper Squad south into a position allowing them to both protect the entrance to the Millennium Falcon’s hanger, and to fire into the market targeting the rear of the Stormtroopers hiding behind the market wall, forcing them to retreat south.

The remaining off-table Rebel Officer, fearing that he, Luke and C-3PO, might get left behind, deployed behind the houses north of the market.

With casualties and shock mounting the Stormtroopers were eventually forced to retreat south into the market, becoming pinned. Meanwhile the Death Troopers advanced towards these troublesome Rebels.


Back at the prison, the Stormtroopers continued to take heavy fire from the Rebels in the cacti to the north, being reduced to a Senior Leader, a wounded Junior Leader, and one heavy weapon trooper. This enabled the Rebels to order R2-D2 to open the prison cells, allowing Han & Chewbacca to escape and join the Rebel’s Incursion Team.

The Empire’s morale had started to fall again, resulting in the loss of Command Dice.

Having rescued the prisoners, the Rebels started to move slowly along the north edge of the battlefield, towards the hanger, still being covered by Rebel Troopers in the cacti.

The Empire decided to use their Chain of Command dice to end the turn, and unpin two of their much-needed squads.

Both sides then decided to re-enact the “Gunfight at the OK corral”, moving their troops into the open for a bloody exchange of blaster fire. The busy streets suddenly emptied of civilians.

 
Although the Death Troopers have a reputation of being formidable fighters, luck was against them this time, and their fire was relatively ineffective, and another stand-off ensued.

Meanwhile the Rebels escorting Han & Chewbacca continued to move towards the hanger.

 
The Empire’s morale had now dropped to 2, causing them to lose a Jump off Point and a nearby team (consisting of a lone surviving Stormtrooper, but technically, still a team).

The Empire decided to try one last attack on the Rebels guarding the entrance to the hanger, but without any noticeable success.

With the Empire’s losses having increased from 13 to 32 (including 2 Death Troopers), compared to Rebel’s losses now having risen to 6 (yes SIX), the Empire concluded that the “Force” had deserted them on this occasion, and decided to retreat from the battlefield, leaving the Rebels with free access to the hanger, and the Millennium Falcon inside.

In conclusion, an easy victory for Leia and her Rebels. Or is it?

A warning has reached Leia that whilst the battle raged within Mos Eisley, a second Empire force has advanced through the desert to the west, armed with a mobile ground-to-air weapon. It would be suicide for the Falcon to try and take-off with this in position. The Rebels must therefore neutralise this weapon quickly, before Darth Vader has time to take control of these reinforcements and launch an attack on the hanger in a final bid to recover the Death Star plans (and of course kill all the Rebels – because that’s what Dark Lords do).

Hopefully, the long-awaited lightsabre fight in the hanger between Obi Wan and Darth will eventually take place. And if struck down, will Obi Wan “become more powerful than you could possibly imagine”?

Don’t forget to tune in to the next (and last?) instalment of “Escape form Tatooine”.

Rob

A Game from the Depths of Simon's Shed

Last night our travel-stained reporter journeyed to the Southern States of the USA to witness some American Civil War riverine action. There had been gasps of amazement when Simon unveiled his 47 strong fleet of 1/600 gunboats, plus wrecks and shore forts including a wildly impractical Fort Sumter. All unused for nearly twenty years, and now including a pristine Peter Pig hex mat specifically for the period.

The game was a simple ship vs ship duel to test the rules and used a scenario from the Peter Pig website. Tony commanded the small CSS Planter

whilst Dave took the mighty and rather menacing CSS Virginia. Chris and Greg commanded Yankee ironclads, with Phil taking the more unconventional USS Tyler, a converted commercial steamer. The scenario set-up meant that the ships were positioned on the board in random hexes. This saw Tony’s Planter virtually prow-to-prow with the Tyler. Phil’s initial move saw the Tyler move alongside Planter which was soon sinking.

It was decided that rather than let Tony sit idle all night the Planter would be resurrected and enter from the Rebel table edge. His problem was that the Virginia was at the other end of the table, and he was facing the whole Federal fleet alone. A second Planter wreck model was soon gracing the table.

The rest of the game saw the three Federal ships trying to hunt down the Virginia. Greg found the designs of his Ironclad baffling, with only front and rear-firing guns. The Federals managed to land multiple hits on the Virginia and even jammed the rudder for a few moves, but with 50 hit points it had only ten less than the whole Federal flotilla. Phil’s Tyler sank first, and then the Yanks made tactical blunder in manoeuvring the Tuscumbia down the Arkansas’ port side to allow Chris’ side battery to join the fray. Both Greg and Chris had forgotten the rules that didn’t permit such an engagement. Soon Greg’s Tuscumbia was blown to pieces.

With only the Cairo and its remaining 13 hit points facing the Arkansas with double that remaining it was decided to call it a night, and a Rebel victory.


Post-game feedback indicated a positive view of the rules. As with most Peter Pig games enough historical accuracy blended with some fun and novel systems. I sense we will be playing again.

Interestingly post game research has revealed that the USS Tyler did face the Arkansas on the Yazoo River during the 1862 Vicksburg campaign. It was actually patrolling with two other ships. The Arkansas simply charged past them and then through the whole Federal River fleet to the safety of Vicksburg. A mighty ship indeed. It was rather ignominiously scuttled a few months later suffering from engine trouble and a lack of engineering support!

Simon

Friday 9 September 2022

General D’Armee: Vitoria Campaign: COMBAT AT OSMA

Our first game of Dave Brown’s General D’Armee rules (Reisswitz Press).

This was a slightly scaled down version of the ‘Combat at Osma’ scenario, from the Vitoria Campaign book. I didn’t have enough 15mm battalions, to furnish the Reserves on both sides, so just went with the on-table forces, for this trial run.

The French, who were supposed to be on the defensive, went with a forward deployment. The stronger Brigade {Fririon} on their left, the weaker Brigade {Gauthier}, with the Artillery, in the centre and Menne’s Brigade screening their fairly open right flank.


The British deployed Halkett’s Brigade on their right, Haye’s Brigade on the centre and Spry’s Brigade on the left. Finally Ompteda’s Brigade was held in reserve, on the road.

On turn 1, the French successfully rolled all their ADCs, while the British only rolled for 2 of their 4 ADCs. The British subsequently lost the initiative roll. This was a trend that was to follow throughout the rest of the game!

Both sides pushed their skirmish screens forward, while the British galloped their horse artillery forward, to bombard French centre. However, Haye’s Brigade refused to move up in the centre (despite a Brigade ADC roll), leaving this artillery exposed.  Gauthier’s Brigade moved up, to engage the gunners, with volley fire. Things did not go well for the gunners!

The French then pushed Fririon’s strong Brigade forward on the left, and this crashed into the far left of the Allied line, in a Brigade massed infantry column attack. The left-most French battalion charged, supported by two other Battalions and despite sustaining significant casualties from the British musketry, succeeded in carrying the British position.

Spry’s Portuguese Brigade started to try to envelop the French right, but the French skirmish line was being effective here and the French right flank battalions moved to prevent the flank being turned.

In the centre, not much happened!! The British artillery continued to get a hammering from the Gauthier’s infantry, while Haye’s Brigade still refused to move up to support.

On the French left, Fririon pulled back the battered left-most battalion, while he himself led a further massed infantry column attack on the next British battalion in line, with the same result, with the French just carrying the British position. However, this now left Halkett’s Brigade ‘Faltering’.

The British deployed Ompteda’s reserve brigade, to shore up their crumbling left and to try recover the initiative, Spry’s Portugese launched an infantry column attack on the far left flank. However, the French had anticipated this, deploying their right-most battalion into line. In a reverse of the normal line-vs-column, the French drove off the attacking Portuguese. At this point, the British called off the attack and withdrew.

General D’Armee seems to play well. Pretty frequent reference to the 4 page QRS, is needed, plus looking up a few things in the rules, but this was our first play. General D’Armee does seem to be one of the few rulesets to successfully reflect massed infantry columns, which is no mean feat! Dave’s British were VERY unlucky, with both ADC rolls and Brigade activations. So much so, that one Brigade (Haye’s) did not move at all!! This can be pretty frustrating aspect of the rules. Simon’s French had a better time of things, twice successfully running a knife edge of massed infantry column attacks on British line. Both of these could easily have been driven off, massively exposing the French left, but fortune favours the brave.

Friday 2 September 2022

Massacre at Mos Eisley (or 'I find my lack of Storm Troopers disturbing')

Tatooine last Friday a rebel strike force headed into the outskirts of Mos Eisley looking to pick up some much needed supplies. The force consisted of a mixed force of Rebel Troopers and Wookies led by Han Solo, Chewbacca and Cassian Endor and supported by some armour in the form of a pair of AT-RT walkers.  A heavy force for a routine supply run, but rumour had it that the Wookies were desperate for a promised batch of hair conditioner after months in the hot desert sun.

Han Solo with his squad

Rebel Walker and supporting troops

Unfortunately the Empire had got word of the operation and had sent a strong force of Stormtroopers to destroy the Rebels supported by a light tank and led by Boba Fett and the Dark Lord himself Darth Rob, I mean Vader.

Darth Vader leads his men into battle

The Imperial Tank proudly advancing


The Empire arrived with Boba Fett leading a force of Stormtroopers towards the landing pad, recently vacated by the Millenium Falcon, whilst Lord Vader supported his flank in the town.  The Imperial tank took the centre while two further squads of Stormtroopers took the far end of the battlefield near the imperial jail.

The Rebels countered with a strong force of infantry in the centre with Han, Chewbacca and the Wookies heading to the Landing pad.  Further troops and Cassian advanced towards the jail and one of the walkers supported each flank.  The forces were evenly matched in points although it was obvious the Rebels were more numerous. The imperial tank and Boba Fett both being high value units of which much was expected by the Dark Lord.


Mos Eisley with the jail in the foreground and the Landing Pad in the distance

Turn 1 saw both sides advancing into town with some long range sniping seeing the Rebels take a slight lead in casualties although little was achieved by either side.

Boba Fett orders his men into the Landing Pad


Turn 2 saw contact all along the board with Landos forces engaging the Imperials near the jail, Boba Fett and his men advancing on Han and Chewie and the Imperial tank advancing across the board only to get ambushed by two rebel squads.  Lord Vader was however somewhat lonely as he failed to get into contact with the Rebels and his squad took considerable casualties from long range rebel fire.  This turn the fire was considerably more effective with the imperials definitely getting the worst of the deal and a couple of squads being really hollowed out.  The tank also took several big hits and Lord Robs confidence started to weaken.

The Butchers Bill starts to mount

The Imperial Tank gets badly dented.


Turn 3 and the imperial tank was damaged and lost its mobility, advancing without infantry support had always been risky and with a rebel anti tank squad on each flank things were never going to end well.  The rebel Veteran squad took some heavy hits in exchange and the squad leader found himself alone.  On the jail house flank the Imperial squads realised facing an AT-RT  was painful as the Imperial Shore Troopers were wiped out and a regular squad decimated.  The Imperials were confident their Anti tank missile would sort out the walker but then realised they were within its minimum range, cry's of pain came from the Imperial commander.

Meanwhile in the landing pad things were also going badly for the empire.  Boba Fett had managed to hurt Chewbacca, but only enough to make him angry.  The main Wookie squad had engaged the Stormtroopers in melee and were busy ripping their arms off , Han Solo looked on but with everyone in Melee there were no viable targets to shoot at. 

A lone Storm Trooper tries in vain to hold off the rebel advance

A lone Storm Trooper gets beaten by Wookies, because he's worth it.


With the end of Turn 3 Imperial morale collapsed and Rob conceded the game.  In hindsight Rob admitted Boba Fett and the tank had been expensive choices that hadn't really delivered.  What he needed was more men as the rebel advantage in numbers had given me the advantage.  Personally I thought the tank had tied up a reasonable part of the rebel infantry but Boba had indeed achieved little beyond annoying Chewbacca.  In my opinion though the real damp squib had been Darth Vader.  Limited by low movement the Dark Lord had been isolated killing one rebel trooper and inflicting a point of damage on the walker.  Not very cost effective.  My own infantry were fairly squishy, but with three extra units on the board compared to the Empire I had the capacity to absorb damage which the Empire lacked. 

The game was played using the Star Wars Legion rules and took about three and a half hours to play three turns.  Partly this is because Rob and I don't play very often and so ended up repeatedly checking the rule book, however I think with the number of units we were playing the game is a fairly slow one.

Will the Empire strike back? Stay turned to find out. 

Chris