Wargaming from Hertfordshire & Beyond!

Wednesday 27 September 2023

3-Way Wars of the Roses Skirmish, Using Lion Rampant 2

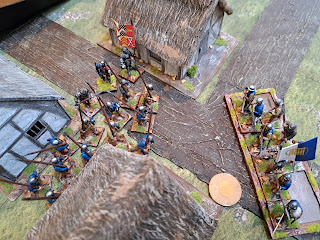
We wanted a nice quick, simple 3-way game, so I dusted off the Lion Rampant 2 rules. Having sufficient Wars of the Roses figures to create three 24 point forces, this was the selected period. The aim of the game was to search the village, to locate the missing documentation which would prove the legitimacy / illegitimacy of the current king. Once a unit contacted a building, a ‘Move’ action would search the building and reveal whether the documentation was there. Three buildings to search, with one set of documentation. The forces were;

Force A – Dave (Entering middle of North table edge),

  • Elite Cavalry (Knights) - 6 points
  • 2x Veteran Heavy Infantry (Billmen) – 12 pts
  • Veteran Archer – 6 points

Force B – Steve (Entering South East Corner), 

  • Elite Infantry (Foot Knights) - 6 points
  • Heavy Cavalry (Hoblier) - 4 points
  • Veteran Heavy Infantry (Billmen) – 6 pts
  • Veteran Archer – 6 points
  • Skirmishers (Crossbowmen) – 2 points

Force C – Mal (Entering South West corner), 

  • Elite Infantry (Foot Knights) - 6 points
  • Veteran Heavy Infantry (Billmen) – 6 pts
  • Heavy Infantry (Spearmen) – 4 points
  • Veteran Archer – 6 points
  • Skirmishers (Handgunners) – 2 points

Dave had first choice of force, with Mal second & Steve last. Selection of entry point was then in reverse order.


Dave opened with a nice orderly march down from the North. Mal’s forces marched up from the South West, with a little bit more disorder, as his archers were dragging their heels, mumbling something about some tight Northern git not paying them! Steve’s Hobliers made an immediate dash for Dave’s archers, while his lord & attendant knights made a quick dash for the village.

Dave suddenly realised that the Wild Charge characteristic of his knights could quickly result in them single-handedly charging the entirety of Mal’s force, so they re-deployed toward the left flank, thereby heading off Steve’s Hobliers.

Dave’s archers decided to save their arrows and so Steve’s hobliers mounted a frontal charge. Disaster! Some rather crappy dice rolling resulted in Steve’s hobliers being thrown back in a 2-all draw. 

Dave’s knights now thundered into the fray, met by a furious counter charge by Steve’s surviving hobliers. A crashing of horse and lance resulted in another 2-all draw, and Dave’s knights thrown back. However, Dave had his archers ready and they thinned the hobliers ranks down to a stubborn last man.


However, Steve still had a plan! His last Hoblier lured Dave’s knights into another Wild Charge, eliminating the last of Steve’s cavalry, but also placing Dave’s knights in a position where they would unwisely charge Steve’s skirmishers, hiding in the woods! 


Meanwhile, back in the village, Dave’s men and Mal’s men had turn-over two of the houses an found nothing. Steve’s foot knights however had struck gold in the last hut. But no sooner had they unrolled the vital parchments, then Mal’s foot knights lumbered around the corner. Red mist descending, Steve’s knights charged and after a brutal street fight, Steve’s knights were thrown back, leaving the parchments scattered in the street. Worse still, his lord was killed in the clash! 

Dave’s Billmen then attempted to muscle-in to grab the parchments, but after clashing with Mal’s knights, both sides pulled back, glaring at each other, over the pile of documentation.

But by this time, Mal’s spearmen had filtered into the South of the village, and took over the stand-off with Dave’s Billmen. At the same time, Mal’s archers worked around the South of the village and started to shower arrows on Steve miserable survivors.

Into the middle of this, Dave’s two surviving mounted knights careered about, charging stuff at random. But, just as they stopped to look for new targets, a hail of arrows from Mal’s Longbowmen cut short the life of Dave’s last knight & force commander!

Dave’s Billmen could not take this insult and charged the spearmen, only to be thrown back, ‘battered’ for their troubles!

At this point, Mal’s spearmen snatched up the vital parchments and marched Westward, while his lord made rude gestures to the survivors of Steve’s and Dave’s forces! A classic case of ‘slow & steady wins the race’!  

Time maybe to introduce some Leader Skills and maybe even try to merge Dragon Rampant, to give the old Song of Ice & Fire miniatures some table time?!


Monday 18 September 2023

LRGG Walk Waterloo


OK, the day before our walk, the wandering members of the LRGG had visited St.Joseph’s Church & the Wellington Museum, in Waterloo, as well as the Musee du Memorial, the Panorama, Lion Mound and Hougoumont, down on the field itself. Now we were going to walk the field good & proper!

The plan was for a 6 mile walk, covering the Northern part of the field, but in an uncharacteristic fit of enthusiasm, the team elected to also include Napoleon’s Last HQ (Simon will do anything to avoid a bus fare!). Anyway, this changed the plan to a distance of over 10 miles and by the time we were finished, we had plodded over 14 miles!


Anyway, we started our march at the Lion Mound [A]. From the bus stop, we carefully avoided the Frit van out on the N27, (having been forced to consume vast quantities of chips and beer here, the day before!), we reach the Lion Mound, from where we strike East, to La Haye Saint, to study the various memorials located there and peer at La Haye Saint [B], from the other side of the Chau de Charleroi (just to avoid being mowed down by passing high speed traffic!).

From La Haye Saint, we set-off East, along the Allied ridgeline, toward Papelotte. What strikes you here, especially as you move away from the excavations made to create the Lion Mound, is the undulating nature of the terrain. What look like quite gentle slopes, do result in quite markedly varying sightlines, when looking Southward, to the advance axis of the French forces. Fortunately there were also a couple of tractors off to the South, more of less marking the position of Napoleon’s Grand Battery. This offered a good perspective of the position of the French guns even if seeming disconcertingly close for 12 pounders!!

At [C] we reach pretty well the extent of the left flank of the Allied army, so we turned South-East toward Papelotte Farm. Sadly as this is on a private road, it has to be viewed from afar. However, once again, the noticeable feature are the relatively significant humps & bumps of the ground looking from the French positions. It also strikes you as to how exposed the French flank would feel, to the woods, where the Prussians would eventually emerge from later in the day!

From Papelotte [D], we head South, cutting down between where the Durutte’s & Von Ziethen’s forces would clash [E] in the evening.

Arrival in Plancenoit [F] is marked by the very Prussian monument! Also an interesting reflection that virtually every national army involved at Waterloo, seems to have a collective memorial on the field, except for the British!? Anyway, having struggled down to Plancenoit and wandered around the Church, we sit down for coffee and consider what must have been some hideous close quarter fighting across the very village green, where we now quietly sip our coffee!

We now make the final decision to press-on, all the way to Napoleon’s Last HQ, away to the South. The trails down here are rather less well travelled and so we brave many nettle stings & bramble scratches to exposed legs, in order to reach Ney’s HQ at Chantelet Farm, with it’s peculiar Baroque Chapel [G]. Simon indulges in a spot of Prussian marching, just to get in the mood!

On to Napoleon’s Last HQ [H], where it eventually dawns on us that it wasn’t Wellington & Blucher who won at Waterloo, but Napoleon, well at least based on statue count and name drops!?


From Napoleon’s Last HQ, we hack back up through the more modern Western part of Plancenoit, until we get up the Observatoire de Napoleon. No wonder he lost, you can see little from here due to the surrounding high hedges! Anyway, peering over these hedges, you do get an idea of how effective Napoleon’s Grand Battery could have been, when they were able to graze balls off the forward slopes of Mont St Jean ridge, into anything that might be exposed on the ridge.


We then trotted off to the rather unmarked Belle Alliance. Did Wellington & Blucher really meet on this very spot, after such an epic struggle? Seems like there should be some sort of marker?!

A brief detour takes us back down the Charleroi road, to the Victor Hugo column and the rather impressive but overgrown French Guard Wounded Eagle monument. After marvelling at yet another French field memorial, we return to puzzle over why the largest moment on the field, is dedicated to a visit by an author, many years after the battle?!

Back up to Belle Alliance and then left toward Hougoumont [K]. Sadly the big Chateaux is no more and the woods that once stood before the big farm, are all but cleared, but you can still see why this position absorbed over a division of French attacking force!

From Hougoumont, we struggle back up to the Lion Mound, dodging the little electric visitor bus, taking those seemingly unable to manage the 1.2km walk from the Visitor Centre, down to Hougoumont!! Pampered and sheltered from the sun, these folk cared little for the little party of hot & sweaty Brits, who by now had covered over 10 miles!

This same sweaty band of wargaming ‘flesh wobble’, struggled it’s way back to the bus stop. But, horror, no bus for at least 40 mins!? Well we thought, we have walked this far, we may as well walk on! 1.5 miles later, we spy the CafĂ© Du Paris bar. Time for a brief refreshment stop. Well 1.5 litres of beer each later, we set off to cover the remaining three-quarters of a mile, back to the enclave of other Waterloo obsessed wargamers, otherwise know as the Waterloo IBIS!? A good, if exhausting day proving that once again that it really helps to walk the actual ground, to properly understand a battle.

p.s. You have to travel into Brussels to find a British Army monument, albeit rather Guards dominated!!


Sunday 10 September 2023

"The Nelson Touch!"


Ebor Lard Games Day 2023 took place on Saturday 2nd September. Having had my pass signed, my missus dropped me of at 9:00am and after a hearty breakfast of black coffee and bacon butties I was ready for a day’s gaming.


The event followed the usual format whereby attendees are offered a choice of two games from the list that are being played that day.  This year the list included the perennial favourites Chain of Command, Sharp Practice and Dux Brittaniarum but also featured a couple of variants of the newly published What a Cowboy along with some lesser known titles such as Flashing Blades and Kiss Me Hardy. Unusually the big Chain of Command game was run as a single event across both morning and afternoon sessions.


I played “The Nelson Touch!” during the morning session my ships were HMS Avoir Dupois and HMS Firkin.


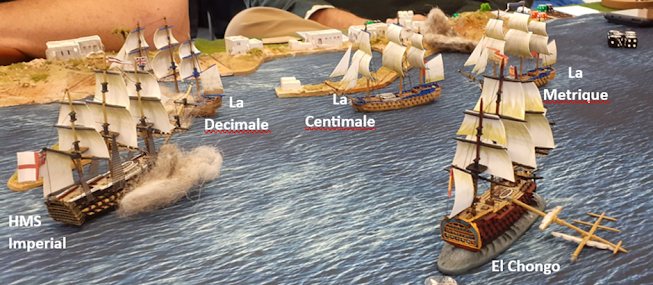
Having just embarked troops for the invasion of the Caribbean Isla del Muerta the French and Spanish squadrons were tasked with running the British blockade of the Rio Riviere and escaping off the western board edge. The French squadron (La Decimale, La Centimale and La Metrique) entered the board at the north east corner of the estuary and the Spanish (La Chongo, Arbusto and Rastas) sailed from the south east.


Opposed to them were two British pickets. Approaching from the north west were HMS Imperial and HMS Badger.  From the south west came HMS Avoir Dupois (a captured French vessel) and HMS Firkin. 


The Spanish flagship El Chongo was quick to take up a firing position in the centre of the board and opened fire on the fast approaching HMS Imperial. 


HMS Avoir Dupois ran north to avoid the shallows around the island to the south west of the estuary, closely followed by HMS Firkin.  Seeing the British move to engage the Spanish in the centre of the estuary, the French admiral decided to sail through the narrow channel along the northern bank of the estuary.


Having spotted the danger of the French slipping past him through the northern channel the Captain of HMS Imperial turned north east to present his broadside to the Spanish flagship and intercept the French squadron.


As he cleared the shallows to starboard the Captain of HMS Avoir Dupois led his small force directly towards the Spanish line aiming to cross their T in best naval tradition. 


Despite receiving fire from El Chongo HMS Imperial opened fire with a devastating broadside dismasting the Spanish flagship and causing her crew to lose way as they struggled to cut free the damaged mast and rigging.


No sooner had El Chongo cleared her decks than Imperial struck her once again collapsing a second mast.  El Chongo was now drifting northwards out of control with the crew fully occupied clearing the remains of her rigging. 


Imperial was now also receiving fire from La Decimale.  


Signalling independent action to Firkin, Avoir Dupois raced towards the Spanish line.  After taking her first hits from Arbusto, Avoir Dupois turned to starboard and delivered a devastating broadside into Arbusto clearing the gun decks and causing multiple fires to break out.


Not content with the smashing blow dealt to Arbusto, Avoir Dupois pressed on to deliver her starboard broadside directly into Rastas. Despite bravely responding in kind Spanish morale plummeted. Following close on the heels of Avoir Dupois and in tandem with Badger, Firkin added to the destruction wrought against Arbusto.


Having taken continuous fire from La Decimale and La Centimale HMS Imperial was now in dire straits with rudder damage and a loose cannon she too was now drifting North out of control.  Having miraculously avoided the sand banks on her port side she was drifting directly towards the trailing French ships.  La Decimale having cleared the Northern channel was now making full speed towards the open sea.


On the Southern edge of the estuary all was not well aboard  Avoir Dupois the crew morale was wavering and the fire from Rastas had cut loose a cannon which thundered around the gun deck.  Following Avoir Dupois, Firkin pressed on to engage Rastas.  Giving as good as she got Rastas spotted her opportunity to escape the British onslaught and headed for the narrow southern channel out of the estuary and into open water.


As Avoir Dupois turned North in pursuit of the escaping French squadron she continued to mercilessly pound Arbusto.  Arbusto her guns now fully disabled struck her colours.  Firkin delivered yet another broadside into Rastas causing her morale to fail and the crew to strike.


On the Northern edge of the Estuary La Centimale and La Metrique, trying to avoid the drifting hulk that was HMS Imperial, collided and fouled.  La Centimale continued to pour fire into Imperial setting her alight.


Having extinguished her fires and brought herself under control El Chongo was now back in action but barely moving due to the rigging damage she had sustained.  Seeing the threat La Chongo now posed the captain of Avoir Dupois raced the length of his ship rallying the crew and steadying his vessel for action.


HMS Badger seeing La Decimale escaping the estuary turned North to intercept her.


Missing La Decimale by a whisker Badger delivered a stern rake into the French ship as she scraped past.  Calamity! Badger now found herself out of sea room and heading for the beach where she promptly ran aground.


The fires continued to rage aboard Imperial and provided the climax of the action when she blew up taking La Centimale and La Metrique with her. 


La Decimale had escaped the British blockade but at heavy cost. The British gains amounted to two Spanish prizes and two French ships set alight for the loss of HMS Imperial and HMS Badger run aground. Although the crew of El Chongo had regained limited control of their vessel the Avoir Dupois and Firkin were now moving to engage El Chongo and deliver the coup de grace before departing in pursuit of La Decimale.  The game was declared a British victory.

Friday 8 September 2023

Battle of Plum Bend

After several months away from the front, our tame reporter reported for duty on the Mississippi river in May 1862. It had been suggested that I dust off my ACW naval collection and run a game of Peter Pig’s “Hammerin’ Iron”. Rather than use the Peter Pig game set-up system, I opted to write my own scenario and found an interesting historical setting of the battle of Plum Bend. The Federal Western Flotilla was pushing up the Mississippi as part of the so-called “Anaconda Strategy”, facing both shore forts and the Confederate River Defense Fleet (note American spelling of defence!). Early morning of May 10th saw the Federal flotilla in position to trying and bombard Fort Pillow into submission. Mortar rafts were in position together with the ironclad USS Cairo as guard-ship,

with the three other Federal ships at anchor upriver. The Confederate flotilla attacked out of the early morning mist. It was a fairly asymmetric game, with the Federals having more heavily armed and armoured ironclads, and the Confederates tin-clad rams but the benefit of surprise. The main problem for the Confederates was that their strategy relied on Chris and Tony’s close co-ordination. They were doomed from the outset.

The game initially proved pretty even. The Rebels managed to sink the USS Cairo through a combination of shore battery fire and a well-judged ram attack, and then Tony ran through the defenceless mortar rafts. The Union managed to sink the weakest Rebel vessel the General Sumter, and also immobilise Chris’ flagship the CSS General Bragg which continued to drift downriver gamely firing away whilst sinking lower and lower in the water.

However, by the end of the game Tony’s CSS General Sterling Price was high-tailing it back up-river leaving the burning CSS Little Rebel to face three large, powerful Union Ironclads.

Tony of course claimed victory for his massacre of the Union mortar rafts, but as with much of the Union juggernaut there were many more rafts to replace them, whilst the Rebels had effectively lost two precious ships and another was highly likely to succumb to overwhelming force.

I hope everyone enjoyed it. As we were re-learning the rules no doubt mistakes were made, and I’m still not sure about the “direction of ram” situation. Phil suggested a “house-rule” which I might adopt. Next up I need to add some sandbars plus I have found some unpainted packs of torpedo boats and strings of mines which will add some more tactical complexity to the game. I also see that Mr Pig has added some more ships to his collection. Could be expensive!

Simon

Thursday 7 September 2023

On Company Business

This scenario is a slightly modified version found in the 2011 TFL Summer special.

The efforts of the Ohio Charter Company to populate and develop trade in the valley saw a significant investment from many of Virginia’s leading personages. Life on the frontier was a tough existence, with settlers attempting to carve farms out of wilderness whilst attempting to co‐exist with the Indian population. Since the Summer of 1753 the French had been intent on securing their claim to the territory by forcibly ejecting the traders and settlers of British stock. As an uneasy peace turned into full‐scale war such punitive expeditions increased, and the civilian population and local militias bore the brunt of the unforgiving fighting. This scenario is based on one such French raid in the Ohio valley.

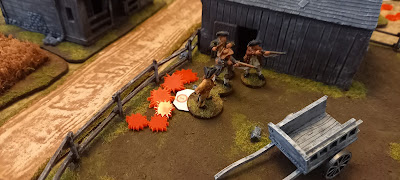
Two families were running the farmstead and the Dunn's son Billy had come running in to say that the French were coming. Billy was immediately packed of to get help from the fort at Squaws Crossing. In the meantime both families barricaded themselves into their respective farmhouses and awaited the assault. An Indian raiding party soon turned up and started to fire upon the Dunns farmhouse,


whilst two groups of Milice Canadiene fired upon the Bradstreets farmhouse from the cover of the nearby field.

Both the Dunns and the Bradstreets were taking casualties and it wasn't long before the Dunns were forced out of their home, swiftly followed by the Bradstreets.

With a hoop and a holler both the Indians and the Milice Canadiene rushed towards the farmhouses in a bid to pillage and burn whatever they couldn't carry with them.


With the Dunns and Bradstreets heading for the cover of the nearest woods.

In the meantime the Marine Infantry slowly advanced towards the trading post by the river.


The Militia in the trading post started to take casualties and decided that hiding in the woods was going to be a better option.

The British regulars at last decided to show up, only to find the farmstead in flames.

The regulars formed line and poured fire into the Marines.


Soon the Marines were falling back, having taken significant casualties.


The Militia seeing the Marines legging it from the field, took courage and advanced, but the Marines had too much of a head start.

The French had done what they had come to do, in burning the farmstead and fields, so were declared the victors. However, the Dunns and Bradstreets said that they would rebuild a bigger and better farm.