Wargaming from Hertfordshire & Beyond!

Saturday 28 January 2023

Sharp Practice in the Flagstaff War

Thursday January 26th. Our reporter ventured into totally unknown territory, going to North Island New Zealand in November 1845. I had laid on a Sharp Practice scenario loosely based on the so-called “Flagstaff War”, with historical characters as leaders but in a fictitious setting. The game saw Greg’s British/settler column aided by allied Maoris trying to locate a Maori Pa and demolish their ritual gate as a punishment for a Maori raid on a farmstead. Phil took the Maoris who were trying to prevent the “Pakeha” from performing their mission.

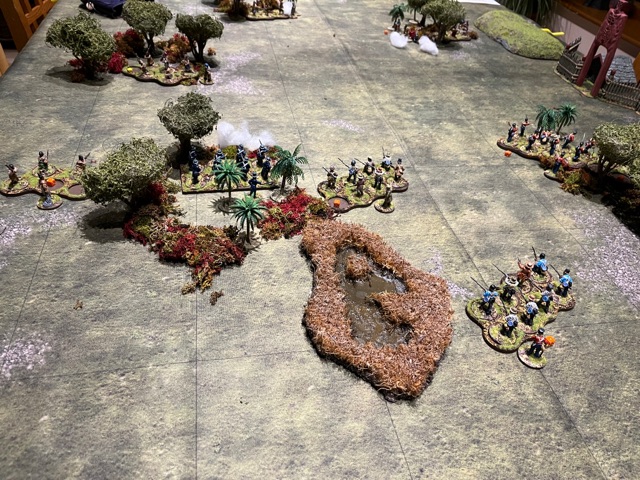
The game saw the British arrive en masse at one deployment point, with their Maori allies deploying to their flank and rapidly advance through the trees.

Phil deployed his troops near the Pa

into the woods and then moved several units off their moveable jump off point to attack the British Maori allies.

Greg got a nasty shock when his Maori allies lost two figures dead due the heavy Maori first fire helped by the “buck and ball “ rule, which reflected the Maori tactic of double-loading their muskets.

Greg’s troops more than held their own and soon had one of Phil’s units reduced in strength and with a knocked out leader.

Greg’s dice rolling was much improved compared to other games played recently. Maori force morale was being dented.


Greg’s Naval Bluejackets and Colonist militia swung into action, albeit taking shock meant the colonists couldn’t act as a formation.

A British regular officer ran across to take command of one of the volunteer units and soon they too were firing at the Maoris hiding in the woods. After one spectacularly poor round of shooting Greg exclaimed that it was like playing a Vietnam game but armed with muskets. Not a bad analogy! Finally the weight of fire from the “Pakeha” told and a Maori unit broke and ran off-table, with more retiring to lick their wounds and find new defensive positions.


Back with the main British column, the regulars got their act together and advanced in line deploying into skirmish formation to move through the woods.

Another SP2 “Maori Wars specific” rule which seemed to work well. The Royal Engineers unit trailed in their wake with on incapacitated officer. One of Phil’s units retired into the Pa intending to use the palisade as cover, and this point he also deployed “Leader Number 6” who Greg had noticed hadn’t done anything throughout the game so far. This was a dug-in naval carronade purchased from an American trading vessel.

The look on Greg’s face was a sight to behold, and he accused me of Sharp Practice in playing fast-and-loose with the rules! It poured 16 dice worth of canister into the British regulars, but thanks to the skirmish formation and light cover the effect was relatively light, and the British continued to advance on the Pa.


At this point we decided to call it a night, and Phil conceded defeat. His units were retreating and his carronade almost out of ammunition, having not performed well at all. Both Phil and Greg said they enjoyed it. It is obviously a quite different game from most of our SP games, with one force comprised solely of skirmishers and lots of wooded terrain and a few specific rules all of which seemed to work well. The game seemed to reflect what I have read of the war, with Maori guerrilla tactics trying to inflict heavy losses on the British and wear away their morale. Even the Pas were not considered vital “fortresses”, being placed at choke points which forced the British to attack them and hence lose men. For me it was nice to finally get my Maori Wars forces into action. I think I’ve had them sitting in a box fully painted for maybe 5-6 years, so their arrival on the tabletop is long overdue.

Simon


Saturday 21 January 2023

Xenos Rampant, Star Wars


We decided to use virtually the same set-up for the Xenos Rampant game, as for the proceeding Combat Patrol game, but using the Scenario Alpha (but with the “reinforcement” Variant Deployment). For some strange reason, Rob’s Rebels choose the ‘corner to corner’ deployment option, with Rebels entering in the South West corner and the Imperials from the North East corner.

Both sides had 24 points, with the Imperials having 4 Heavy Stormtrooper sections & Darth Vader (Elite, Single Model, 5 hits, Mono Blade). The Rebels had Luke (similar Elite, single figure, 5 hits, mono blade), but they had an Elite 3 figure Hero team (Han, Leia & Chewy), along with 4 Light Infantry Rebel teams, one equipped with a heavy weapon.

Utilising their ‘free’ move actions, the Rebels rapidly occupied most of the centre of the table. The Stormtroopers were  definitely on a ‘go slow’ day, barely able to get two Stormtrooper units established as a defensive fire base, before the Rebels started to swarm around them.


The Rebel light troops then fast discovered that their blasters were not having much impact on the Stormtrooper armour (not helped by Rob forgetting that his heavy Blaster did 2 damage per 6 rolled!).

While the Rebel troops were discovering that Stormtroopers were harder to kill than in the films, Han, Leia & Chewy went on a site tour and Luke decided to stop and fix his hair! Darth used this ‘interval’ to chase out his sloth like remaining Stormtrooper teams.


A Stormtrooper attempt to flank the Rebel left, met with disaster, as Han, Leia & Chewy eventually popped up, to quickly despatch 3 of their 5 Stormtroopers.


On the Imperial left, Darth started a little game of ‘choke the rebel trooper’, one at a time, forcing Luke to come forward.

However, as other Rebel troopers were then arriving in support, Darth sent forward a section of Stormtroopers, to finish Luke, but he rather rapidly reduced them to a pile of severed heads & limbs!

Overawed by his success, Luke rashly rushed forward to tackle Darth himself, by daddy summoned up 14 hits, removing Luke’s right hand, via the left shoulder!?

However, the struggle with Luke had cost Darth, he was down to 2 Strength and his Stormtroopers were dying around him.  He strode forward, ripping through one Rebel trooper squad, but as he turned around the corner, Han Leia & Chewy were waiting for him and there he fell!

Xenos Rampant plays MUCH faster than Combat Patrol. It gives a nice feel for the heroic characters. There is a real danger of ineffectual snipping between standard trooper teams & hence a static ‘dice fest’, but thoughtful terrain selection and maybe using the large squad options, heavy weapons options, etc, should get around this. Will definitely be getting this on the table again. I particularly want to get a Captain America style, weird WW2 style game on the table, using Xenos Rampant. I also want to explore the Boarding Actions / Space Station type scenarios.

Combat Patrol, Star Wars


This was our first test game of Combat Patrol and we wanted a reasonable comparison to the following game of Xenos Rampant, so we kept the sides modest. Two Stormtrooper sections, verses two Rebel Trooper sections. The Rebels were led by Princess Leia and the Stormtroopers, by some half brained Imperial desk-jockey, who seemed to have brought a water pistol with him, rather than a real gun!

Each side had assistant section leaders, so in essence there were 5 leaders on each side, with effectively 4 fire teams.

Stormtrooper Blue section pushed to secure the Imperial right flank & the storage tanks. Stormtrooper Red section filtered through the cliffs on the left flank, to secure the high ground on the left & form a defensive line behind a central row of storage bins, centre left of the compound.

The Rebel sections went far left and right, aiming the flank the Stormtrooper positions, Leia leading the Rebel left section.

On the Stormtrooper left, the flanking team struggled to get into position on the hill. Their central supporting fire team, did establish a fire base, but their heavy weapons specialist was rapidly stunned, wounded and ran out of ammunition!? Unlucky day!

However, the flanking Rebel team on the hill was also fairing badly, with the muppet bringing the largest head, quickly accumulating 2 head wounds! Repeated cries of keep your head down, were only met with cries of “how”, or was it Oww?!

Stormtrooper Blue section, on the Imperial right, seeing the problems on their left, decided to split. One fire team headed for the central bins, while the far right team secured the reinforced barrier, near the storage tanks.

Sadly for them, Leia & her band of groupies, managed to work around the rear of this ‘strong’ Stormtrooper position, with Leia despatching two Stormtroopers with sporting shots to the back of the head!

Finally left flank Red section Stormtrooper fire team managed to reach the crest of the hill, only for their Section leader to get wounded and the rest of the team pinned!

In the central bins area, things were going from bad to worse for the Imperials. The Stormtroopers were taking fire from all sides, while the Imperial lacky officer waved his waterpistol about and shouted vague instructions. Eventually the Stormtroopers themselves decided to take matters into their own hands and rush the rebel troopers in front of them (at least this way avoiding the flanking fire).

Leia, having now shot her 3rd Stormtrooper in the back of the head (while he was frantically  trying to reload – you don’t see this side of her character in the films!), decided to move-in on the central position.

By this time, the Blue Section Stormtroopers had decided that battlefield commissions were definitely not a good thing, as it also seemed to result in a very, very short service life!? Just to add insult to injury, virtually the whole of the red section Stormtrooper fire team, on the hill, discovered that someone had forgotten to pack the spare ammo!?


Our first experience of Combat Patrol suggests it can be a fun game. The card turning resolution system works well and slickly, but figures firing individually, can slow play. Game size of 2 sections / 4 fire-teams, seems a comfortable upper limit, maybe up to a platoon? The troop quality works well, ie, Elite troops could get up to 3 activations in a turn, but Green or pinned troops only 1. This system looks like it could work well for more modern, 4-man fire-team based skirmishes. The Star Wars adaptions look nice, but quoted ranges seem rather odd, ie, a blaster with 200” range! We very quickly switched to cm, just for this game. This needs some work.

Overall though, we thought the rules well worth another visit.

Battlegroup, North Africa, 1941


 A 15mm 1941 Western Desert game, between Tony (Afrika Korps) and Chris (British). Tony got off to a great start, rolling 11 units for the initial deployment and a great first round orders total, enabling the Afrika Korps to rush the platoon of Panzer IIIs to the North of the central walled orchard and the platoon of Panzer IIs, between the orchard and the solitary dwelling.


Chris’s British only managed to deploy a meagre 3 units! A 2 pounder deploying on the hill overlooking the orchard, a single load of lorried infantry on the road, while a single Vickers Mk IV roared off to contest the orchard.

This game looked like it was going to be over before it started! However, the Afrika Korps’ luck not so much changed, but more turned into a Greg sized luck blackhole!!


While the Afrika Korps managed to get few orders, the British managed to accumulate a steady progression of decent order rolls & reinforcements, managing to reinforce the single 2 pounder A/T gun with a second 2 pounder A/T gun & an A13 cruiser, then 2 more A13s. Soon 2 of the 3 Panzer IIs were burning.


More trouble then arrived for the Germans. While their Panzer IIIs dithered over orders, a platoon of Honey tanks rounded the hill, to engage them. Initially German gunnery was good, but something was horribly wrong with their shells, most shattering on the frontal armour of the M3s. The volume of return fire convinced one Panzer III crew to abandon, while the other two were giving it very serious consideration!


In the centre, the sole surviving Panzer II decided to attack! Caught by surprise, by this very aggressive move, the A13 gunners could not get a bead on the plucky Panzer II, while the 2 Pounders simply missed!

The Panzer II rampaged over the hill, getting amongst the lorry mounted British infantry, but all it seemed able to do, was punch holes in the canvas backs of the lorries!! While the Panzer II crew frantically tried to find the fault with the vaunted May Luck, the left-most 2 pounder pivoted around and brewed up the Panzer II. This was the last straw for Tony’s Afrika Korps!! He went in search of his four leaf, rabbit’s foot!?

Monday 16 January 2023

Early war What a Tanker

This week our reporter travelled from dark days “In A Galaxy Far Far Away” to the first days of WW2. Inspired by the recent Battlegroup Blitzkrieg game over Christmas, plus my completion of Sarissa’s Russian Church and Dacha, I laid on a WAT scenario set in September 1939. The Army of Lodz’ 2nd Light Tank Battalion were fighting for control of the communication routes through the town of Piotrkow Tyrbunalski against 4th Panzer Division. Phil and Tony took the Poles, leaving Greg and Chris with the Germans. Greg quietly despaired at the thought of Chris trying to unleash Blitzkrieg.

Chris arrived slightly late and refused his traditional tea, citing recent dental work and rubbing his jaw gingerly. We all politely enquired if he was in pain. The Germans advanced swiftly with their PzIV and a PzII to the North, a PzIII and PzII in the centre and eventually two PzIIIs in the south.

Everyone was amazed at Chris’ uncharacteristically swift advance and wondered if his dentist had given him a dose of Pervitin, the German methamphetamine, used to enhance performance but often induce reckless behaviour. Chris denied it. The Poles were more circumspect Moving their TKSD tank destroyer to cover the North, a TKS tankette in the South and the 7TPs holding the centre. 

The game started to settle into a flurry of ineffective firing, and after about four turns everything was still fully operational. Phil then rolled a set of dice giving him plenty of movement and a 7TP roared through the German lines crashing into a copse.


It was clearly trying to get flank of even rear shots on the German armour. A bold move. Tony followed up with an attack by his mighty TKS tankette on the PzIII in the south. The Germans moved to counter both attacks but found the Tankettes particularly hard to hit thanks to their “low” and “small” attributes. One of Chris’ PzIIIs finally brewed up taking hits from 20mm cannon fire and the 37mm of a 7TP.

Phil’s 7TP was forced to reverse into the open and eventually abandoned by its crew. Chris’ second PzIII found itself losing command dice thanks to the mighty TKS.


The German situation looked serious as they had lost more combat power, yet they were actually winning the scenario, as they had possession of the crossroads. However the two TKS both advanced and started to threaten the Germans from flank and rear.

A single volley of 20mm fire saw Chris PzII explode and at one point his remaining PzIII was down to one command dice.


At this point it was decided to call it a night and award the game to the Poles. Although the Germans technically held the objective their flanks were exposed and they had lost nearly three vehicles to the Poles solitary abandoned 7TP.

As ever with “early war” head-on firing had proved pretty ineffective and attritional. The winning move had been the Poles’ bold attack which exposed the German flanks. Once again the mighty TKS tankette armed with a 20mm cannon had proved its worth as a tank killer...much to Greg’s annoyance.

That’s it for this week!

Simon