Wargaming from Hertfordshire & Beyond!

Sunday 31 July 2022

Sudan Death in Sharp Practice

Having finally finished the Perry 28mm Sudan figures, I decided to try out the Sharp Practice Sudan conflict adaptations, from the 2021 Too Fat Lardies Special, written by John Savage.

Steve & Rob took the Brits, leaving Dave & Mal to take the Mahdists. This was a rescue mission. The Reverend Godbotherer and his daughter, Felicity, were sheltering in the ruined fort, “protected” by a group of Seamen and a group of Bashi Bazouk Skirmishers (@ Deployment Point 2)!! A British relief column, compromising two groups of British line and a Gardner Gun, entered at DP1.

The Mahdist objective was to capture the Reverend, in order to make an example of him (and do unspeakable things to his daughter!). The Mahdist forces comprised four groups of Beja Spearmen & a group of Beja Skirmishers at DP1 and three groups of Beja Spearmen & another group of Beja Skirmishers, at DP2.

Things started well for the Brits. The column marched on, covered by the Gardner gun, even managing a double move (using 4 flags). The Mahdists deployed into the depression in the South East and the wadi in the North East and watched.

Deciding time was against them, the Mahdist spear groups broke cover, the Southern group headed for the British column and the Northern group for the fort. The British infantry went into line and wheeled to meet the ongoing Mahdists. Their initial volley chewing holes in the leading group of Beja spearmen. In response, the Mahdist leader thoughtfully sent this leading group off to the East, to provide a target for the British infantry, while the remainder rushed into the rough ground to the North West, avoiding the British infantry volley fire and instead risking the rather ineffectual fire of the Gardner Gun.

At the fort, the Sailors rushed to defend the North wall, while the Bashi Bazouks went to the West wall.

The initial British luck then deserted them! A couple of turns on the trot, where all that came out of bag, were really a couple of Mahdist ‘flags’. This enabled the Beja spearmen to close on the British line, as well as the fort, at end of turn.


The British line infantry did manage to halt the Southern charge, but at huge cost! At the fort, the Beja spearmen swarmed over the walls, massacring the British sailors, before engaging and then driving off the Bashi Bazouk, capturing the Reverend and his daughter in the process. At this point the British Major, commanding the column, decided to withdraw. A sad day for British honour.  

Sunday 24 July 2022

The Americans attempt to push into Germany

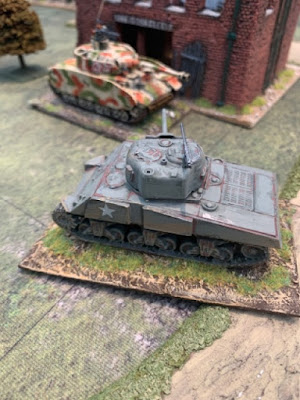
After retirement at the end of May our doughty reporter realised that he was missing the cut and thrust of combat so returned “to the colours”. Refreshed from his break and hoping for a journey to warmer climes he was dismayed to find himself in dark, dank Western Europe in February 1945. The allies were starting their push into Germany, and this game saw armour from Combat Command B of General Maurice Rose’s US 3rd Armoured Division trying to take the small town of Elsdorf held by an ersatz Kampfgruppe from Hurst Von Mellenthin’s 9th Panzer Division.

The Americans roared onto the table with A Sherman and Hellcat veering south and another Sherman and a shiny mew M26 Pershing advancing down the centre and in the North. The Germans had cunningly deployed a Hetzer in a wood and quickly moved the Tiger to block the Northern advance. The MkIV seemed to be held in reserve in the centre. Very wise! At this stage all vehicles were on blinds.

Phil’s Northern M4 got a nasty shock when it found itself staring down the barrel of the Tiger I and beat a hasty retreat into cover. Tony’s Hellcat moved into position to try and take on the Hetzer but failed to spot the German tank hunter in the woods and suffered the ignominy of a “first shot first kill” as the Hetzer’s 75mm L/48 barked into action.

The accompanying M4 then fired twice at the Hetzer only to record two misses.

Back in the North it became a game of “big cat hunting”. In the end the Americans broke cover hoping to use their speed to counter the Tiger’s slow turret. A cry of “oh crap” was heard from Dave as he realised the “fast” American vehicle wasn’t a lightly armoured tank destroyer but rather the formidable Pershing with 10 defence and 11 strike dice.

However, the Yanks luck ran out as the Tiger managed a flank shot into the Pershing and a “burning” marker was placed on the table.


Back down south, Tony engaged in a frantic war of manoeuvre with the Hetzer, inflicting some damage but not the killing bow.

Finally, the Hetzer emerged from the catfight bloodied but with a burning M4 in its wake.

That left a solitary M4, the same that had prudently hidden from the Tiger at the start of the game. It started a Keystone Cops style chase around a building with the MkIV but in the end the game was called as the Yanks were beaten. Indeed, the next turn may have seen the destruction of the M4 as the Tiger had an obscured flank shot as per the photo.


The game did reflect reality. The battle of Elsdorf witnessed the combat debut of the M26 Pershing and one was destroyed by a Tiger 1. That said the American gunnery rolls, courtesy of the Umpire was truly pathetic.

 Simon

Thursday 7 July 2022

Operation Martlet - Table 4 – Striking at St Nicholas

As expected the British pushed deployment points into the orchard area, as well in a flanking position in the cornfields on the Southern table edge. The Germans pressed to get their deployment points into St Nicholas Farm, as well as covering the road.

The British initially deployed their Forward Artillery Observer, with a supporting infantry section, in a flanking position on the Southern table edge. They then deployed two infantry sections into the orchard area, which started working Eastward, supported by a Sherman, just south of the road.

This forced the Germans to deploy an infantry section into the Western edge of St Nicholas farmyard, but after dropping a couple of spotting rounds, the British FAO called a 3” mortar barrage down on the farm. The Germans then revealed a dug-in Mk IV, just South of the road, which immediately hit the Sherman, forcing it to withdraw in shock.


The two British infantry sections were now approaching the farm, through the orchards, so the FAO drew the barrage back toward the South-East, obscuring the Mk IV, clearing the Panzer Grenadier position.


The British Blue section, supported by the recovered Sherman, laid down fire on the Panzer Grenadiers in the farm, while Yellow section eased around the left side of the farm. However, Yellow section quickly discovered another section of Panzer Grenadiers, dig-in at the North-West corner of the farm. The four MG42s of the Germans started to inflict losses on the British infantry, which their return fire just could not counter. To prevent further losses, the British FAO walked the barrage back over the farm area.

Lifting the barrage from the Mk IV allowed the Germans to reveal an IG.18 gun, entrenched next to the Mk IV. Both of these proceeded to engage the infantry section on the Southern table edge, in the hope of neutralising the FAO. Sadly for the Germans, there appeared to be significant quality issues with their HE shells, because although the combined fire of two 75mm guns, was just not inflicting damage fast enough, because the mortar barrage on the farm was starting to inflict intolerable losses on the Panzer Grenadiers in the farm area.

Eventually the German Commander decided that these losses could no longer be sustained and called for withdrawal. However, even this withdrawal did not go well for the Germans, with the platoon leader and two section leaders being captured and only one member of Red section managing to sneak out from under the barrage!!