Wargaming from Hertfordshire & Beyond!

Saturday 30 January 2021

Operation Lightning Pegasus (First Badlands Playtest)

Date: Classified, 

Location: Classified (but hot and sunny, possibly near the steppes although strangely snowy).

Forces Involved: US Squad Able and Squad Baker (both 5 man Professional Troops armed with Assault Rifles).
Insurgents: People's Democratic Republic militia (2 groups of 6 Conscript/Militia with Assault Rifles)

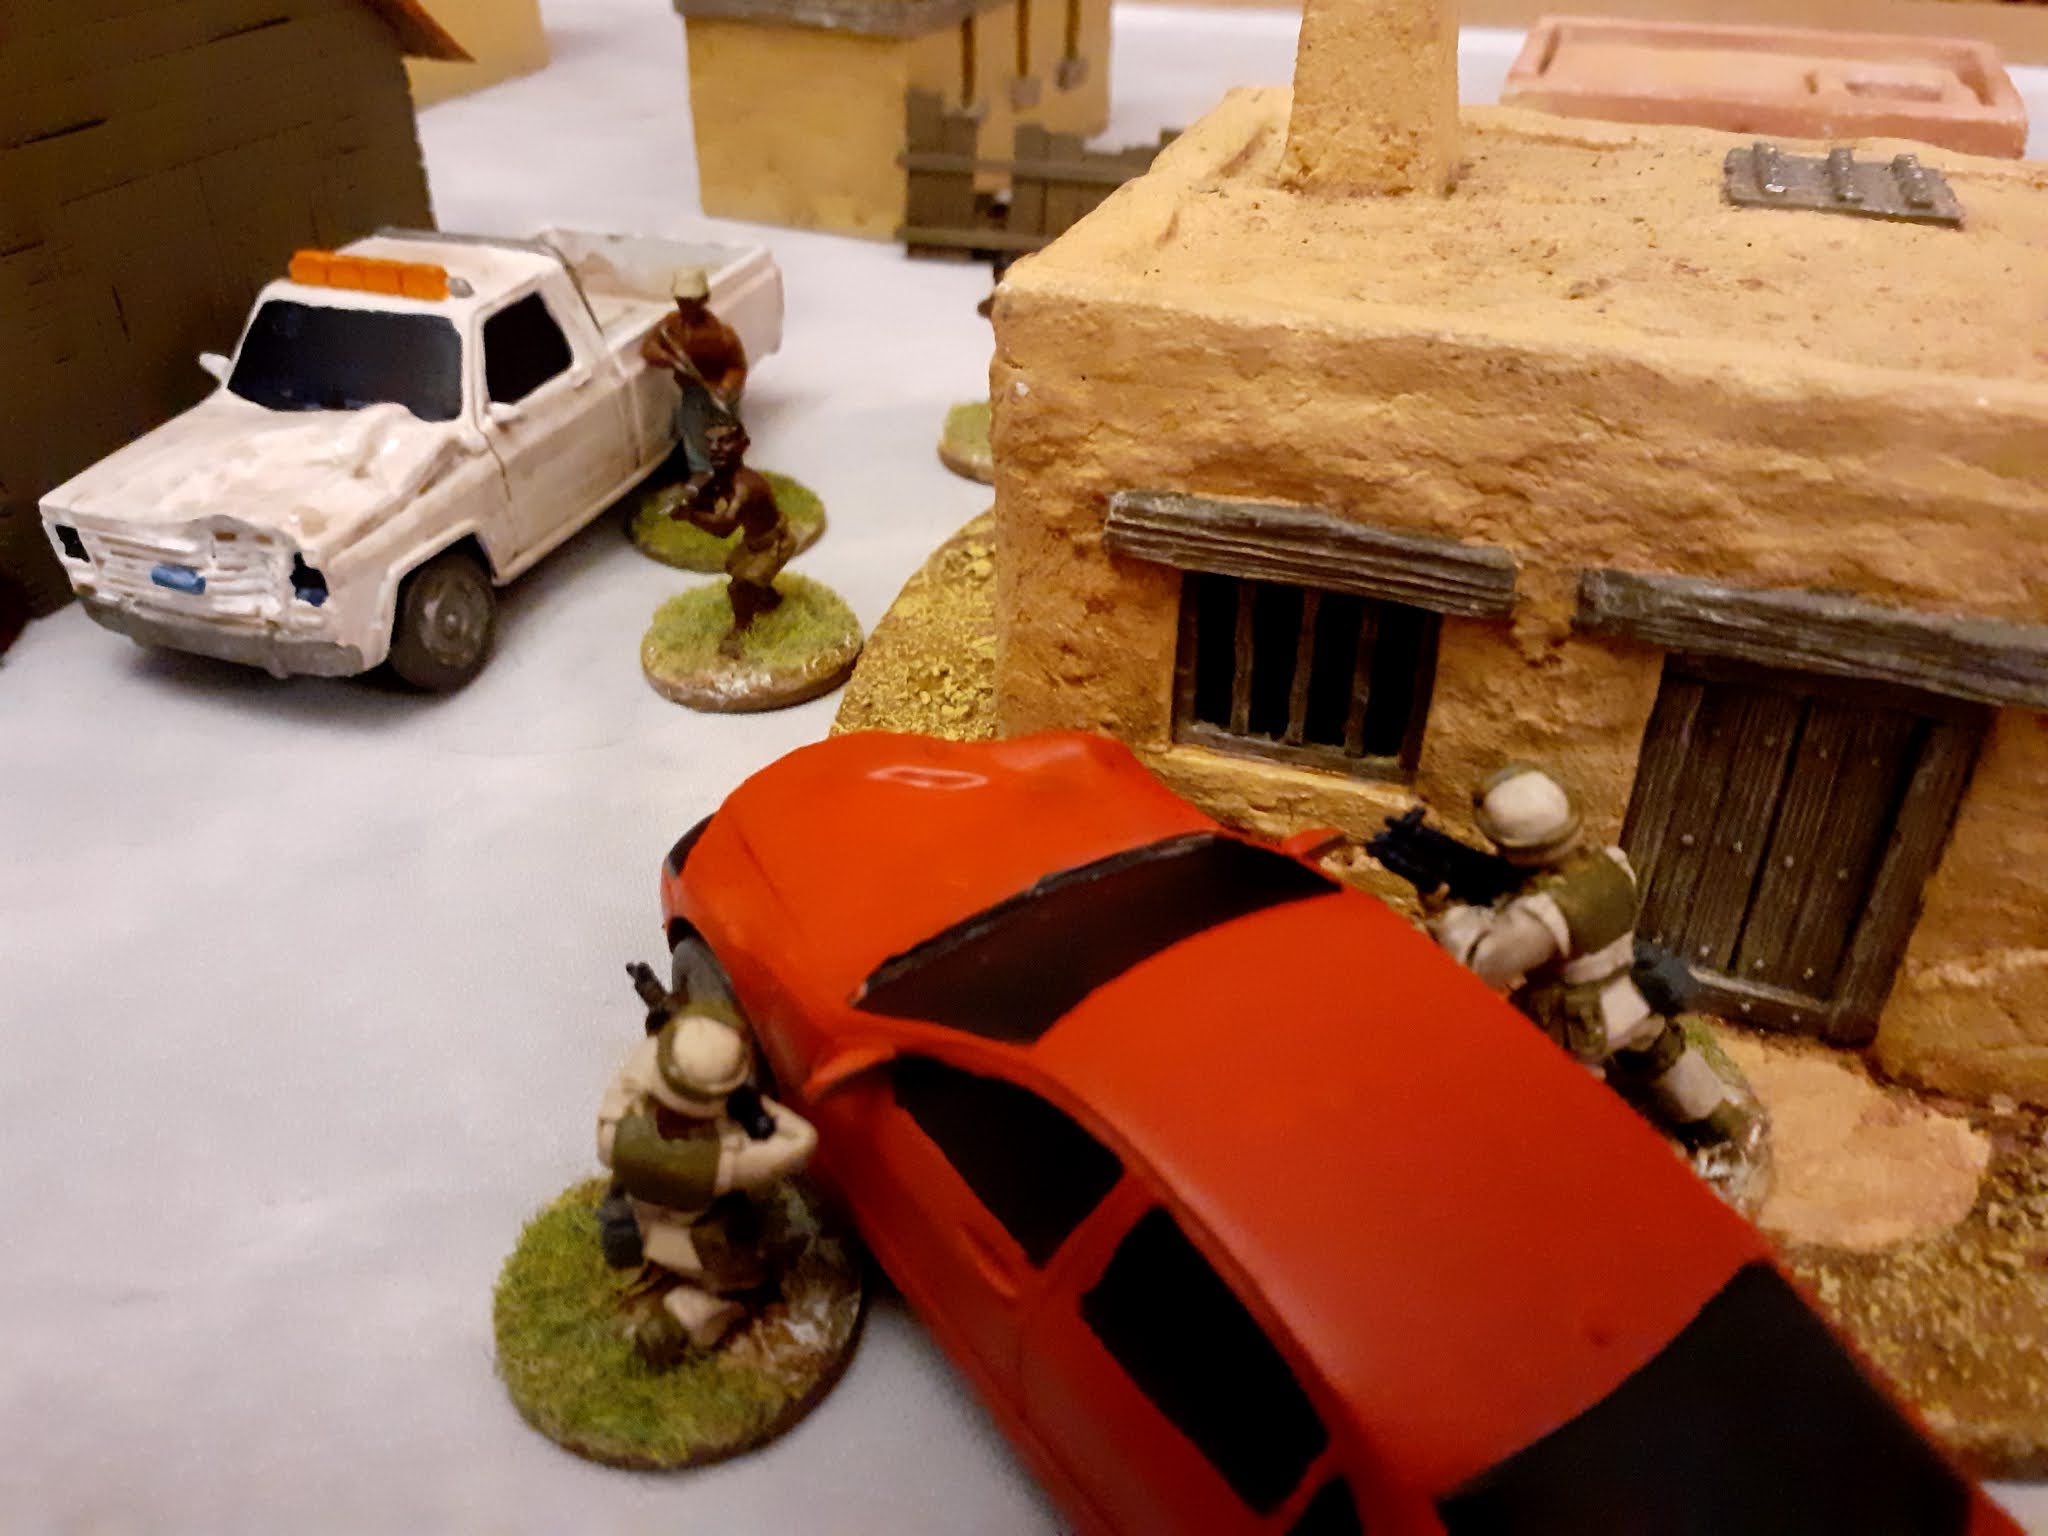
Colonel 'Kurtz' observed the small village ahead, another inconsequential group of old adobe buildings, 1960's industrial units and cheap modern temporary structures thrown together.  Vague signs of movement could be discerned but it was impossible to tell from this far out exactly what was waiting for his men.  His orders were far clearer though, sweep the village for rebels and clear out any he found.  Squad Able was directed to enter the village from the south with Squad Baker entering from the west. Things started to go wrong from the start.  Baker advanced into the village and took up positions behind a fence.


Then the first militia squad advancing from the North East corner of the village opened fire. 


The rickety fence proved scant defence against AK47 rounds and 3 of Squad Baker became combat ineffective (aka out of action, aka Dead).  In response Squad Able sent two men onto the roof of a nearby building where they could spot a member of the second insurgent group in the east of the village.


Several rounds later and the first insurgent lay dead.  Having realised that getting hit by bullets was dangerous the rest of turn one was characterised by taking cover and going prone.

Turn 2 and the first Militia squad advanced towards the two surviving members of Squad Baker who were sensibly hiding behind a house.  Sadly for them they were in sight of the two roof mounted members of Squad Able who killed two of them from long range.  


Covering fire from the second insurgent squad proved ineffective and further fire from another member of Squad Baker saw a further two insurgents killed.  Finally the rest of Insurgent squad 2 managed to shoot down one of the members of Baker coming out of cover to do it.

Turn 3 and the remaining two members of the first Insurgent squad advanced more cautiously towards Baker.


The second squad advanced some of its members towards Able in an attempt to take out another of the ground level members.  Bakers two survivors re-manned the barricades and killed two more of the second squad as they had incautiously exposed themselves to fire from the north while advancing towards the south. Another member was despatched by the snipers on the roof. But one more member of Baker was killed in the crossfire.

Turn 4 and the US gained the initiative.  The remaining member of baker drew a bead on the last two members of the first insurgent squad causing one to dive for cover while the other fired back ineffectively.  Unfortunately the cover proved to be in line of sight of the two snipers on the roof - exit another insurgent.  In the final move a member of Able shot down the last insurgent advancing towards him down the main road before moving to the other side of the building to shoot the final member of the second insurgent squad.

With only one member of the insurgency left it was decided to call time on the game.  The US were left with the village and the victory - but with 5 casualties was the cost worth it?

****************************

The first play test of Badlands, a set of rules currently being play tested on behalf of the author.  An early version of the rules with only Assault Rifles being available (hence the set up) and a card based initiative and combat system.  10 Professional soldiers v 12 Militia should have been a walk over by the US but with Rob running the US and low cards being preferred it was court cards all the way at several points in the game.

The game was played on a snow mat to improve the contrast between the figures and terrain on the camera - which worked.

Chris

Havoc off Havana

And so our intrepid, time-travelling war reporter swapped the deserts of Syria in the 3rd century AD for the humid climes of the Caribbean I the early 1800s. A British “intelligencer” based in Havana had learnt of a Spanish convoy setting sail for Spain loaded with bullion. The British West Indies squadron was alerted and sent a small, but powerful flotilla to intercept.

The Spanish sailed out of Havana harbour in close formation. One had to ask was this wise for a large merchantmen and inexperienced crews?  The British sailed to intercept, spreading out to attack the front and rear of the convoy. The Spanish escorts swung to intercept but almost immediately took heavy 1st fire, and with inexperienced crews and long-range their return fire was frankly pathetic. Malcolm’s gallant British frigate was soon crossing the rear of the Spanish. One Spanish ship lost control of its rudder and the alarmed captain of the merchantman slowed as he saw the wild manoeuvrings of his inexperienced naval colleagues risk a collision. Very soon one Spanish frigate had been turned to matchwood, and Malcolm managed to grapple and board the merchantman.

The Spanish fleet lurched on taking fire.  They did manage to set fire to Phil’s frigate but his veteran  crew handled it well.  More Spanish catastrophe followed as Dave slowly sailed off the edge of the board and Rob managed to expertly line up his 3rd rate up for a ramming contest with the island. I wonder how that would end. Chris’ 3rd rate was pummelled into submission.


A pretty crushing British victory….

Once again the British easily prevailed over the Spanish. Inexperienced crews are pretty useless and veteran crews worth their weight in gold. The fleets were equally balanced in points but numbers rarely seem to be the deciding factor in Black Seas.

Next week over to Hitchin for what is rumoured to be WAT Arab-Israeli….

Simon

Wednesday 27 January 2021

War of 1812 (in the Americas)

The war is not going great for the British as the Yanks have taken and spiked a British battery at Queenstown. Major General Isaac Brook has been ordered to retake the battery and drive off any lurking Yanks.


The battery is in the bottom right of the table with the British deploying in the top left. The Yanks have two deployment points, one next to the battery and one in the woods at the top of the table.

General Brook is first up and deploys his three groups of flank company troops in an open column whilst placing the moveable deployement point into the woods at the bottom of the table.

The Yank regular infantry under Captain John Wool deploy also in open column next to the battery, with the light infantry under Captain Ogilvie deploy into the woods.

Both forces continue their march towards each other with the Yank militia under Lootenant 'Buck' Rogers deploying infront of the battery.

The British deploy into line so as to not get caught in the flank by the Yank light infantry. However they need not have worried as the movement dice were not kind to the Yanks.

General Brook ordered the men to open fire to hopefully drive off the Yanks.

However he need not have bothered as the resulting fire was fairly ineffective. Meanwhile, Captain Cameron deployed his scouts into the wood to cover the British left flank and again were fairly ineffective with their fire against the light infantry.

In the face of overwhelming odds the Yank light infantry retreated back into the woods. On the other flank two groups of Indian skirmishers under Chief Roundhead rushed out of the woods and came face to face with the miltia that had advanced into the woods. The main Yank force under Captain Wool attempted to form line but their hearts were not in it and the last group lagged behind.

The main British force moved forward and a long range firefight developed between them and the Yank regulars. With their controlled fire and use of "Sharp Practice" this should be easy or so they thought.

The dice gods were not with the British as they received "Kills" and "Shock" whilst not having much effect upon the Yanks. Maybe their luck will change!!!!

or NOT!!!


However the Indians threw "Tomahawks" and charged into the militia in the woods, causing mass slaughter and pushing them back, taking their wounded leader with them. However, this was all too much for Chief Roundhead who was knocked out in the fight.


Things were not looking good for the main British force when Lt. Dennis was knocked down.


The harasing fire by the Yank light Infantry had to be stopped, so Captain Cameron cheered his troops on and advanced to cover the left flank and take the fight to the Yanks. On the other flank a group of Indians broke cover and rushed to the flank of the Yank Regulars, hoping to do some good whilst their chief continued his nap.


At this point in the battle the poor mobile phone battery gave up (so roving cam was lost), probably in sympathy with the British. However things were about to change for the better; the scouts had distracted the Yank lights into firing on them instead, thus saving the main force and Lt. Dennis recovered to help rally the troops.

On the other flank Chief Roundhead also recovered and moved the second group of indians through the wood and the two groups poured fire into the Yank regulars, wiping out one group. The main British force was just hanging on by it's fingernails with both leaders spending their activations rallying the troops.

Things were going from dire to worse for the Yanks as first Captain John Wool took one between the eyes, swiftly followed by his subordinate Lt. Gausevroot. This was all too much, with the Yank force morale plummeting the game was called with a British victory.

Friday 22 January 2021

Once More into the Fray or It Ain't Half Hot Here

Last night our roving war reported hot-footed it from the snowy Ardennes of 1944/45 to “somewhere near Antioch” in the late 3rd century AD, where the forces of invading Palmyra met Aurelian’s Romans determined to re-capture the Eastern provinces.  The Palmyran General Zabbas  (aka Rob) set up with a cataphract-heavy centre, and light cavalry/archer wings. No subtlety here….go for the jugular with the heavy boys.  Aurelian (aka Malcolm) set up with a centre of legionaries, and traditional cavalry wings.


The Palmyrans got off to s good start with swift movement, but inflicting no casualties. The Romans started slower but eventually routed a  light unit off the board and killed another. In the centre “Tribune Chris’” artillery poured fire into a unit of veteran archers eventually killing them.  The Palmyran wings faltered as outnumbered and out-gunned they literally, had nowhere to go.  

The Palmyran cataphracts smashed into the Roman centre but to little effect. The managed many “ hits” but veteran legionaries are pretty tough, plus Phil remembered to use the modifiers which made them even better. 


The Romans struck back inflicting a number of disorders, and a “kill”.


The battle seemed to turn when Dave’s errant light cavalry returned to the table straight into the Roman camp, but the Roman discipline held. A brief conversation between Commanders made it clear that the camps were expendable and the destruction of the Palmyran army was the objective. Back on the flanks more light cavalry died and the fate of Zenobia was sealed when even more Cataphracts  literally “bit the dust”.

The result of the game looked pretty one-sided with zero Roman casualties. However the Palmyrans were unlucky with their archery fire and the Romans lucky with saves. That said the Roman defensive position in the centre using hills as an anchor was good generalship.

Simon

Saturday 16 January 2021

La Gleize, Bulge High Water Mark

And so our intrepid war reporter travelled back to the dark days of January 1945 and the Battle of the Bulge, where he joined a British battlegroup near the village of La Gleize. The dastardly Hun had rounded up the locals and were threatening to immolate them in the chateau. Very un-British behaviour.  We don’t treat the natives like that.


The British force advanced from the north-west with the recce screen out front. Malcolm’s Cromwell made excellent progress thanks to its “fast” attribute. The M4s which were meant to clear the woods to the north were more unfortunate and jammed their tracks in the dense woodland.  Rob’s Achilles for some inexplicable reason advanced in the open down the road.  This wouldn’t end well!  The German Stug then roared into life, located Rob and despatched him with a single shot.  Rob remembered too late that his “Hell Driving “ card would have allowed the Achilles to dive for cover….

Rob’s stricken Achilles was soon followed by Chris’ Sherman that had also gone on a suicide mission down the road. He fell to the mighty King Tiger which had been reported prowling in the vicinity.

With two out of five tanks burning , including one of the 17pdrs the British reluctantly radioed a nearby American unit for assistance. Soon a 76mm-armed Sherman was advancing up the road from the south-west. With the Cromwell, Greg’s Firefly and the 76mm all advancing from the south west the sole remaining Sherman in the north decided to play it safe, and advance very cautiously .  The Stug retired to a well-chosen position between buildings to the east of the Chateau. With its low profile and cover it was very difficult to spot by the advancing allies.  Leaving Greg and Rob to contest matters with the King Tiger and Stug,  Malcolm raced his Cromwell across the board to try to outflank Tony and take advantage of his limited firing arc.  Nice tactics!

The battle swung when the 76mm-armed M4 scored a hit on the King Tiger and removed two dice from play. Two poor sets of dice roll  left the King Tiger immobile in the town square and the remaining 75mm –armed M4 administered the coup de grace with a shot from the rear.

Outnumbered now 4:1 things looked grim for the Stug, but with a fanatical SS crew they fought on.  The M4 which had despatched the King Tiger was itself knocked out by the Stug, who eventually found himself surrounded by three Allied vehicles at point-blank range.  The Cromwell administered the telling shot and Tony's Stug died.


Simon