The fourth
game in our Wars of the Roses campaign was the battle of Northampton between
the Yorkist Earl of Warwick (Paul) and the Lancastrian Henry VI (Adrian).
Historically
Northampton looked like an even fight. Despite being outnumbered the Lancastrians
had deployed in a strong defensive position supported by their newfangled
cannons and with their flanks resting on the river Nene.
Unfortunately,
it rained putting the cannons out of action and when Warwick contacted the
Lancastrian line Lord Grey (Lancastrian right) changed sides taking no further
part in the battle. The loyal Lancastrians found themselves outflanked
with their backs to the river.
Remember this game was NOT meant
to be an historical replay. The aim was to kill as many of the enemy as
possible.
Adrian stuck with the
army he had selected for 1st St. Albans. Paul select 3 camps and enough palisades to
wholly enclose them. This added two
extra victory coins to his stock and indicated a largely defensive battlefield
strategy.
Paul relied on his
mounted infantry to scout the battlefield and gather intelligence on the
opposition. Adrian fielded a more
balanced attacking force including Northern Border Staves (light cavalry), Currours
(medium cavalry), mounted longbows and Irish
Kerns. This gave him a significant
advantage in scouting points and he comfortably won the scouting. Warwick therefore began the set up process.
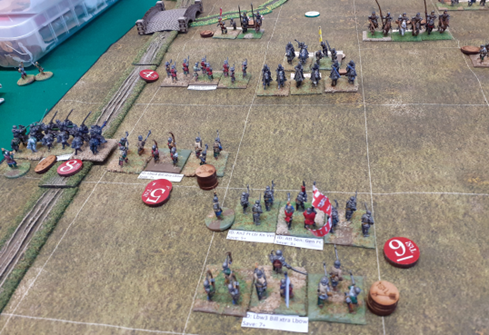
Warwick started his deployment by screening
his right with a mixed line of billmen, doubled armed with longbows. A unit of Shire Levy were deployed in the
relative safety of Delappe Abbey. These troops were under command of Sir Thomas
Neville (Tony)
Opposite these Henry responded with
his Welsh contingent. This consisted of
Tudor mounted infantry, deployed in forward positions and supported by Welsh
longbowmen. This wing was under the
command of Jasper Tudor 1st Earl of Pembroke (Reg)
Warwick then deployed his centre, a
formidable array of fortified camps manned by his heavy artillery and the
remainder of his Shire Levy. This force
was commanded by Baron Hastings (Mal).
Henry then set up his cavalry right
wing. A daunting array of cavalry and knights under
command of Thomas Courtney 13th Earl of Devon (Rick).
To complete his deployment Warwick
faced off against the Lancastrian right with an offensive force of bills and
knights under his personal command.
Henry concluded the set up by deploying
a centre of bills and longbowmen. His
longbows were on the left supporting Jasper Tudor’s right flank. His bills and foot knights were on the right
in support of Devon’s (Rick’s) mounted troops.
Henry began the battle by smartly
advancing his entire line, leaving only Jasper’s Welsh longbows North of the
river
In response the Yorkist artillery
opened fire disordering the leading Lancastrian bills. To their right Sir
Thomas Neville’s troops stood their ground.

Warwick’s left wing advanced resolutely to
oppose the Lancastrians and drive off their light cavalry.
Treachery!
As Warwick closed with the enemy a blast of brazen trumpets signalled
the Earl of Devon to halt his troops and take no further part in the
battle. The Lancastrian right wing ground
to a halt.
Reacting swiftly
to Devon’s betrayal, the Lancastrian light cavalry engaged the Yorkists billmen
with javelins disordering them but failing to charge home and deliver a
decisive blow.
In the centre Henry’s
troops held their ground as he turned his attention to his right reorganizing
his cavalry in response to Devon’s treachery.
The disordered Lancastrian billmen were withdrawn and replaced with
fresh troops.
On the Lancastrian
left Tudor longbowmen fired an ineffective volley against the Yorkist right
flank.
Seizing his
opportunity, Warwick now closed with the
enemy pinning the Lancastrian knights against the immobile Earl of Devon. A confused melee developed.

At this moment a
second thunderbolt rocked Lancastrian resolve. Yorkist Billmen appeared behind
the Welsh on the extreme left of the Lancastrian line.
The crash of
cannon fire and the hiss of arrows continued to be heard from the Yorkist
centre but with little effect.
Henry now moved to
reinforce his imperilled right flank.
His currors advanced to join the growing melee centred on the perfidious
Earl of Devon and he personally led his bills and knights in support of his
embattled right wing.


On the
Lancastrian left the outflanked Welsh
bowmen briskly about faced turning to address the threat in their rear.
Confusion reigned within the ranks of the Yorkist flank march and they failed
to turn towards the now threatening Welsh archers. The remainder of the Tudor line was achieving
some success as they continued to pour fire into Neville’s defensive line.


In the Yorkist
centre the combined fire of cannon and longbow was taking it’s toll and the
leading Lancastrian bills were destroyed. Ammunition was now running low but things were looking sticky for the
Lancastrians.
Keen to break the
deadlock developing on his left Warwick continued to assault the trapped
Lancastrian knights.
After a brief
struggle the Yorkist flank march was destroyed and the Welsh archers turned to
conform with the Tudor firing line.
The Tudor archers
were now getting into their stride and Neville’s right wing collapsed taking
with it his bills. Neville moved to join
his remaining archers who were also
under pressure.
Henry committed
himself to the counterattack on his right.
As he personally led his foot knights into combat, his trapped
Lancastrian knights and currors were fighting boldly against Warwick’s bills. Unable to strike a decisive blow and with
losses growing on the far flank Yorkist frustration was palpable.
Having expended
their ammunition the Tudor firing line
began to advance towards Delappe Abbey.
Rallying his troops Neville pulled back into the cover of the abbey
grounds rallying his troops

The stalemate swirling around the
treacherous Earl of Devon was now to reach a resolution. After bravely holding off everything that Warwick
could throw at them the Lancastrian knights at last succumbed and were
destroyed.
Henry led his foot knights forward against the
mounted Yorkist knights but in the face of a determined counterattack their
morale broke. In the ensuing chaos Henry
suffered a light wound as he fell back to his supporting billmen.

The Yorkist right flank was now in
danger of being rolled up as the Tudors moved menacingly forward towards
Delappe abbey. Despite this the
Lancastrians only retained three victory medals to the Yorkist eight. Lancastrian losses were a small unit of mounted
knights under the command of the double-crossing Earl of Devon, a unit of billmen and two units of fully
armoured knights. A total of +9 points.
Yorkist losses were two units of retinue billmen and a unit of retinue
longbowmen. A
total of +6 points.
At this point the returning
rain drew a veil over the battlefield and the narrowest of Yorkist victories.