Wargaming from Hertfordshire & Beyond!
Showing posts with label Osprey. Show all posts

Saturday, 4 November 2023

A Song of Ice and Fire

Following his humbling in the afternoon Dave went into the evening session with a sense of dread. Would his long drive down see him lose 2-0 on Thursday as usual! The evening game witnessed a sight not seen at “Festung Williams”, being a game firmly set in the Fantasy genre. Our long dormant “A Song of Ice and Fire” figures finally returned to the table to contest a game of Lion Rampant II with extracts from Dragon Rampant. Dave teamed up with Tony to field the Northern hordes of Stark and the Free Peoples whilst Simon and Phil led the forces of civilisation and progressive government known as House Lanister and the Targaryens.


The aim of the battle was to retrieve a magical object hidden of lost in one of the casualty pits from a long-forgotten engagement and the resultant battle was pretty much a slugfest of Targaryen vs Free People and Lanister vs Stark. No bad blood here! Suffice to say that Tony’s Free People’s belied their looks of crude furs and crap equipment to pretty much destroy the much vaunted Targaryens including a dragon. On the other flank Dave recovered the object and then had to withstand Lanister attacks which saw his General killed and several units destroyed. However they managed to reach the table-edge with the object which meant “game over”, and a victory for Dave and Tony ... or more correctly for Tony as Dave’s character was dead!

Simon

Sunday, 18 June 2023

Honours of War

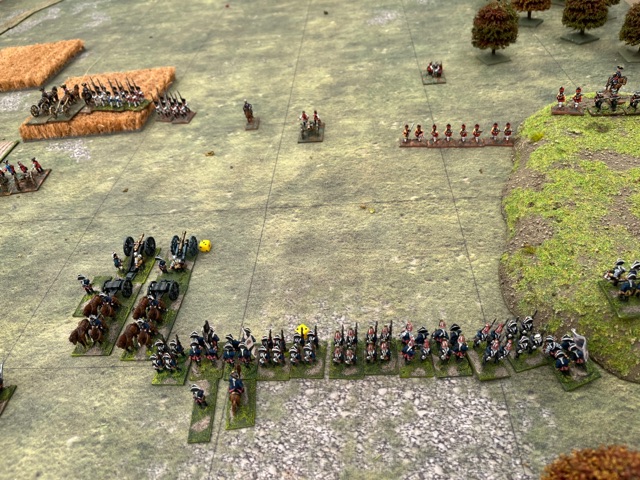
Saturday saw my third game of the week. Greg and I decided to dust off my thirty year old 15mm Seven Years War armies and try a bit of old-school gaming using Osprey’s “Honours of War” rules. I had devised a semi-fictitious scenario pitching my French vs the Prussians. Historically they only met once in a major battle, being the heavy French defeat at Rossbach in 1757. Hence, I devised a scenario set during the lead up to Rossbach with a numerically superior French force trying to push through a Prussian blocking position.

The French had four brigades being light infantry on one flank and cavalry on the other, with infantry and artillery pushing through the centre.


The Prussians matched the French cavalry and decided to take the French infantry head-on leaving the French lights to wander around the woods.

Under Honours of War a key element is the influence of the Brigade Commanders. These are rated from “Dithering” to “Dashing” and on a die roll can end up doing nothing to being inspired and making double moves. Unfortunately, two out of four French Brigadiers were rated as “dithering” which seriously undermined their battlefield effectiveness. Hence the French artillery and light troops hung back leaving the infantry to march into the teeth of the Prussian infantry defensive line.

Firing and melee uses system akin to TFL’s shock, albeit in Honour of War no figures are removed. The battle for the centre saw the French infantry comprehensively destroyed by the Prussian artillery and musketry.

In return the French broke one Prussian infantry regiment and forced back the cavalry.


I conceded the game when it was clear the French centre had disintegrated and the cavalry failed to make the desired impact. It was only a matter of time before the French army reached its “break point”.

We both enjoyed the game. As with any Osprey set of rules there are a few issues, but I think this is one of their better sets. The rules are simple enough to handle “big battles” but to my mind have enough period flavour. I have found an active “Test of Honour Forum” which (a) shows there is a loyal cadre of players and (b) contains some useful stuff such as an improved QRS specifically for 15mm figures, scenarios and answers to rules queries etc etc. Tony has Austrians and Chris is slowly building a Russian force. Maybe we will see some Prussians vs Austrian/Russian action one day soon. I am almost inspired to build a British/German allies army to take on my French or a crap Reichsarmee force to ally with the French or Austrians.

Simon

Friday, 6 January 2023

Star Wars meets Xenos Rampant

After witnessing last Saturday’s crushing of the Spartacus rebellion, our intrepid reporter had no idea where he was going. Not being a devotee of the Star Wars genre but being told by Chris that the setting was before the “classic” Star Wars films of the 1970s and ‘80s, I think he went to Didcot IV “a long time ago in a galaxy far far away”. According to Chris, Tony was playing General Grevous,

a separatist leader defending a key installation with his Elite Battledroids

against Chris’ Galactic Republic led by Jedi Anakin Emo with his force of Clone Troops. Once again, the rules were the newly released Xenos Rampant. Greg came along to witness the “fun”.


Chris advanced on a wide front from one corner of the 4’ x 4’ board, seizing the moisture evaporator and a solar panel array.

Tony countered taking the buildings and sought cover.

He then began a flanking attack to which Chris responded with pretty ineffective fire. Chris then realised that his troops had heavy weapons which doubled their firepower, and in the next turn rolled 6 sixes with 10 dice which resulted in Tony losing three droids and halting the attack.


Chris was amazed at the distance Tony’s troops could move with “Aussie Inches”, but forgot that they had a better movement than his troops. Tony retaliated by asking me to read the rules. However, the game soon stagnated into a firefight across no-mans land as both forces sought cover. Tony did force two of Chris’ units to retire leaving the Jedi exposed, and at this point Chris sent him into hand-to-hand action against a drone unit, destroying three but taking two wounds himself. 

The next turn saw a further Republican unit retire from action and Chris decided to call it a day leaving Tony’s Separatists victorious.

What were the positives. Firstly, everyone agreed that Chris’ forces did look surprisingly nice. Secondly, I managed to deploy the Snapdragon terrain I bought back in the ‘90s and which has languished unloved in a box for over ten years.

Negatives. Everything else. Chris made a valiant attempt to defend the rules, but I don’t think anyone else is convinced by them. As with the Secrets of the 3rd Reich game that Tony and I played two weeks ago, we seemed to have a lot of models on the table which meant a lack of manoeuvre room and resulted in a dice-fest of a firefight. Maybe that’s what some people want? Also, some of the rules look decidedly odd. In hand-to-hand combat defending units almost seem at an advantage as they use their invariably higher defence dice to “attack”. Even Chris thought this bizarre.

All I will say is that I’m glad I didn’t spend my hard-earned cash on Xenos Rampant. The Snapdragon terrain will be going back into deep storage until Chris buys yet another set of over-priced sci-fi skirmish rules of dubious quality.

Simon


Friday, 23 December 2022

Secrets of the 3rd Reich meets Xenos Rampant

So, from Abbeville in France 1940, our intrepid reporter just had to move several hundred miles and five years in time to “somewhere in Germany 1945”. With the arrival of “Xenos Rampant” I had volunteered to run a trial game using Greg and Tony as guinea pigs, plus I could dust-off my long-neglected “Secrets of the 3rd Reich“ figures and terrain. I read the rules quite carefully and wrote-up a crib-sheet as an addition to the fairly sketchy Osprey QRS which I downloaded from their website. Phil also kindly sent his more professionally produced QRS.

I used two of the set German and US forces from the rulebook, and the “snatch the VIP” scenario. A German scientist was hiding in an abandoned research facility. The American OSS were trying to locate him and the local German Werewolves trying to stop them. Greg had to pull out, so I took the Germans leaving Tony with the Yanks. Chris also popped in to see how things were going.


The scientist was placed as per the scenario in the centre of the board and Tony’s forces raced onto the table. His Command Group moved quickly in their half-track, and his OSS team used their “infiltrator” attribute to make a pre-game 12” move which allowed them to take the “high ground” of part of the complex in turn one. Things already looked tough for the Krauts.

I moved my sniper squad into a bunker from where they began to fire at the American infantry. The Hitler Youth, in this case my Pulp Nazi female figures, took cover in some undergrowth as did the Heer unit.

Soon the game had degenerated into a brutal firefight. Our two “large” units traded fire with the Yanks taking casualties. Tony’s OSS proved almost impossible to target and kill being in cover and benefitting from the “Hard to Target” skill. No German unit seemingly wanted to close within 12” to shoot. The one that finally did regretted it.

Eventually I managed to get off a Panzerfaust shot against the M3 Half-track which had deployed its team. Pretty useless. Tony now had the scientist and was hustling him to the rear. 

Time for the Germans to counter-attack. As the “SS Assassins” advanced in open, skirmish order they found the Yank flamethrower squad hiding in cover. Disaster! 


With four of the five men burnt to a crisp the survivor raced off the board in panic. Counter fire from other German units killed two of the squad but their morale held. When the final German fire forced the American “large unit” to retreat I conceded to Tony, as their withdrawal only helped his forces back to where they wanted to go.

After the battle Tony and I chewed things over. Our overall verdict was “OK but nothing special”. Playing with 28mm figures on a 4’ x 4’ table the ranges can look a bit weird, so we think they would play better with 15mm. We don’t think we got much if anything wrong, but probably missed some of the subtleties which were buried in unit -specific “special rules”. It is clear from reading them that they are aimed at the gamers who love pulling bespoke forces together with special skills and options, plus leaders with varying characteristics. Most of the book is devoted to assembling your forces and from memory the rules take only 30 of the circa 190 page count. Not quite my cup of tea but I acknowledge it has its place in the gaming pantheon. Actually somewhere near the bottom cleaning out the Augean stables. I think they will appeal to Chris...

Simon

Friday, 28 October 2022

Mount Badon (or the Lion is not so Rampant)

Last night our reporter returned to the early/mid 6th century AD, and the cold, wet island known as Britannia. Following withdrawal of the Roman regular army nearly 100 years before, the invading Saxons have been steadily advancing westwards from their initial settlements in Kent. Today the Britons under their warlord Arthur plan to defeat them at Mount Badon recapture much of the lost ground. As he climbed to the top of the palisade his initial reaction was “that’s a lot of forces for Lion Rampant”. Indeed the 25 units that deployed seemed double or more what would normally be used, and even then Phil had reduced the unit count as per the scenario in WSS121. 

The scenario saw the British holding position below the hilltop fortifications, behind the ford over the river Avon and on the Saxon flank. The Saxons were in a single mass albeit facing mainly in two directions, with a small force defending the ford against Arthur’s cavalry.

Battle began with Arthur charging his Elite cavalry across the river into the Saxon light infantry. Surely this would be a massacre? Maybe not and Arthur’s men pulled back.

The light cavalry thought better of charging and threw javelins, causing a solitary casualty. Below the fort the two forces moved closer.

British archers inflicted a few losses, but the Saxons advanced remorselessly.

The flanking forces faced off against each other, with four British units deciding that attacking six Saxon units was rash in the extreme.

The cavalry tried again but failed to rally and below the fort things deteriorated for the British. The Saxons virtually wiped out the archers and another foot unit was reduced to half-strength. In desperation the British warleader Amalric of the Dobunni issued a personal challenge to Cerdic the Strong. Wrong decision! The hairy-arsed barbarian was soon standing over Amalric’s bloody corpse, and the British line was wavering.

With Arthur sitting impotently across the river, one leader dead and several units battered the British called it a day and left Badon to the Saxon scum.

My observation was that it had been an “interesting” game. Tony rolled some excellent dice, and Greg’s presence on the British flank was noticeable by some particularly poor British die-rolls. The sheer number of units meant it would always become a slug-fest, and so it proved, with numbers favouring the Saxons. As with Lion Rampant 1 the rules didn’t inspire me at all, albeit Phil said that we hadn’t used the leader characteristics despite them being on the force rosters. I was also struck by how there is no benefit for flank or rear attacks. To me a bit weird, but there you go. I certainly wouldn’t use them for this size battle again. This was almost TTS-size in unit count, so why drop our tried-and-tested “go to” set of rules. I have borrowed Phil’s copy to read whilst he ventures into the land of NFN* next week. I’ll see if actually reading them makes things any clearer!

Simon

*NFN: “Normal for Norfolk”. "Normal for Norfolk" is a descriptive phrase used to describe an individual or action which is seen as so ridiculous it could only have been born as a result of the inbreeding supposedly commonly found in Norfolk. This can range from unusual local pronunciations and dialect to the incredibly stupid nature of many accidents in the region, or sometimes merely be a comment on how someone might look physically abnormal in a manner which cannot be prescribed to a specific condition.

Friday, 26 August 2022

The Men Who Would Be Kings: Sudan

Two back-to-back games of scenario E, from Dan Mercey’s “The Men Who Would Be Kings” rules and they could not have been much more different.

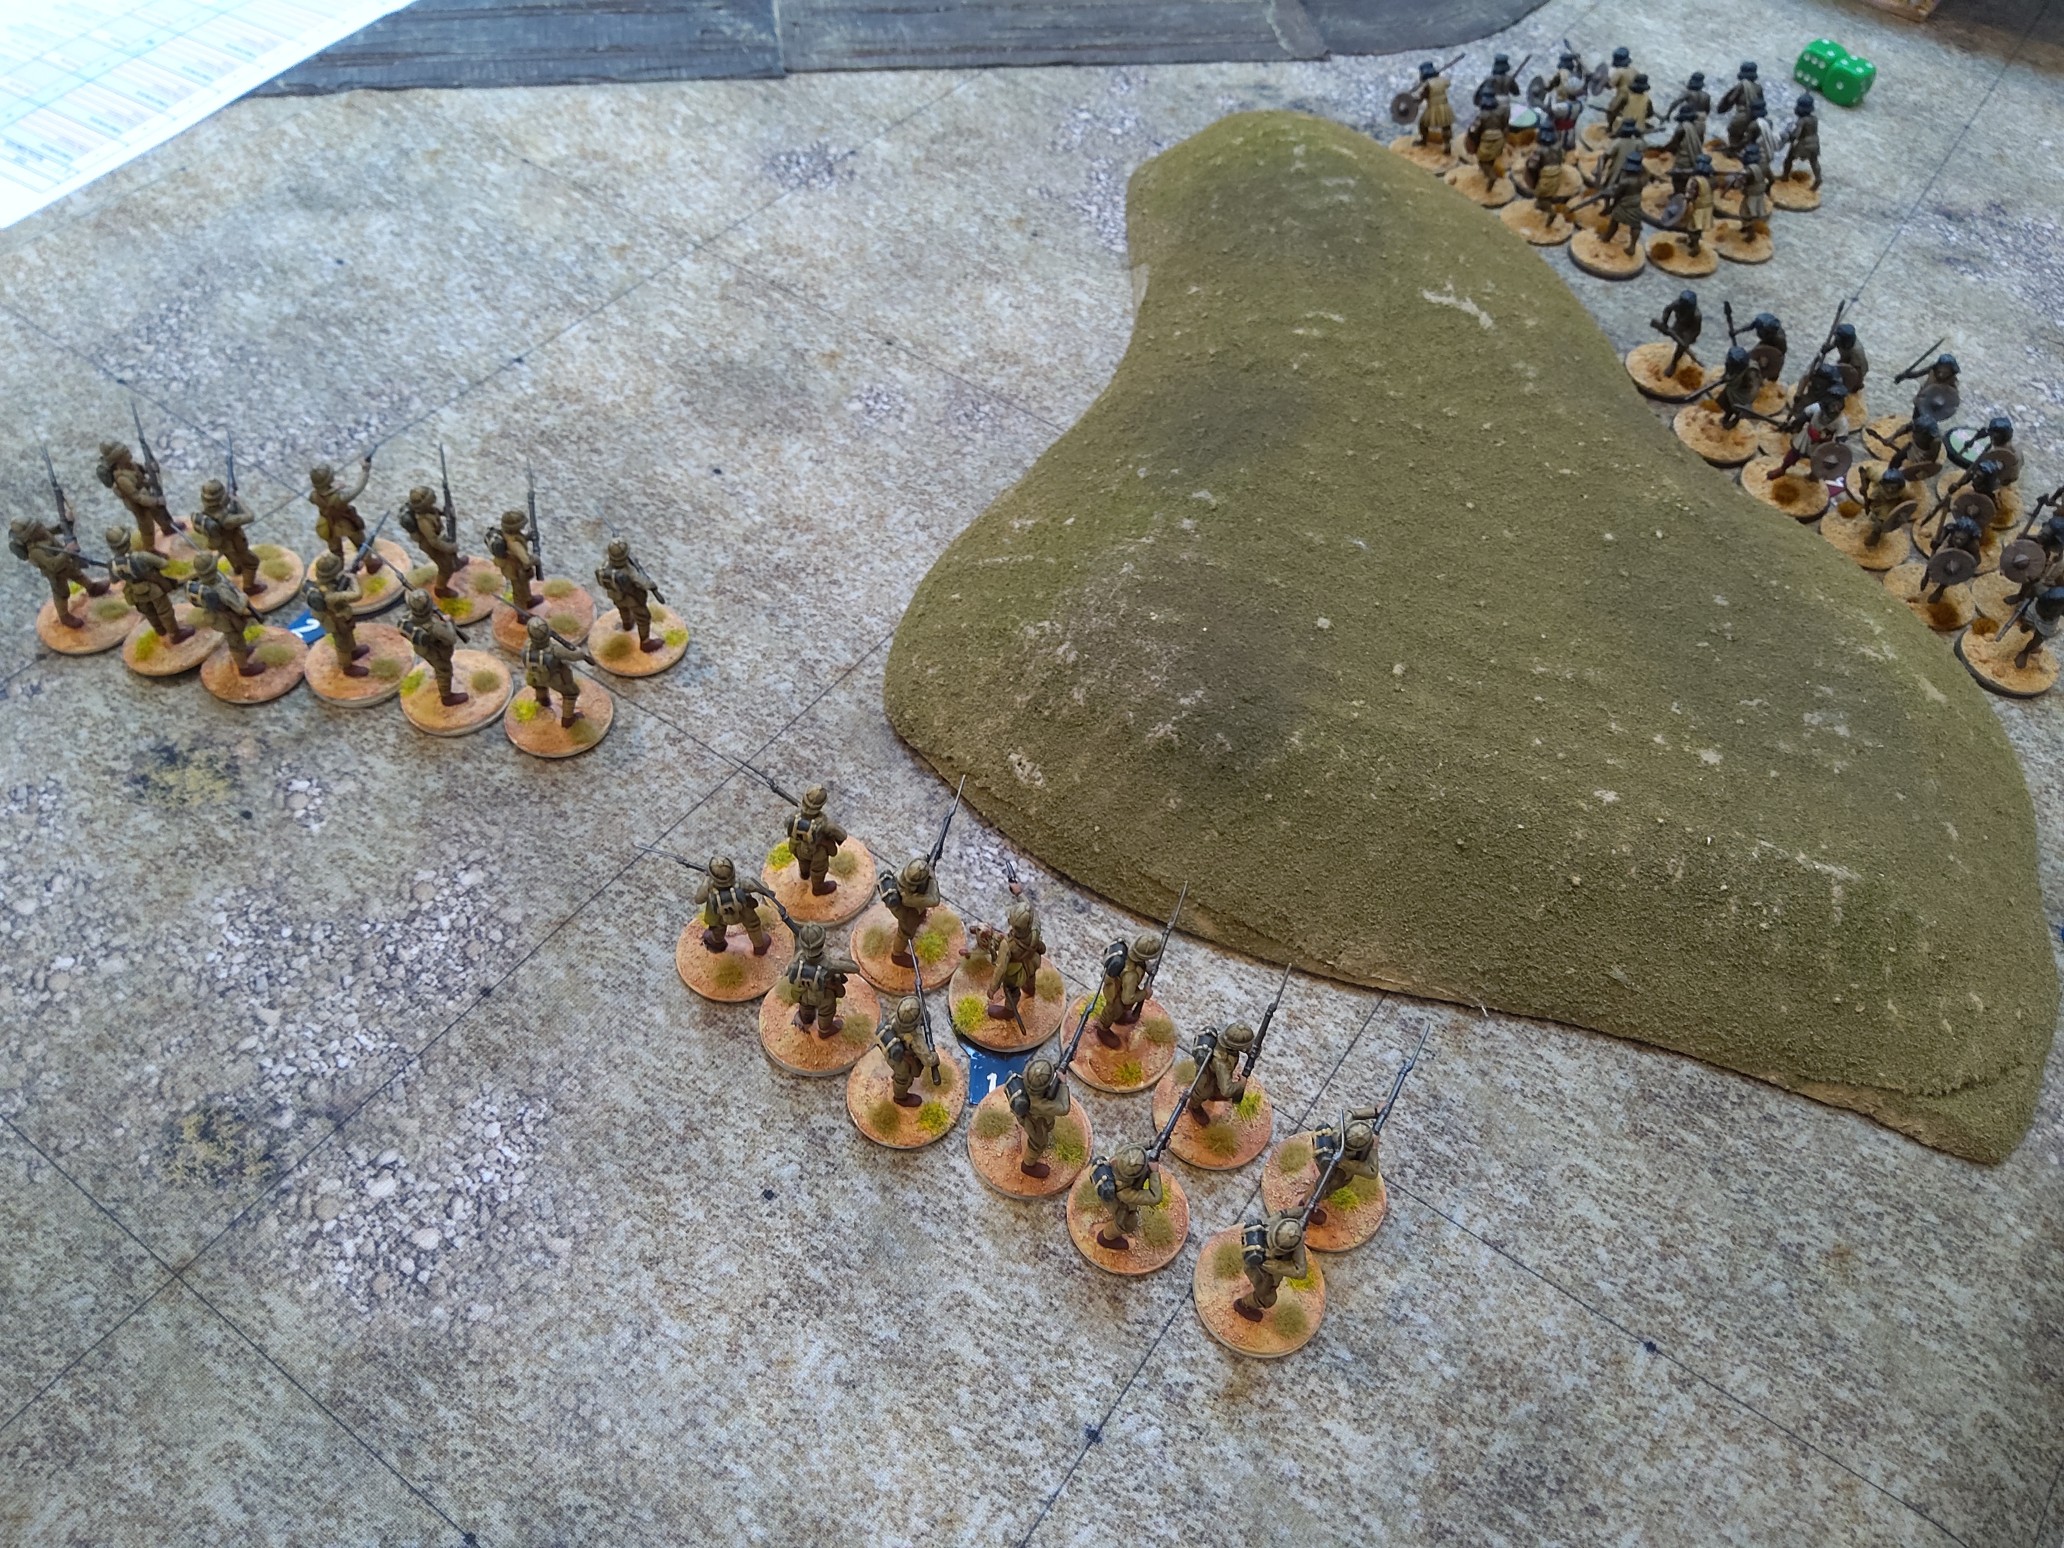
Scenario E: “Run for the Hills”, had an attacking Beja force of 5 tribal infantry units, vs, a British “Defender”, comprising 3 Elite Line Infantry units. The British deploy against one short table edge and have to reach the other end of the table. The Beja can deploy along either/both of the long table edges, but 50% of their units in each table half, in this case 3 in left half & 2 in right half. The Beja force always activates first each turn.

Game 1: A forward deployment by the Beja forces, saw one Beja unit rush straight into melee with the left-hand British unit, in this case, a Royal Navy landing party, while a second unit trotted into a central palm grove, ready to rush the central British infantry unit.

Sadly for the Beja forces, they lost the melee with the Royal Navy and where thrown back. The poor souls then had to suffer the indignity of alternately rallying, then being shot & pinned again, by the surviving Naval infantry!


In the centre, the Beja unit in the palm grove waited for further support to arrive, before dashing out to engage the British. Sadly for the Beja force, they did not make contact and the Martini-Henry rifles, made short work of this Beja unit and it’s supporting unit. At this point, the other two Beja units slunk off into the haze!

Game 2: This time the Beja forces deployed much further back, so the leading units could trot back over the hill, to join their comrades, already lying ambush.

The British deployed in a 3 sided box/wedge formation, with the Naval party to the left. The British line infantry moved forward, ‘at the double’, down the right flank, while the Naval Landing party worked around the left of the central palm grove / rocks.


The movement by the Naval party, caused the Beja units on that flank to move out from behind the hill, to threaten the Naval unit. Rather than face this directly, the Naval party filtered through palm grove to join onto the left of the other 2 British units.

These British units then entered Close Order, ready to ascend the hill and flush out the Beja forces ahead of them. Sadly, the British had left a gap to their right, wide enough for one Beja unit to flow through and outflank the Close Order British line.

Threatened with being outflanked, the British had no option but to break Close Order formation and rush the Beja unit directly ahead of them, bayonets fixed, in the hope of break through!

Sadly, although courage was not lacking, numbers were! First the right hand British unit went down under a welter of Beja spear thrusts. Then the Naval detachment was swamped by first one, then another Beja charge. Finally Colonel Coredun was left facing down 3 separate Beja charges. The last but one leaving him standing alone! The last that was heard of him, was his revolver clicking and him yelling “Come on you hairy ba**ards, finish it!”.

Sunday, 20 February 2022

Honours of War; Game 2

Sunday saw the second run-out of our refurbished Seven Years War armies, and Osprey’s “Honours of War” game. Although a fictitious scenario the battle was set the day after the battle of Leuthen in December 1757 where Frederick of Prussia has decisively defeated the Austrians commanded by the Archduke Charles. The action saw the Austrian rearguard trying to hold off the Prussians to allow the remains of the field army to escape intact to Breslau.

The Austrians set up holding a line between the villages of Rathen and Sahra.

The Prussian mission was simple, break the line. The armies set up with the two lines of infantry facing each other and the cavalry also facing off.

The Prussians as attackers set off at a smart pace but were soon under artillery fire, and had no reply. They just had to take the casualties.

The Prussian cavalry attack saw one regiment retire as the combination of Austrian cavalry and artillery fire took its toll.

The Prussian infantry marched stoically forward as Tony tried in vain to relocate his artillery on the flank.


Back with the cavalry the Prussians secured a decisive advantage as they broke two Austrian regiments in quick succession aided by the harassing fire of a Freikorps regiment who had taken the village of Sahra. The fourth Austrian cavalry regiment retired badly battered but just about still in the fight.

The infantry battle however went badly for the Prussians. The charge of the left flank Brigade into the Austrians went disastrously wrong as the infantry fire took its toll and then the melee saw them break.


At that point we called it a day. The Prussian cavalry on the right were victorious and the centre “superior” infantry Brigade largely intact. The Austrians still had two infantry Brigades largely intact albeit one was “inferior”. We decided it was an honourable draw.

So, what did we think of the rules? Fairly simple but with some nice touches of “national characteristics” and added “friction”. I have written my own QRS which translates everything into inches and distances for 15mm figures, and some more work is needed on this. I think the key will be in setting challenging scenarios for the period. All armies are pretty similar despite “national characteristics”, so just setting up equal points armies across the table will be a less-than-satisfying experience. However, if this means our twenty-five year old armies finally see some action I for one will be more than happy.

Simon