The seventh game in our Wars of the Roses campaign was the second
battle of St. Albans between the Yorkist Earl of Warwick (Paul) and the
Lancastrian Earl of Northumberland (Doug/Reg).
With Edward Earl of March delayed in the Welsh Borders at
Mortimers Cross, the Yorkist defence of London fell to the Earl of Warwick.
Ranged against him was a Lancastrian army raised in the North of England by
Queen Margaret. The Northerners moved swiftly South pillaging as they went.
Warwick took up a position north of St
Albans where he set up several fixed defences along the line of an
ancient earthwork known as Beech Bottom Dyke.
The day of the battle (17th February 1461) dawned cold and
damp. Moving via Dunstable Margaret bypassed Warwick's fixed positions
and attacked St Albans from the West.
By late afternoon, the Lancastrians were attacking
north-east out of St Albans to engage the Yorkist centre and right.
As dusk set in (which would have been in the very early
evening on a February day with poor weather), Warwick realised that his men
were outnumbered and increasingly demoralised. He withdrew with his remaining
forces.
Remember this game is not intended as an historical replay. The
aim is simply to kill as many of the enemy as possible. This was the first of our historical “grudge”
matches and each unit destroyed will attract an additional campaign victory
point.
The players are now becoming more experienced with their
chosen units nevertheless for this battle Paul chose to drop his artillery and,
in their place, invested in additional cavalry units. In contrast Doug/Reg stuck with their previous
army featuring large numbers of units double armed with bills and longbows.
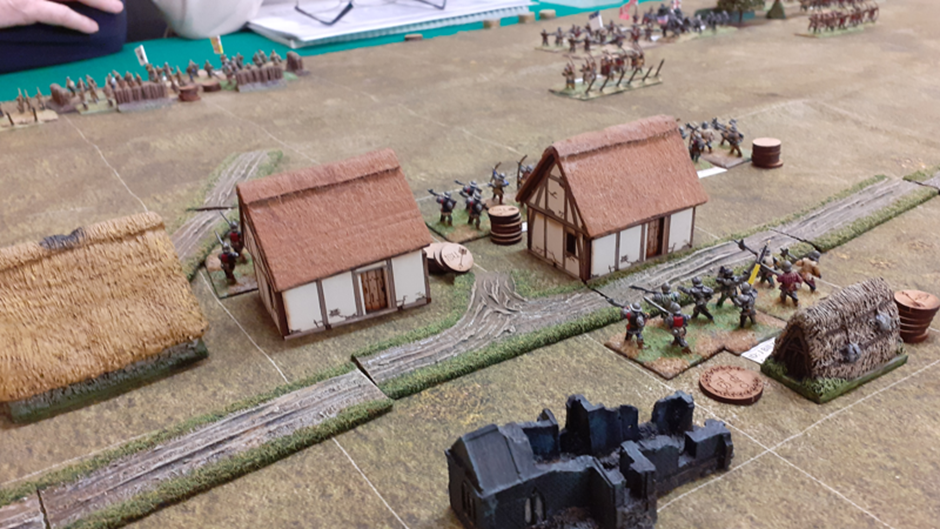
The main feature of the battlefield was the town of St
Albans on the Lancastrian left flank.
The rest of the field was flat and featureless with a small wood between
the Yorkist centre and left deployment areas.
Despite Paul’s extra cavalry the Lancastrians had a
small scouting advantage nevertheless a poor chit draw saw the Yorkists seize
the initiative and the Lancastrians were forced to begin the set up.
The Lancastrians decided to set up on the South side of the
battlefield. They started by deploying their right wing. This wing consisted of Shire Levy stiffened
by a few retinue troops and Welsh mercenaries under the command of Baron
Clifford (Doug) and Sir Christopher Curwen.
Paul responded by setting up his Shire Levy on the opposite
flank. The task of these units appeared
to be to defend the Yorkist camps from behind strong palisades. They were supported by a unit of Burgundian
hand gunners and were under the command of Baron Hastings (David) and Baron
Ogle
The Lancastrians now deployed the first of their camps and
placed a force of mounted retinue infantry into St. Albans. This wing was under the command of William
Tailboy (Mal) and Ralph Percy
Paul proceeded to set out his left wing. The extreme left of his line was held by a
strong cavalry force and to their right were retinue longbows backed up with a unit of veteran billmen. This wing was under the command of Sir Thomas
Neville (Tony) and Sir John Conyer.
Both armies now deployed their centres. The Lancastrians placed their second camp
next to their first, the whole surrounded by palisade walls and garrisoned by
Irish Kerns. The Lancastrian cavalry
were arrayed in strength behind a line of retinue and veteran billmen. The centre was commanded by the Earl of
Northumberland (Adrian) and Sir Richard Percy.
Finally, Paul set out the Yorkist centre. A deep formation of mounted and foot knights
were supported on their right by retinue bill and mounted archers behind
stakes. The Yorkist centre was commanded
by the Earl of Warwick (Paul) and Sir John Clinton.
The Lancastrians agreed that the Yorkist right flank was probably
a holding force designed to draw Lancastrian troops to their doom as they
engaged at a disadvantage across the palisades.
It was agreed that the left wing would incline to their right throwing
their weight into a combined attack against the Yorkist centre.
The Yorkists appeared to initially plan a defensive strategy
weakening the Lancastrian close combat units as they advanced through the
Yorkist arrow storm
The battle began with William Tailboy (Mal) moving smartly
North East out of St. Albans to engage the archers stationed ahead of the
Yorkist centre.
The Lancastrian centre, under the Earl of Northumberland
(Adrian) moved forward in support. Their right, Lord Clifford (Doug) began his
long march into bowshot.
The Yorkist line also advanced conforming with their leading
elements
As the Lancastrian left wing continued to press forward a unit of Irish Kerns which had become lost on it’s approach
to the battlefield made an appearance on the Yorkist right flank.
After much debate it was
agreed that they should appear as close to St. Albans as possible.
The Lancastrian line continued to advance moving into
longbow range. The Yorkists opened fire, showering the Lancastrians with
arrows. Despite their superior firepower
the Yorkist fire was generally ineffectual but did succeed in disordering the left of the Lancastrian line
as it emerged from St. Albans .


The Lancastrian left now attacked the Yorkist archers but to
no avail as they struggled to engage past the archers’ stakes. In the centre Warwick (Paul) now advanced to menace Tailboy’s
(Mal’s) left flank only to be met by Northumberland’s (Adrian’s) advancing centre.
The Lancastrian right flank (Doug) engaged the Yorkists by
fire spreading disorder through the Yorkist ranks and destroying a unit of
Yorkist bills.
Back on the Lancastrian left the Yorkist archers withdrew,
closely pursued by Tailboy’s (Mal’s) billmen.
Hasting’s handgunners (David) sallied forth from the safety
of their palisaded camp engaging the extreme right of the Lancastrian line and
forcing the late arriving Kerns to retire into the shelter of St. Albans
The Earl of Warwick (Paul) continued to press forward in the
centre of the battlefield turning to threaten the exposed flank of Tailboy’s
(Mal’s) impetuous charge. A desperate struggle developed in the centre of the
battlefield and despite Tailboy sustaining a light wound neither side was able
to gain an advantage.
In the Yorkist centre Northumberland (Adrian) charged
forward against Warwick’s (Paul’s) knights, losing both his body guard knights
and his Northern border horse in the maelstrom.
Despite these setbacks Northumberland (Adrian) engineered a flank attack
against the rampaging Yorkist knights destroying them and capturing the Yorkist
army standard. Things were beginning to
look sticky for the Yorkists.
despite his advantage in firepower Sir Thomas Neville
(Tony), on the Yorkist left, was making little progress. In an attempt to break the deadlock Sir
Thomas (Tony) extended his cavalry to the left threatening a charge against the
Lancastrian line.
Neville’s (Tony’s) cavalry contacted the Lancastrian line to
little effect but at last his archers succeeded in destroying a Lancastrian
unit.
Back in the centre Warwick (Paul) and his rampaging
bodyguard were struck in the flank by Northumberland’s (Adrian’s) Lancastrian
knights.
The Yorkist shire levy under Baron Hastings (David) now sallied
forth from their camp striking the Lancastrian right and causing a general
panic as three Lancastrian units fled the field.
With the Lancastrian centre
shattered the battle was declared a Yorkist victory.
With only two games left, the
campaign is a Yorkist victory. The
Yorkists have won five battles and the Lancastrians only two. The Lancastrians are now battling for pride
and the title of Kingmaker. With extra points to be won in the final two
battles it’s still an open field.
The next battle will be Ferrybridge
between The Duke of Somerset (Rick) and Richard Duke of York (Tony).