Wargaming from Hertfordshire & Beyond!

Wednesday, 7 April 2021

Chain of Command in the Gembloux Gap or what fun we had with explosives

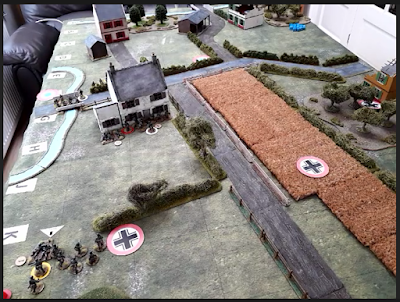
Today we played scenario two from the Too Fat Lardies Gembloux Gap pint sized campaign book. In this scenario the French are defending but have to blow up two culverts; a tricky proposition in the face of an aggressive German force.

Lt. D. Bukkanarn surveys the smaller of the two culvert objectives, while Lt. Malcolm Bowen discusses the demolition of the small culvert with the British demolition team.


The Germans deployed two sections hoping to rush the nearest culvert but the French managed to deploy a section there in defence.


The Germans rushed a section forward under covering fire to secure the farm. However the French brought on a second section and poured fire into the building causing casualties.


The firepower the French brought onto the occupants of the farm was devastating and soon they retired in disarray.

This however opened the way for the Germans to bring down a mortar barrage, with a 5th columnist sowing misinformation as to where the French were to go.

The French found a tank from somewhere and in response the Germans deployed their last section and an infantry gun to hopefully take and hold the centre of the table.


The French finally set the charges on the culvert by the farm but the mortar barrage had been particulary bad, especially for the engineers who decided to scarper. With the mortar barrage now lifted and a double turn the Germans launched an attack on the culvert, wiping out the French and riping out the charges.


At this point the French morale had dropped to zero so the survivours bugged out leaving the way open for the German armour.

Thursday, 1 April 2021

Meales Onwheals goes raiding, an Infamy Infamy tale

Centurion Septimus Rodious had heard rumours that Meales Onwheals was abroad again raiding Roman territory so he readied his forces and marched towards the latest reported enemy position.

Meales Onwheals band had spotted a nice little farm and had decided to burn the Roman sympathizers out. Brin Gupdrear with his levy and slingers arrived torches in hand ready to burn the crops, whilst Meales Onwheals watched, sitting in his chariot, from the distance. The Roman advance guard of some auxiliary archers started to creap through the woods.

With Septimus Rodious nowhere to be seen the auxiliary archers nerviously moved through the woods only to see the first signs of fire coming from the crops; "looks like we are a tad late" was a comment heard in the ranks. Leggit and his band of warriors lined up next to their chieftain.

Septimus Rodious arrived with the rest of the force, only to see a large warband infront and to the flank, with some light cavalry heading to outflank him...

He marched the legion forward and detached Optio Maximus Deridious to watch his flank...

whilst watching in anger as the crops started to burn. "Well there is no way we are saving those so lets make those barbarians pay" he was heard to mutter.

The skirmish cavalry threw several sticks at the legion with no effect. It was only afterwards that their leader pointed out that they need to throw the sharp end first. With the crops burning the warband moved towards the legion.


The warband crashed into the legion and a lengthy slog began.

Meanwhile Meales Onwheals lept from his chariot and attacked the Optio and his mates, with the skirmish cavalry heading for the rear of the legion.


The legion was holding on in the centre, just, and Meales Onwheals was pushed back, retiring onto his chariots. With game time at an end and with the skirmish cavalry getting ready to launch their attack on the rear of the legion the game was called as a barbarian victory.

We did note some issue in that the initial warband attack came after the "Tempus Fugit" card had been played as as such the Romans were unable to use any of their "Drill". Appeared a tad unfair as any attack prior to the "Tempus Fugit" card would have allowed them to use "Drill" to throw pila and brace shields if "Signa" cards or commands were available.

Sunday, 28 March 2021

Patton saves the day?!!!

This week our stalwart correspondent simply had to change his underwear, wait six and drive south from the “Northern shoulder“ of Operation “Wacht am Rhein” to witness the American counter-attack to relieve the encircled town of Bastogne. Armour from Patton’s 80th Division was attacking the village of Heiderscheid held by the Fuhrer Grenadier Brigade.

The armour of both sides advanced cautiously through the mist and gloom, unable to see their opponents clearly. Some targets proved to be infantry moving from foxhole to foxhole, others fast moving recce assets. Eventually however the Americans recognised the unmistakeable silhouettes of two Panther tanks advancing down both the southern and northern edges of the table, with two squat Stugs holding the centre. 


The Americans were even more dismayed when one of their M10s blew up , leaving only M4s and another M10 to contest the table. Dave’s M4s gamely contested ground with Chris’ Panther, skilfully using natural and man-made cover to avoid detection. Chris ploughed on finally getting round Dave’s rear for a rear-shot. Disaster, loads of loading practice and no “shoot” dice. Dave pulled back and fired his 75mm into the engine deck of the Panther. “Kaboom”!!

To the North Phil struggled to press his advantage. The Panther took damage and decided that a rampage into the American rear was in order. However, when Malcolm’s Stug died from an M10 shot the Panther decided discretion was the better part of valour and pulled back. The game had swung decidedly Yanks’ favour with the Panther surrounded on all sides and Malcolm’s second Stug feeling vulnerable in the open. Even the destruction of the second M10 was unable to prevent the demise of the Panther with 3 “kills” and zero saves. Malcolm wisely decided to “leg it”.


The Yanks had the village and the road to Bastogne.

Since then we have heard rumours that the American forces have been reinforced by some M18 Hellcats. A nice 76mm gun but even thinner armour than the M10!

Our resident reporter has an Easter break next week but returns after Easter with a likely journey back to 12th century Outremer.”

Simon

Wednesday, 24 March 2021

'O' Group, a test game

Today we played a test game of the new 'O' Group rules from Reisswitz Press as a rules learning experience. The game was set in Normandy and had a British battalion of three companies attacking a German battalion also of three companies.


The Germans were in the North with the British attacking from the South. The British 1st phase objectives were the crossroads for B Company on the right and the built up area on the left for A company. B company's 2nd phase objective was the built up area on the German left. A company's 2nd phase objective was the bridge on the German right.

The British started off with three infantry platoons deployed, but the Germans had no on table assets. The British won the initiative and advanced infantry and combat patrols and managed to remove one of the German combat patrols, leaving a bit of a gap in their line. However, the Germans deployed an infantry platoon into the built up area to their left and immediately opened fire on the British platoon that was advancing on them. The platoon was very quickly suppressed and eventually lost a section. The Germans also brought on their MkIV tanks to help hold this sector.

In response the British brought on a couple of Cromwells but the defenders of the built up area were proving difficult to dislodge. 


As B company's advance was grinding to a halt it was decided that the main attack should shift to A company. However, the Germans were defending tenaciously and the British platoon in the centre woods was pushed back. The British advanced a platoon into the woods on the left, removing a German combat patrol. At the same time they deployed two Churchills which advanced down the road to try and support the troops in the woods. As one Churchill rounded the corner it ran headlong into a 75mm PaK round, which damaged the tank. The tank fired back causing some shock on the PaK crew.


Final image shows where we had gotten to as we finished, with the Germans holding off the infantry/tank attack on their left, but with the British infantry starting to outflank them on their other side of the table.


I am sure we got a few things wrong or forgot about but as this was a test game to learn the rules everyone involved was happy with the experience although one person might have enjoyed it more if they had bought the rules.

As regards future Zoom 'O' Group games, the 'to do' list includes,

Create some infantry platoon tags (one per platoon to highlight the platoon position)
Create force lists, with a deployed location record column (which can also be used for ambush locations).
Look at a way to make the battalion HQ order totals clearer (bigger dice)?

Sunday, 21 March 2021

A visit to Fort Rocky, Port Royal

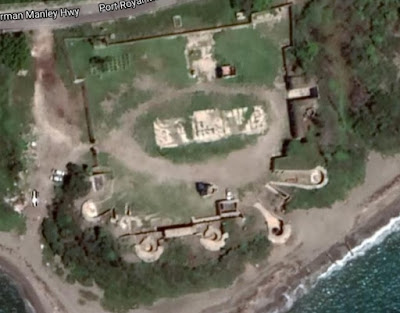
After a lovely lunch at Glorias in Port Royal we stopped off at Fort Rocky on the way home. The picture below was taken from Google Maps and shows the layout of the fort which is situated on the southern side of the spit that goes from Kingston to Port Royal.


Built around 1888, Fort Rocky had five gun pits enclosed by a wall. Installed there were 6 inch breech-loaders designed to deny access to the harbour by submarines or armed merchant cruisers. These guns remained in place until the end of the Second World War when most were returned to England.

I took a number of pictures of both the inside and outside of the fort. As you will see the fort is completely derelict and there are no infomation boards. There is a sign outside stating that it is to be developed into some sort of outdoor entertainment zone.

The main gate on the western side.

Outside the fort looking at the western gun pits


Inside the western wall showing the loopholes and firestep.
 

Looks like some barracks

Tower in the centre faces the south and is just behind the gun pits. Probably a fire control tower as it has a good view out to sea.


Western gun pit


View out to sea from the western gun pits

Looking back into the fort from the western gun pits


View out to sea from the eastern gun pits


Looking back into the fort from the eastern gun pits
 
 
Last of the gun pits


As it wasn't a nice Roman fort I didn't have to drag Mel away, unlike previous experiences when visiting Hadrian's wall.