Wargaming from Hertfordshire & Beyond!

Sunday, 10 April 2022

Star Wars – Escape From Tatooine Campaign, Mission 1: Recover The Death Star Plans

This is the first mission of a mini campaign based on Star Wars Episode IV.

Amid a galactic civil war, Rebel Alliance spies have stolen plans to the Galactic Empire's Death Star, a massive space station capable of destroying entire planets. Imperial Senator Princess Leia Organa of Alderaan, secretly one of the Rebellion's leaders, has obtained its schematics, but her starship is intercepted by an Imperial Star Destroyer under the command of the ruthless Darth Vader. Before she is captured, Leia hides the plans in the memory system of Astromech droid R2-D2, who flees in an escape pod to the nearby desert planet Tatooine alongside his companion, Protocol droid C-3PO.

The droids are captured by Jawa traders, who sell them to moisture farmers Owen and Beru Lars and their nephew Luke Skywalker. While Luke is cleaning R2-D2, he discovers a holographic recording of Leia requesting help from an Obi-Wan Kenobi.

Luke wakes to finds R2-D2 missing. He therefore sets off in his Landspeeder with C-3PO to try and find the missing droid.

THE PATROL PHASE

The terrain was laid out to represent the desert area around the Lars moisture farm. Both sides started the Patrol Phase in opposite corners, and ended with three Jump-Off Points placed as shown on the map. No JOPs were permitted on or next to the Escape Pod.

FORCES

The Empire fielded an Imperial Officer, Stormtrooper Lieutenant, Comms Officer and four Stormtrooper Squads, and an AT-ST. The Rebels fielded Princess Leia, a Rebel Officer, Adjutant, Medical Droid, three Rebel Trooper Squads, a Fleet Trooper Squad, and a Wookiee Squad. The Rebels started with a Force Morale of 9, the Empire with 8.

OBJECTIVE

For the Rebel cause to succeed, the Rebels, led by Princess Leia, have to recover the Death Star plans contained in R2-D2’s memory system. They also have to find the Jedi Master Obi-Wan Kenobi and the young Luke Skywalker, not yet aware of his Force abilities, and persuade them to join the Rebel cause.

Although the Empire believe their Death Star is invulnerable, they don’t want the plans to fall into Rebel hands. The Empire must therefore recover the plans, at any cost. They also wish to capture Rebel officers for “interrogation” by Darth Vader.

The locations of Luke, R2-D2, Obi-Wan and the Sand Worm pit, as shown on the map, were unknown to both sides.

BATTLE REPORT
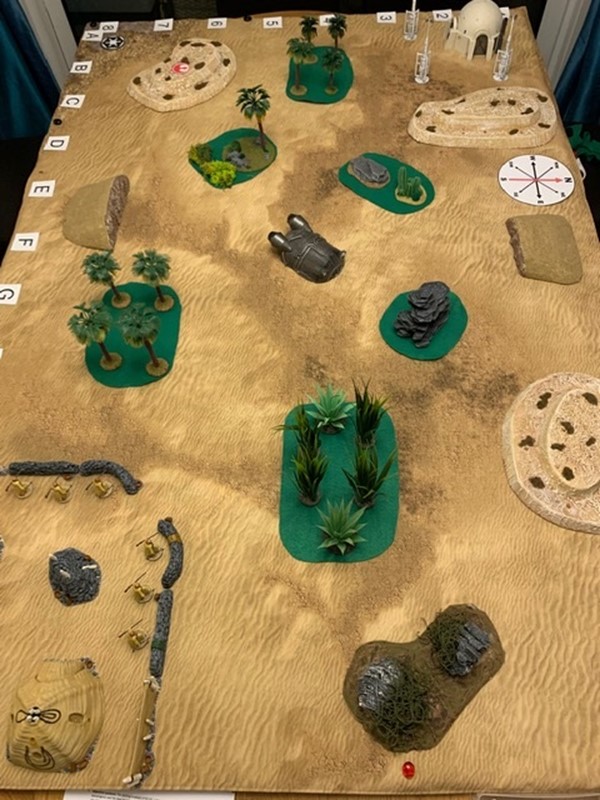

The Rebels started, deploying Black Squad behind the small hill in G1, and Blue Squad on Overwatch in the cacti in J4.

The Empire responded, deploying Green Squad in the cacti in E3, and opening fire on the Rebel Squad in the cacti, killing one Trooper. The Rebel team on Overwatch fired back, but failed to hit anything.

The Rebels then commanded Black Squad to head for the moisture farm, so they left their cover and ran towards the hill to the west (this turned out to be a really bad idea). Leia also deployed, joining Blue Squad.

Wanting to seize the advantage, the Empire then brought on their AT-ST, which combining with their Stormtrooper Squad in the cacti, laid heavy fire onto the Rebel Blue Squad and Leia, causing casualties and shock. Rather than firing at the Stormtroopers, the Rebels tried repeatedly, and unsuccessfully, to take out the AT-ST. But unfortunately their Ion Rifle had no effect against the AT-ST’s armour.  

The Rebels to the north continued their advance towards the hill and the moisture farm beyond, but failed to reach it, becoming stranded in the open. The Wookiees deployed on the small hill to add much needed Rebel firepower. But failed to do any real damage.

More Stormtroopers joined the first squad, together with a Senior Leader with his Comms Officer. These opened fire on the Rebel Squad stuck in the open whilst trying to climb the hill. The Rebels took significant shock, which although not enough to pin them, prevented them from climbing the hill (in addition to movement losses due to shock, they also lose 2 pips/dice due to the hill). The Rebel Officer joined this group to help motivate them, but failed.

Whilst the firefights continued, the Empire deployed a Squad of Stormtroopers in the south, to start the search for the objectives (although they were miffed they couldn’t join in the Turkey shoot).

On entering the palm grove near the Tusken camp, the Stormtroopers discovered R2-D2, and more importantly, the Death Star plans. The Empire had achieved their key objective. Extra rations all round tonight!

Things started to get a lot worse for the Rebels.

Blue Squad leader took a wound, rendering him out of action, and from here on, Leia spent most of her activations repeatedly removing Shock, which was all put back on in the Empire’s next phase.

The Rebel Squad in the open near the hill quickly, despite being Tactical, had eventually become pinned, with the attached Senior leader also taking a wound and put out of action.

The Empire deployed a fourth squad in a small palm grove, who immediately spotted Luke and C-3PO in their Landspeeder in the moisture farm. Their second objective was in sight.

The Wookiees started to advance, also hoping to find one of the objectives. However, the Squad being commanded by Leia finally became pinned. Things had gone from bad to worse.

With two leaders down, two squads pinned, and casualties mounting, the Rebels decided to make a Voluntary Withdrawal.

Red and Black Squads and the Wookiees managed to safely withdraw, taking Luke & C-3PO with them. Unfortunately, Leia and the remnants of Blue Squad were captured by the Empire. (Mutterings were overheard amongst the Stormtroopers about who would be first to “probe” Leia.)

Obi-Wan managed to avoid capture and made his way out of the Tusken camp to join up with the remains of the Rebel force. He was heard muttering “Things would have gone differently if I’d still been in charge”.

CONCLUSION

An Empire victory (All Hail the Emperor!), with the Rebels voluntarily withdrawing, leaving Leia, R2-D2 (and the Death Star plans), a wounded Squad Leader plus the last four of his men, in the hands of the Empire.

These will now be transported to the Empire’s nearby Imperial Fortress to await the arrival of Lord Vader, who is on his way to Tatooine, who will personally interrogate Princess Leia.

The Rebels have an opportunity to intercept the convoy and attempt to rescue the prisoners before the Empire transport reaches the Fortress.

With Leia captured, and Luke still not aware of his Jedi ancestry, the Rebel force (or what’s left of it) will be led by General Kenobi (retired).

Rob

Friday, 8 April 2022

Kiss Me Hardy, Blockade Runner

 Another small ships scenario, using Too Fat Lardies “Kiss Me Hardy” rules, with the “To Covert Glory” supplement, by Chris Stoeson.

A small French merchantman “Baignoire”, has succeeded in breaking the Royal Navy blockade and has reached the West Indies. She has rendezvoused with two French Navy Brigs (Génie (12) and Pandour (12)), before continuing her onward journey.

Sadly for the French, the sails of the Merchantman have been spotted by the RN Sloop Sealark, who has relayed the sighting to the RN Frigate HMS Surprise, both of whom are now closing on the Merchant vessel’s location.

The French Merchantmen started stationary to the North of the Island, located at the centre of the table, while the French Brigs entered from the West side. The aim was to exit the table at the East side, South of a second island.

The Frigate HMS Surprise (24) and the Schooner Sealark (12) entered from the South, headed for the Eastern side of the island.

While the merchantman Baignoire worked slowly around the South-East side of the central island, the Brig Génie ran quickly down to join her. The Brig Pandour meanwhile attempted to work around the South-West side of the island, but finding the headwinds too strong, switched to following Génie.


HMS Surprise, with Sealark in company, ran toward the South-East side of the island, aiming to cut-off the French merchantman. Baignoire, realising that she was in danger of trying to work around the headland, without the support of either of the brigs, sheared off, to wear around to the West, to buy time.

While Génie eventually succeeded in reaching a screening position for Baignoire, the Brig Pandour unfortunately ran foul of HMS Surprise. What ensued, was a one sided boarding action, with Surprise’s 160 crew swarming over the deck of Pandour. But this all took time!

So, it was left to the Schooner Sealark to try to head-off the Brig Génie and Baignoire, which she managed remarkably well.

Having secured Pandour, HMS Surprise then set off in pursuit of Baignoire. Unfortunately, Baignoire’s small and rather poor crew, was struggling with a shift in the wind. They only managed to sort themselves out, to try to work around the headland of the second island, when HMS Surprise arrived. Running out her broadside of ten 6lb cannons, Surprise caused Baignoire to haul down her colours. Another RN Victory!

To The Strongest - Normans vs Vikings, 7th April 2022


To the Strongest is a great set of rules for simple, fast, multi-player pitched Ancients battles. However, we have previously used them for an ambush type game, so this game was a second go at this, throwing a predominantly cavalry Norman army, against a Viking army comprising mostly of deep Shieldwall infantry units. Normally this would just be a bit of a slugfest.

The scenario background was a fast moving Norman force, moving to intercept a retreating Viking raiding force. The Vikings had to get the two baggage train units, off the Eastern edge of the table, while simultaneously having a higher Victory Medal total than the Normans. This reflected the Vikings attempting to deter further pursuit. The Vikings started with 14 Victory Medals and the Normans 15.

The battle opened with the Norman Vanguard drawing a ‘1’, as first chit from the bag and not on the General’s unit!? Things did not look good!

The Vikings were slightly puzzled by the failure of the Norman Vanguard to advance, so decided to advance themselves, to secure some more ground, for the baggage train to escape Eastward. The Viking Vanguard advanced onto the low hills to the South of the exit road. The Viking Centre advanced down the road, to the South, while the Viking Rear took up station on the rough hill spine running West-to-East, overlooking the Western side of the battlefield.

Slightly un-nerved by the aggressive Viking advance, the Norman vanguard decided to use the superior range of their new fangled crossbows, to try to disrupt the Viking shieldwall, to then allow the Norman Vanguard cavalry to charge home. However, these new fangled crossbows seemed to be causing problems and the Norman Vanguard stalled (more ‘1’s!).

The Norman centre (5 units of heavy cavalry) arrived on the West of the battlefield and moved to threaten the Viking Rear/Centre. The Vikings responded by continuing their aggressive advance on the East side and also chose to forsake the high ground on the West, in order to create a wider escape route for the Centre & Rear. The attached Viking archers started to assail the Norman cavalry with bow fire, but the long Norman kite shields seemed a very effective foil to this!

Turn 3 saw the Norman Rear (4 Shieldwall foot + 2 bow units) arrive, but they immediately ran into the log-jam of the stalled Norman Vanguard (still more ‘1’ activation chits plaguing the Vanguard!).


The Norman cavalry Centre in the West advanced to shower the Viking shieldwall with javelins, causing a couple of disruptions. This also appeared to enrage the Viking shieldwall, who charged forward to engage the cavalry. Curiously, the Norman cavalry chose not to evade these charges and stood to receive the Viking charge, but this seemed to work! The Western side of the battle, initially just a sideline, was turning into the main feature!

The Viking Vanguard was still puzzled by the failure of the Norman Vanguard to advance, so decided to take the fight right to the Normans! However, this failure to advance by the Normans, was beginning to look like a trap! A gap was opening between the Viking Vanguard and Centre.

Into this gap rode the Norman Vanguard general and his household cavalry. He was headed for the Viking baggage train, which was now only screened by some light bowmen.

The Viking Vanguard realised this danger, but the Norman foot was working it’s way around their crossbowmen (still struggling to fix their new fangled crossbows!), to fall onto the exposed flank of the Viking Vanguard.

So, instead of looking to mop-up a couple of quick kills on the Normans, the Viking shieldwall began to collapse, right across the battlefield and then Normans seized one of the baggage units! The Viking Victory Medal total just started to dissolve!

With the stalled Norman Vanguard advance at the start of the game (five early phase ‘1’ chits), it looked like it was going to be a quick game! However, the gap opening between Viking Vanguard and Centre, allowed Normans to start rolling-up the Viking Vanguard shieldwall, as well as placing the Viking baggage ‘out of command’. It also allowed the Norman Vanguard cavalry to seize half the Viking baggage. So, it seems that Viking hubris and over-confidence, led to their downfall. A brilliant tactic by the Normans, or some good fortune?!


Thursday, 7 April 2022

Carnage in Kucha

Forty eight hours after watching the destruction of SS armour in the Saarland, our travel-stained correspondent reported for duty in North-West China. It is early 1933, and Ma Chung Yin, better known to history as “General Ma” is busy carving out a Muslim state on the Silk Road of Sinkiang Province. Just North of the inhospitable Taklamakan Desert, this inhospitable territory is strategically important for the players of the “Great Game”, as through it runs the main route from North-West British India all the way to Mongolia.

General Ma has a mixed force of so-called Chinese regulars, supported by White Russian mercenaries or émigrés, and has seized the oasis town of Kucha. Rumour has it that the deposed Chinese Governor Sheng Schicai has some new “friends” coming to his aid. These friends are a small force from the Red Army, despatched on a “special military operation”. Comrade Stalin is not at all in favour of a Muslim state bordering his restive Khazakh territories. The Basmachi rebellion is still fresh in his mind and cannot be allowed to flare up again.

The game started with the White Russians in possession of the oasis,

and Ma (aka Tony) trying to push more infantry and the armoured car to support,

leaving his cavalry to sweep around and outflank the Russians. The Commissar (aka Phil) deployed his artillery piece to engage the White Russian traitors

whilst his elite infantry advanced through the broken ground leaving his cavalry and other infantry to counter the outflanking movement.


The card-based initiative system added some “fog of war” and combined with the D10 roll for unit activation certainly injected a good dose of “friction”. Phil’s artillery piece was a casual observer for most of the game, and Tony’s cavalry charge only resulted in his own unit eventually breaking.

Another Chinese cavalry unit retreated off the board leaving General Ma to seek the sanctuary of the armoured car. Infantry rifle fire proved fairly ineffective in destroying anything, but did manage to push units back. The Putilov half track armoured car was more effective as it’s MGs did almost break a Red cavalry regiment. The game was finally decided when a Red cavalry regiment swung round and took General Ma and the Putilov in the flank.


The game was a play-test for Chris Swann’s “Beyond the Empire” which several people had purchased at the recent Hammerhead show. The concensus was that they are a nice set of rules for this “fun” genre, and we didn’t use all the special rules and attributes covered in the book. We only used five unikts plus a leader per side, and you probably wouldn’t want to play with many more units than we had on the table.

Although very nicely produced with beautiful colour photos, the rules could definitely have done with some more editing and playtesting. They feel as if they have been written by a group of afficionados who know intuitively what should have been written. In some cases shame it wasn’t. Also, the QRS are not terribly logical. Or is this the biggest understatement since Brigadier Brodie declared the situation of the Glorious Gloucesters in Korea as “a bit sticky”...

As someone said...”Has Chris Peers changed his name by deed-poll to Chris Swann”.

Simon

Slaughter in the Saarland

On Thursday our hardy correspondent reported for duty on the French-German border in March 1945. American forces were trying to take the Saar-Palatinate as part of Operation Undertone. The town of Uttweiler had seen the scene of bitter fighting for several weeks and once again the Germans were trying a counter-attack. A mixed assault-gun and Panzer force from the 17th SS Panzer are attacking with the defenders being from the US 7th Infantry supported my M4 Shermans and a pair of M10 Wolverines.


The Americans started with an M10 deployed on-table hidden in a copse looking towards the German line of the expected German advance. Tony immediately turned it and sent it racing south. The Germans advanced on a broad front, trying to cover the likely routes of the more numerous American vehicles. With Shermans advancing in the North the second M10 roared onto the table in the centre, reaching the hedge line and again inexplicably turned ninety degrees and followed its compatriot into cover on the southern table edge. We would soon see if this was genius or sheer insanity. After all it was Tony we are talking about!


The small Hetzer took the battle to the Yanks going toe-to-toe or rather mantle to turret with a Sherman. Both shots missed and then Tony’s M10 rolled good dice, managed to acquire and sent a three inch shell into the side armour of the Hetzer. It didn’t end well for the SS crew.

Phil then decided to gamble on advancing a Stug down the road. Once more an M10 crept round the corner and slammed a round into its side. Even additional “Schurzen” couldn’t help save the Stug.

Down to two vehicles the Germans decided to redeploy a Stug to face the Shermans coming from the North-West. However, Tony raced an M10 out of cover and for the third time they destroyed a German vehicle.


Down to one vehicle, and with Phil joining Americans to ease the command-and-control burden on the Australian contingent, the Umpire offered the German to throw in the towel. In true SS style Rob adopted to fight on. His Panzer IV found itself pinned in the extreme south-east corner of the table with the Americans closing in from all sides.

The M10s tried to finish the job but both found that going head-on versus a Panzer with only four armour was suicidal. Both ended up as blazing wrecks.


The three M4s finally encircled the lone Mark IV. Even then one was only saved from a killing side shot by the judicious playing of the “Impressive Bush” card which meant the Panzer commander couldn’t acquire the target. In such a situation the neutral Umpire “called it” as an American victory.


Although an emphatic American victory, for a game that seemed to be over in one hour, how the Germans kept going for the second hour was pretty impressive.

Simon