Wargaming from Hertfordshire & Beyond!

Friday, 5 February 2010

PMZ WW2 Campaign 1944-45

This campaign is being fought by members of the club and also by Chris R. who created it. Battles are fought using the 'Arras to the Ardennes' ruleset.

Background

Patton Monty Zhukov ("PMZ”) recreates the final twelve months of World War Two in Europe predicated on a race to take Berlin. The three participants are the US Third Army commanded by General Patton, fighting the German Fifth Panzer Army and then the German First Army; BR Second Army controlled by General/Field Marshal Montgomery, fighting the German Fifth Panzer Army and then the German First Parachute Army; the First Byelorussian Front commanded by Marshal Zhukov, fighting the German Fourth Panzer Army. The Germans are controlled by the same player on all three fronts.

In order to avoid the problems of historical hindsight the situation is not the same as what a contemporary might have anticipated. In reality these armies were not always directly commanded by Patton, Montgomery and Zhukov and they did not always follow the given routes in the given months, however it generally follows the course of the campaigns. Unit designations and OOBs are generically approximate to reality!

Objectives

The campaign map is divided into a number of areas as a linear approach from the starting points of Caen, Avranches and Gomel to the objective: Berlin. This campaign comprises 12 'monthly' game turns from June 1944 to May 1945. Patton, Monty or Zhukov achieve victory by reaching Berlin no later than any of others; being first gives an outright rather than shared victory. If none of them take it by the end of May 1945 then the German player wins.

Wednesday, 28 January 2009

The Great War, Anzac Style

The Turks (Dave) waited nervously in the outer trenches, while their German allies (Chris), lounged in the fort, drinking schnapps!

The Brit infantry and dismounted cavalry (Simon) 'demonstrated' against the left flank trenches, coming off slightly worst off and suffering badly from the German snipers.
The Anzacs (Phil) then launched a close packed assault, led by two armoured cars. While the armoured cars were quickly neutralised by the Turk field gun, this gun was in turn knocked-out by the combined fire of the British and sole remaining armoured car mounted machine gun.
The massed Anzac infantry then rushed through the scrub, up to the wire. Unfortunately, the Anzac commander had misjudged the thickness of the scrub and the Turkish command bunker machine gun pinned down the entire Anzac force, short of the wire, until a group of Anzac 'bombers' finally succeeded in storming the bunker.
By this time, fire from the Germans, in the fort / central compound, was beginning to take effect and the one Anzac squad that managed to cross the wire, was wiped-out by the remains of the Turkish trench garrison. The one bright spot of the assault, was the VC awarded to Capt Walter (Bruce) Willis, who singlehandedly finished off the celebrating Turks!!
The Turko-German alliance claimed a marginal victory, while the Anzac command were sent on a bunker recognition course!? Many thanks to Tony for organising the game.
Phil T

Secrets of the Third Reich - Trial Game

OK, bit of a mix-up with who was organising the game, but eventually the Russians and Germans pitched-up for a scrap. Unfortunately, nobody told the Germans that they could bring anything other than infantry. While the Russian infantry hid in the trees (+1 bonus), the Germans tried to force the centre.

After a brief fire-fight, with the Russian snipers coming off second (but not before routing a German squad), the Russian mech thingies and a handy werewolf, succeeded in turning both German flanks. While the German infantry struggled to deal with the mech thingies (having no serious anti-armour) weapons, the werewolf closed in on an unfortunate German squad, who promptly fled!?

The German commander's official statement was "no comment", but was later heard muttering dark things about dodgy rules and rigged scenarios!?
Phil T

Tuesday, 27 January 2009

Strange Goings on in Warmington!

Major Kreutz the daring hero of the German parachute attack on Eben Emal crouched behind the hedge surveying the village of Warmington-on-Sea . He had the unenviable task of parachuting into England to rescue or eliminate the crew of a German Heinkel, commanded by Captain Lufthansa downed by the tommies while trialling the new secret radar beacon technology. After identifying the main tommy defence line along the river , which also happened to be the proposed route of withdrawl, Kreutz made his plan.

Without concrete information on the whereabouts of Captain Lufthansa and his crew Kreutz had no option for a silent extraction of the crew but would need to sweep the entire town and surrounding fields to discover their location. He ordered Lieutenant Weis to take his two sections to sweep the fields surrounding the town and Lieutenant Rot and his two sections to sweep the buildings of the town. Kreutz decided that his command section with the only machine gun in the force would occupy the Church spire and bring down fire onto any troops moving into the town from the main tommy defence line.

The initial move of these elite paras was carried out in silence and superb skill without anyone seeing what was happening. However on as Kreutz was slowly moving around the outside of the church through the grave yard the local vicar decided to have a little walk around his pleasant little English church. As he turned the corner he was transfixed by the large men of Kreutz’s section moving silently through the grave yard. Kreutz initially tried to remember the English language lessons from his time at Potsdam university to try and pacify the Vicar could not recall anything of use. Instead he decided to spring into action and waved his men forward in a mad rush around the church. Pushing passed the vicar he turned the corner and saw the front doors of the church were open wide he dashed through the door barrelling passed the portly curate blocking the entrance. Once inside the nave Kreutz relaxed he somehow had got into the nave of the church without raising the alarm. However this short movement of relaxation was shattered as the woman walking passed the church started screaming and yelling “Germans, Germans the invasion has started”

A well trained british army unit jog trotted into the centre of the town square to see what had caused this terrible screaming. Lt Rot in the meantime rushed forward to the grave yard wall had decided the game was up and opened up on the tommy section in the square. Regrettably an English civilian was hit in the crossfire which pinned this tommy section in the square.

A tommy armoured car came bursting out of the local garage moving to cover the tommy section in the square. Unbeknownst to the armoured car the Lt Rot’s second section was just infiltrating into the garage and when they heard the engine they burst into action and charged out into the street in an attempt to neutralise the armoured car. However as the armoured car was travelling to quickly (and the umpire had decided these brave paras could not melee with the armoured car or drop grenades into the top) they gave it a couple of bursts to speed it on its way.

Lt Weiss teams in the meantime had scoured the fields to the north west and took up a position at the entrance to the town. The well trained tommies now started their counter attack pouring forth from their defensive line (one element of this intricate defence line also included the local pub !) they moved into the village. One unit took up position on the left of the pub. Another congregated outside the pub in preparation to clearing the centre of town a third moved through the back part of the town using the cover of the surrounding buildings. A forth unit of elite bicycle borne infantry moved on behind the german lines and took up position in a field. A fifth unit the famed Warmington on Sea platoon lead by the famed Captain Manawaring assembled outside the manor house.

The brave and fearless Kreutz knew that to complete the mission successfully he needed to establish a firebase in the church spire. He raced up the ladder into the spire, closely followed by his mg team. On reaching the top and throwing open the trap door he was confronted by two startled tommys operating an advanced device. Thinking quickly he motioned to them with his schmeiser and called hande hoch. After a moments indecision quickly ended by the aperance of the mg crew the two tommys raised their hands. Kreutz’s covered the two tommys while the mg crew hosed down the tommy section in the square.

In the meantime the Tommy attack was developing. The unit to the left of the pub rushed forward to the graveyard wall opposite Lt Rot and bought down fire onto his section. The Section in the town square retreated out of the deadly kill zone. The Pub section deciding that it would be best to keep in cover skirted around the town square through the buildings. A further section was also cautiously moving forward through the back yards on the right of the town. Manawaring had an impromptu inspection of his troops to see if they were ready, while taking some fire from one of Lt weis’s teams. The elite bicycle unit enraged by the attack on Manawaring gunned down half of Weis team.

Kreutz surveyed the surrounding town and saw a Tommy section move to the wall of the graveyard opposite Lt. Rot’s position along with the Mg he hosed down this section forcing it to retire to the pub. Kreutz’s radio operator meanwhile picked up a message from the stranded bomber crew. Lt. Weis team set of to skirt the town and establish contact with the bomber crew. Kreutz meanwhile directed fire onto Manawarings platoon while Rot’s second team secured the square and also put a few rounds into Manawarings platoon.

The tommy attack through the centre of the village was taking shape and bought Lt. Rot’s second team under a furious barrage. The Tommy’s started a barrage from their secret weapon on the top of the church spire. However this was ineffective and only destroyed the roof of the church.

After the Weis linked up with the Bomber crew Kreutz started to withdraw his troops from the village. While withdrawing he over ran the section cowering by the pub and captured another secret weapon.

In recognition of their bravery the Furher awarded Kreutz the Knights Cross with Oak Leaves and Lts. Rot and weis the Iron Cross first class.

Report filed by Tony M
Rules: Triumph & Tragedy, 28mm WW2 Skirmish.

Saturday, 15 November 2008

Black Wolf – Napoleonic Principles of War Competition Finale

The winner of the 2008 Black Wolf Napoleonic POW Competition is Ian Rawlings. He defeated Kevan Smith by 75 points to 72 points in the Grand Finale played on the 1st /2nd November at a secret location in Stevenage.


Picture: Ian with the BW trophy after ‘a near run thing’

The Grand Finale pitched the winner of the pre-1811 league (Ian) against the winner of the post-1811 league (Kev) in a final based loosely on Waterloo. Each competitor had ca 85-90 points of POW armies at their disposal, though curiously both armies both had a strength of 326 points.
Ian had drawn the French. Marshal Ney was his commander on the day with Napoleon taking a back seat. In gaming terms Napoleon was a staff officer in charge of the Grande Batterie but also capable of influencing The Guard, (but no-one else!). Ian had taken the option of splitting the Guard into two with Duhesme acting as a Divisional General in charge of the Young Guard.
Kevan had the British and Allies. This was a complicated army with nearly every type of system, infantry type and shooting ability present. Wellington in charge.
There was an off-table ‘race to the battle’ between Grouchy and Blucher. Only one would arrive – not that Ian knew this. Kevan started the game outnumbered but would reach parity once the Prussians arrived. The Prussians would arrive at any time, the later they arrived the more aggressive and more likely to be toward Papelotte and the French line of supply. In gaming terms both players rolled a die with Kevan having a distinct advantage for the first 6 turns. Kevan’s troops also having the better terrain and ensconced in buildings.


Map: Deployment and terrain

The map was pre-designed. The number in brackets showing the die roll for that terrain feature. Hence Hougoumont was very strong. La Haye Saint was not, especially as it lined a road with an open door!
The British and Allies had to deploy behind the red line. A Dutch Division had to deploy on Hill 2 in plain view. Kevan had the option to deploy up to a division in Hougoumont and one brigade in La Haye Saint (LHS). All the allies were on hold orders except one division. Kevan had the Union Brigade, a Dutch Division, the Guards, and the 2nd and 3rd Divisions. Kevan placed the 2nd and 3rd on the ridgeline with 2 brigades in reserve. The guards were in Hougoumont and the Union brigade between LHS and Hougoumont on engage orders. Kevan was forced to allocate VPs to the enemy LoS, Papelotte, and hills 3 and 4.
The French had to deploy behind the blue line, but were restricted to the central 4ft. Ian had three infantry divisions, a lancer division, a dragoon division, a cuirassier division, the Guard and a grand battery. The Cuirassier Division had to be on hold orders on their LoS. The French had to allocate VPs to LHS, Hougoumont, and Hill 3, and optionally hills 4 and 2.
The French opened the battle by sending all three infantry divisions and GB through the centre and the two cavalry divisions on a right hook.
Somewhat surprisingly to all concerned ( a 10 on a D10!) the Prussians arrived on turn 1.
(Behind the red line to engage to the British line)
The French Cv destroyed some German conscripts and broke through the very thin ‘red’ line. The recently arrived Prussians then dealt a severe blow to the two French Cv Divisions. The Dragoons scattered but one of the squadrons of Lancers escaping the carnage. However despite their ‘free rein’ elected not to capture Brussels (-50VPs!!!) but preferred to attack the British on hills 3 and 4.
The rest of the battle was mainly a tussle between besieged British and Allies on the ridge from assaults on all sides from the French. La Haye Saint was soon lost. The British and Hanoverians dealing out as best they could but the fire from the grande batterie was devastating: on one turn Ian was rolling on 150pts of damage!! – he rolled a 6 – ha ha ha! (4 points of damage to Ian, 8 to the enemy)
The Union brigade had surprising success against the Cuirassier division eventually scattering it and capturing the enemy line of supply.
At the end of the game hills 3 and 4 were bitterly contested. Hougoumont was still in British hands, La Haye Saint in French hands, and the Union Brigade were on the way to Paris.
Each competitor had been forced to allocate Victory Points to features on the battlefield.


Picture: The situation on the ridge and Ian trying to hide the British Cavalry on his LoS.

Kevan had lost 28% of his army, Ian 25%. The result of the battle depended upon Victory Points. Ian had strategically ignored Hougoumont (-10 VPs) but had captured LHS (+10 VPs) and contested Hill 3 scoring +15 points but lost his LoS (-15) giving a total of 75pts.
Kevan had placed most of his hopes on holding hills 3+4, which he disputed but could claim no points for. He had been forced to put 5 points on Papelotte which he did not capture, and 5 points on the enemy LoS which, surprisingly, he did capture. This gave Kevan a total of 72pts.
Ian, and the French won Waterloo!!


But surely 75 to 72 is ‘a near run thing’.


Thanks to everyone involved in the competition; Chris, Conor, Kevin, Peter, and Ryan.


Seán Slater


PS A difference of 3pts is usually a draw, but this is the finale!! Next year more competitors please!

Wednesday, 5 November 2008

WW1 Battlefield Tour – October 2008

After a protracted planning period, finally kicked into action by youngest son missing out on a school trip to the First World War battlefields, the Threlfalls packed-up up kit bags and headed for the continent.
This being a family visit, the itinerary was not too ambitious and spread over 3 full days, but allowing a day to travel out and back. Anyway, below is a short summary of the trip, which I hope might help / inspire others to embark upon the path of remembrance.

Monday: Caught the 11 o’clock ferry to Calais.


First stop was La Coupole V2 launching site, near St Omer. OK, not really WW1, but it made a good stopping off point and represents the staggering industrial scale, which the Nazi’s applied to constructing the ‘V’ weapon launching sites against England. The Museum also contains a rather harrowing holocaust exhibition and displays of Allied air missions, in the area. Well worth a visit. Then it was on to Albert, in the Somme, to get something to eat (but no chance of that on a Monday evening in France!?).
Our accommodation was with the really welcoming Sarah and Peter Wright, at Trones View, literally a ‘stones throw’ from Delville Wood. Sarah and Peter could not have made us more welcome and provide a really good English breakfast. We could not recommend them more highly, for a visit to the Somme area. Check out their web site at;
http://www.tronesview.com/

Tuesday: First stop was the Newfoundland Memorial park, near Beaumont Hamel. The park is beautiful and the semi-preserved trench / shell holes, give an excellent feel for the action. The story of the Canadian Newfoundland regiment’s tragic losses and courage is moving.


Next stop was the Thiepval memorial to the 73,000 Commonwealth ‘Missing’ during the Somme campaign. The new visitor centre is very good and the memorial, a very dignified and thoughtful place.


Then it was on to Pozieres. The Australian’s fought hard for this village, as recorded by the 1st Division memorial and the Windmill memorial. Opposite the Windmill memorial, is another memorial commemorating the first use of tanks.


We then moved on to Lochnagar Crater, now a privately owned memorial, showing just what 60,000lb of ammonal can do! After this we called in at Mametz, to get a feel for the nature of the Somme battlefields. From the town cemetery, one can see the Devonshire’s CWG Cemetery and visualise what the German machine gun, sited in the cemetery, could have done to the exposed lines of British troops walking over the crest line in the distance (near the current CWG Cemetery). Even more sad when the British commander had predicted this!?

Wednesday: We said goodbye to Sarah and Peter and headed north, toward Ypres. The plan was to take-in Vimy ridge en-route. It was a sunny day, with a clear blue sky, making the twin sparkling white towers, of the Vimy Ridge Canadian memorial, very beautiful, as well as very moving. The preserved observation trenches and German front line section, complete with shell and mine craters, really brings home the ferocity of the bombardment and reinforces my admiration for the Canadian planning of the operation, to take this hill.
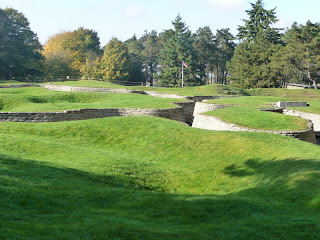
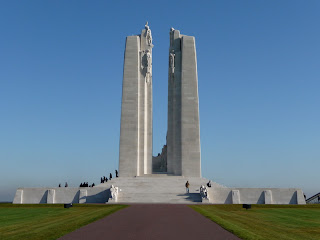


After lunch in Arras, we moved on to the German Cemetery at Neville St Vaast. We were the only visitors and staring out across the 37,000+ burials, even with the sunlight shining through the crosses, was just very sad.


We then moved on down the road, to the Commonwealth cemetery, at Cabaret Rouge. Again we were the only visitors (quite different to Tyne Cot next day!) and even the occasional passing car, does not detract from the sad peacefulness of the place. The large proportion of “unknown soldier of the great war” stones and multiple burial stones, gives on a feel for the brutal nature of the conflict. Our last port of call, before leaving the Arras area, was the French cemetery at Notre Dame Lorette. The chapel and ossuary / lighthouse are very fine buildings and the views from the cemetery, give one a very good idea of the tactical and strategic significance of the two ridges (this and Vimmy ridge opposite).


We then headed off to Varlet Farm, our accommodation for the next two nights. Charlotte Cardoen-Descamps runs Varlet Farm and besides offering a fabulous continental breakfast, excellent accommodation and a vast knowledge of the WW1 sites of the area, is just a really nice person. On her advice we popped into Ypres for the evening ‘last post’ ceremony and a meal in town to follow.


Details of Varlet Farm can be found at;
http://www.varletfarm.com/en/index.htm

Thursday: Now following Charlotte’s plan (in place of mine), we headed off toward Passendale town, marking the peak of the Allied 1917 advance. From Crest Farm and the Canadian memorial, one can appreciate the ‘high ground’ (all 25m of it!!) and the nature of the terrain, which can quickly turn to mud, as it did back then.
We then went on to Tyne Cot cemetery. The new visitor centre is very good and the cemetery itself probably a ‘must do’ (containing nearly 12000 burials (8000 unidentified!) and the wall with over 35,000 names of the missing in the campaign, or for whom there was no room on the Menin Gate!!), it is just that it is a bit ‘busy’.

After calling in at the Passendale memorial museum (in Zonnebeke) and the local chocolate factory(!), we then called in at Hooge crater. This little private museum (opposite the cemetery), has a very extensive collection of WW1 items and equipment (but just don’t visit on a day with ‘museum fatigue’!). About a 100 yards up the road, is the actual site of Hooge Crater, now a muddy pool in the grounds of a hotel. At the far side of the crater (lake), there are some recreated trenches, Sadly these were flooded, but perhaps gave more of an idea of the famous Passendale mud!?
It was then on to the Canadian memorial at Vancouver Corner. The ‘Brooding Soldier’ marks the spot where the Canadians and British stood against the first German gas attacks. Our last call of the day was the recreated Yorkshire Trench. This short section of recreated trench, sits somewhat incongruously in the middle of an industrial estate, but gives a good idea of the construction of a typical trench section. Then it was back into Ypres for a spot of shopping and a look at the Menin gate in the daylight.
We would recommend a visit to the First World War battlefields. One can read the books, but only by standing in front of the thousands of graves and having driven through fields, where it is rare to be out of sight of a CWG cemetery, can one get a grasp of the scale of the loss of life and wasted opportunities.

Friday: A relatively short drive back up to Calais, for the early afternoon ferry, was broken by a visit to Dunkirk. The is not much to see of those fateful days in 1940, but standing atop of the crumbling “Atlantic Wall” defences, looking out over the dunes, one can still picture the desperate scenes of the evacuation.
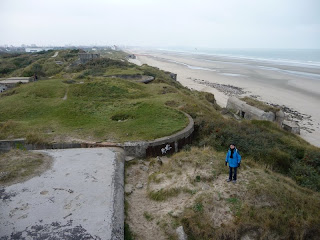
Phil T

Further pictures can be found at;
http://www.flickr.com/photos/phil_t_photos/sets/72157608680424628/

Tuesday, 9 September 2008

Club Night, 4th Sept

Just a few pics from the selection of games going on last Thursday.
1st up, Jim and Phil in a Napoleonic naval game, using Jim's rather fine 1:1200 miniatures.

The French wait at anchor.

The Royal Navy arrives.
...and forces the gap between the French line and the fort
The game closes with the British being forced too far downwind, while the battered, but unbowed French weigh anchor. A win for Jim's French.

Simon's Kings African Rifles participate in Pete's Crossfire lookalike, ww1 African game.
The German Navy in the African jungle.
The King's African Rifles try to dislodge the Germans.
...but are driven off with significant loss.

Meanwhile, Ian and Colin conducted the first of the Principles of War, Napoleonic league games.